CAUTION: READ THIS MANUAL CAREFULLY BEFORE OPERATING YOUR NEW CANNON® DOWNRIGGER. RETAIN FOR FUTURE REFERENCE. MAG 20DT/HS MAG 20DT/ts NOTE: Do not return your CANNON® Downrigger to your retailer. Your retailer is not authorized to repair or replace this unit. You may obtain service by: • calling CANNON® at 1-800-227-6433; • returning your downrigger to the Factory Service Center; • sending or taking your downrigger to any CANNON® Authorized Service Center on enclosed list.
Introduction to downriggers Introduction to Controlled Depth Fishing Undoubtedly there are many fishermen familiar with the methods and use of controlled depth fishing. During the mid 1960's the state of Michigan introduced Pacific salmon into the Great lakes in an attempt to revitalize its sport fishing industry. From this successful transplant, new fishing techniques and equipment were developed.
Magnum Power The Mag 20 DT/HS and Mag 20 DT/TS feature improved tolling weight capacity, retrieval rate, and quality. The Mag 20 DTs can now accommodate trolling weights up to 20lbs. The newly improved Mag 20 DTs also feature a high retrieval rate up to 250 feet per minute. Mag 20 DT/TS Features The Mag 20 DT/TS (Tournament Series) has an improved appearance featuring a sleek metallicwhite finish.
MOUNTING & SETUP Downrigger Mounting on Boats A downrigger should be mounted where ever it is easy to operate and observe. You want to be able to see your fishing rod and to react quickly. So, choosing a good spot to mount your downrigger on your boat is 99% of the job. Due to the great variety of boats available, mounting your downrigger can be a dilemma. Having proper mounting accessories is essential. Cannon has a complete line of mounting accessories to conveniently mount your downriggers on any boat.
You can also use these for mounting to a very narrow side gunwale. There is a plate provided for back-up with bolts and washers. If the gunwale compartment is foamed in, then wellnuts should be used. It is also recommended to install two additional flat head screws through the top plate for stabilization (you will need to drill and countersink). Side/Rail on T-Section MOUNTING & SETUP Side Rail Mounting Side/Rail mounts can be mounted to a welded T section.
MOUNTING & SETUP Installing the Base on Your Boat Decks up to 7/16" thick Where access to the underside of the deck is not available, the mounting base can be mounted using wellnuts. Use the base as a template to mark locations and drill four 1/2" holes. Mount the base using four 1/4-20 x 4" truss head screws and four wellnuts. Tighten the screws so the wellnuts are firmly compressed as pictured.
Slide body over the lip of the base, with boom outboard or facing the stern. Lift Lock Knob to hold threaded shaft clear of base until body completely covers base. Turn Lock Knob clockwise to tighten the downrigger to the base. Tip: Periodically check base to ensure integrity. The base should be replaced at least every 5 years.
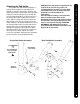
TERMINATOR & LINE RELEASE Terminating the Downrigger Cable Rubber Cushion Cable Examine the top of the terminator and note the order shown in the detail to run cable. Unwind about 2 feet of cable and thread the cable through the rubber cushion. CABLE IN CABLE IN Attach to terminator. CABLE OUT Snap & Swivel Tip: A set of pliers with wire cutters is recommended for this part of setup. TIP: Use only straight cable, not kinked. Lead cable into HOLE A. Pull six inches of cable through.
The positive lock rod holder incorporates a locking disk that allows the rod holder to be aligned in 15 degree increments. Slide the rod holder tube into the clamp to the desired position within the recommended area (see below). Be sure the angled shoulders are facing up. Place the locking disk into the mating recess of the frame. Slip the clamp arms in place where the obround tab on the disk fits into the slot on the clamp. Slide the star washer between the arm of the clamp and the frame.
WIRING YOUR DOWNRIGGER Wiring Your Downrigger Your Boat's Electrical Condition It is important to make sure that your boat is properly set up before installing your Mag 20 DT with Positive Ion Control (PIC). Whenever a boat is in water, various submerged parts interact to create weak electrical currents. These weak electrical currents must be controlled to extend the life of the boat's metal parts and ensure a good fish catching environment.
Battery Battery Fuse Holder Circuit Breaker Red ( - ) Powering Multiple Downriggers When operating multiple Mag 20 DTs, run a maximum of 2 downriggers per dedicated battery. The advanced features of the Mag 20 DT can keep the unit working virtually all the time. (See below for the recommended wiring setup.) WIRING YOUR DOWNRIGGER FUSE / BREAKER SPECIFICATIONS: 30 Amp, 32 Volt, waterproof, fast blow. WIRE SPECIFICATIONS: 0-15 ft. (0-5 meters) 10 gauge 15-25 ft. (5-8 meters) 8 gauge 25-30 ft.
OPERATING YOUR DOWNRIGGER Operating Your Downrigger After mounting the Cannon downrigger to your boat, release some line from your rod and reel so that the lure is anywhere from 5 to 100 feet behind the boat. Tthis is called drop back. Attach the fishing line firmly into the line release. Press and hold the toggle switch down to lower the weight to the desired depth as indicated on the depth meter. Place the fishing rod in the rod holder and reel up the slack so that your rod has a slight bend in it.
NOTE: Actual fishing depth may vary from depth shown on meter due to trolling speed and weight of cannon ball. (See "Blowback") NOTE: If your reel continues to slip no matter how hard you tighten the brake adjust knob, try this suggestion. Raise Off Lower 1. Unwind the cable from the reel and remove the set screw. 2. Align set screw hole in reel with reel shaft hole by inserting 3/16" or smaller rod. Rotate the reel until you feel the rod drop into the shaft hole. 3.
THE SHORT STOP SYSTEM The Short Stop System The Short Stop system is composed of three critical components: the electronic unit, the reel set screw, and the trolling weight insulator. While the downrigger cable is in the water, there is a minute electrical current that flows between the cable and the grounded metal boat components in the water. When the cable clears the water, this current flow will stop. The Short Stop system senses this interruption and turns off the motor.
Measuring the Natural Electrolysis and PIC Voltage on Your Boat A voltmeter with a scale of zero to one volt will measure the natural electrolysis. Place the ground lead of the meter on the motor or the battery ground. Place the positive lead on the stainless steel downrigger cable while it is in the water. The downrigger must be unplugged. The voltage you measure on the volt meter is your boat’s natural electrolysis voltage.
Simply stated, blowback is what happens to the downrigger weight when you pull it through the water behind your boat. As your speed increases, so does the horizontal distance between the weight and your downrigger. The faster you go, the farther the weight is behind you. The farther the weight is behind you, the shallower the weight is.
PROBLEM: Up or down will not work. SOLUTION: Check the battery cable polarity then check the battery voltage. A properly connected and charged battery is important for safety and for proper operation of the downrigger. PROBLEM: The Mag 20 DT/HS \ Mag 20 DT/TS fails to continue running after toggle switch is pushed up and held momentarily, while cable is still in water, or is having problems with the PIC voltage. SOLUTION: Make sure your boat is properly bonded.
TROLLING TIPS Ten Good Trolling Tips 1) Test your lures over the boat side before sending them down and back. Do this to make sure the lure wiggles and wobbles properly without going belly up or wandering off. Some lures can be adjusted, fine tuned actually, to impart maximum action. For example, a slight bend in the tail of a spoon or twist of the hook eye in the nose of a plug can make a noticeable difference in how the lure performs.
Johnson Outdoors Inc. warrants to the original purchaser that if the accompanying product (see exclusions below) proves to be defective in material or workmanship within the following warranty periods, Johnson Outdoors Inc.
Service Centers Authorized Service Centers Your new Cannon® Downrigger was built to exacting specifications under rigid quality control to provide you years of trouble-free operation. If it should ever need adjustment or service, you may send it to any Cannon® Authorized Service Center near you. ALASKA MICHIGAN (continued) NEW YORK (continued) UTAH Alaska Performance 6820 Arctic Blvd Anchorage 99518 907-522-8965 Trolling Motor Repair 119 E Main St Box 77 Kingsley 49649 231-263-5998 Fish307.
Form No.
FRAME - LARGE BLACK (LEXAN) NOSE DECAL MAGNUM HOOK - 1/4" - 20 ROLLED NUT - HEX 1/4"-20 SCREW - 1/4" - 20 (RH) x 3/4" PPH BASE LOCK KNOB BOLT - 3/8"-16 X 1-1/2" HEX BEARING - REEL SHAFT NYLINER [2.EA] WASHER - 1-1/16" OD X 7/8" ID (NYLON) DEPTH COUNTER - 3 DIGIT GEAR - COUNTER REEL ASSEMBLY - HS ELECTRIC >GEAR REEL ►REEL - MACHINED 3.75" REEL MAGNET [2.EA] SHAFT - REEL SCREW - SET 5/16"-18 x 1-3/4" (REEL) SPOOL CABLE SS [400.FT] CABLE LEADER SLEEVE [2.
Form No.
4 3 2 1 9280750 2263102 9040040 4427005 3392500 BOLT - 3/8"-16 X 1-1/2" HEX BASE LOCK KNOB SCREW - 1/4" - 20 (RH) x 3/4" PPH NUT - HEX 1/4"-20 HOOK - 1/4" - 20 ROLLED NOSE DECAL MAGNUM FRAME - LARGE BLACK (LEXAN) 48 47 46 45 44 43 42 4421002 9400005 9010003 1433074 1264670 0467695 9250002 COVER - GEAR CASE SPRING - SHAFT CONTACT BEARING - DRIVE SHAFT NYLINER GEAR - DRIVER WORM CLUTCH PAD BRAKE PLATE - REEL PIN - DRIVE SHAFT 3/16" ROLL SS 89 88 86 84 83 0267001 87 3
Form No.
FRAME - LARGE WHITE (LEXAN) NOSE DECAL MAGNUM HOOK - 1/4" - 20 ROLLED NUT - HEX 1/4"-20 SCREW - 1/4" - 20 (RH) x 3/4" PPH BASE LOCK KNOB BOLT - 3/8"-16 X 1-1/2" HEX BEARING - REEL SHAFT NYLINER [2.EA] WASHER - 1-1/16" OD X 7/8" ID (NYLON) DEPTH COUNTER - 3 DIGIT GEAR - COUNTER REEL ASSEMBLY - TS ELECTRIC >GEAR REEL ►REEL - 3.75" SS REEL MAGNET [2.EA] SHAFT - REEL SCREW - SET 5/16"-18 x 1-3/4" (REEL) SPOOL CABLE SS [400.FT] CABLE LEADER SLEEVE [2.
Form No.
11 10 9 8 7 6 5 4 3 2 1 0854654 3333010 3320011 9430210 9010001 9040340 0849615 9280750 2263102 9040040 4427005 3392505 >GEAR REEL (METRIC) REEL ASSEMBLY - TS ELECTRIC (METRIC) COUNTER CUSHION/STOPPER [2.EA] COUNTER GEAR (METRIC) DEPTH COUNTER - 3 DIGIT (METRIC) WASHER - 1-1/16" OD X 7/8" ID (NYLON) BEARING - REEL SHAFT NYLINER [2.