
User Manual
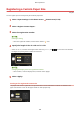

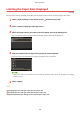
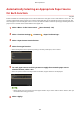
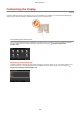
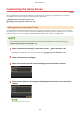
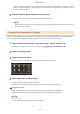
Table Of Contents
- Contents
- Setting Up
- Main Functions
- Preparations Required Before Use
- Preventing Unauthorized Access
- Setting Up Using the Setup Guide
- Setting the Date/Time
- Setting Up the Network Environment
- Installing Drivers
- Configuring Initial Settings for Fax Functions
- Configuring Scan Settings
- Basic Operations
- Parts and Their Functions
- Turning ON the Machine
- Using the Operation Panel
- Logging in to the Machine
- Placing Originals
- Loading Paper
- Loading Paper in the Paper Drawer
- Loading Paper in the Multi-Purpose Tray
- Loading Envelopes
- Loading Preprinted Paper
- Specifying Paper Size and Type
- Specifying Paper Size and Type in the Paper Drawer
- Specifying Paper Size and Type in the Multi-Purpose Tray
- Registering Default Paper Settings for the Multi-Purpose Tray
- Registering a Custom Paper Size
- Limiting the Paper Sizes Displayed
- Automatically Selecting an Appropriate Paper Source for Each Function
- Customizing the Display
- Changing the Default Settings for Functions
- Setting Sounds
- Entering Sleep Mode
- Registering Destinations
- Using a USB Memory Device
- Copying
- Faxing
- Printing
- Scanning
- Linking with Mobile Devices
- Managing the Machine
- Setting Access Privileges
- Configuring the Network Security Settings
- Restricting the Machine's Functions
- Increasing the Security of Documents
- Managing the Machine from a Computer (Remote UI)
- Updating the Firmware
- Initializing Settings
- Setting Menu List
- Maintenance
- Troubleshooting (FAQ)
- Appendix
- SIL OPEN FONT LICENSE

● Clear
the check box for the name of the button you want to remove and then select <Apply>. Once you
remove a registered button, a space appears where the button was displayed in the Home screen. If
necessary, delete the space.
5
Read the message that is displayed, and select <OK>.
➠ A button for the ne
wly selected settings is added to the Home screen.
● If
the Home screen is full and no more settings can be registered, delete registered buttons and spaces
in <Home Screen Settings>.
Changing the Arrangement of Buttons
T
o make the buttons easier to use, you can rearrange the buttons however you like. For instance, you can put the most
frequently used functions rst, or arrange the function buttons together with shortcut buttons for Favorite Settings.
You can also insert a blank (space) instead of a button to make it easier to view the Home screen.
1
Select <Home Screen Settings> in the Home screen.
Home Screen(P. 124)
● If the login scr
een appears, enter the correct ID and PIN.
Logging in to the Machine(P. 135)
2
Select <Set Display Order>.
3
Select the button to move.
● The selected button is highlighted. T
ap the selected button again to deselect it.
4
Select <Move Left> or <Move Right>.
● The button mo
ves as many times as you tapped.
● A long touch on <Move Left> or <Move Right> moves the selected button continuously.
Inserting a blank
● When <Insert Blank> is selected, a blank is inserted on the left side of the selected button.
● If the button at the end is selected, a blank is inserted e
ven if <Move Right> is selected.
Deleting a blank
● Select the blank to be deleted, and select <Del. Blank>.
Basic Operations
170