
User Manual
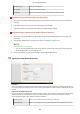
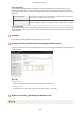
Table Of Contents
- Contents
- Setting Up
- Main Functions
- Preparations Required Before Use
- Preventing Unauthorized Access
- Setting Up Using the Setup Guide
- Setting the Date/Time
- Setting Up the Network Environment
- Installing Drivers
- Configuring Initial Settings for Fax Functions
- Configuring Scan Settings
- Basic Operations
- Parts and Their Functions
- Turning ON the Machine
- Using the Operation Panel
- Logging in to the Machine
- Placing Originals
- Loading Paper
- Loading Paper in the Paper Drawer
- Loading Paper in the Multi-Purpose Tray
- Loading Envelopes
- Loading Preprinted Paper
- Specifying Paper Size and Type
- Specifying Paper Size and Type in the Paper Drawer
- Specifying Paper Size and Type in the Multi-Purpose Tray
- Registering Default Paper Settings for the Multi-Purpose Tray
- Registering a Custom Paper Size
- Limiting the Paper Sizes Displayed
- Automatically Selecting an Appropriate Paper Source for Each Function
- Customizing the Display
- Changing the Default Settings for Functions
- Setting Sounds
- Entering Sleep Mode
- Registering Destinations
- Using a USB Memory Device
- Copying
- Faxing
- Printing
- Scanning
- Linking with Mobile Devices
- Managing the Machine
- Setting Access Privileges
- Configuring the Network Security Settings
- Restricting the Machine's Functions
- Increasing the Security of Documents
- Managing the Machine from a Computer (Remote UI)
- Updating the Firmware
- Initializing Settings
- Setting Menu List
- Maintenance
- Troubleshooting (FAQ)
- Appendix
- SIL OPEN FONT LICENSE

Description Example
IPv6:
Delimit alphanumeric char
acters with colons.
fe80::10
Specifying a range of addresses Insert a hyphen between the addresses. 192.168.0.10-192.168.0.20
[Subnet Settings]
When manually specifying IPv4 addr
ess, you can express the range by using the subnet mask. Enter the
subnet mask using periods to delimit numbers (example:"255.255.255.240").
[Prex Length]
Specifying the range of IPv6 addresses manually also allows you to specify the range using prexes. Enter a
range between 0 and 128 as the prex length.
[Local Port]/[Remote Port]
If you want to create separate policies for each protocol, such as HTTP or WSD, click the [Single Port] radio
button and enter the appropriate port number for the protocol to determine whether to use IPSec.
IPSec is not applied to the following packets
● Loopback, multicast, and br
oadcast packets
● IKE packets (using UDP on port 500)
● ICMPv6 neighbor solicitation and neighbor advertisement packets
9
Specify the IKE Settings.
[IKE Mode]
The mode used for the k
ey exchange protocol is displayed. The machine supports the main mode, not the
aggressive mode.
[Authentication Method]
Select [Pre-Shared Key Method] or [Digital Signature Method] for the method used when authenticating the
machine. You need to enable TLS for the Remote UI before selecting [Pre-Shared Key Method]. You need to
generate or install the key and certicate before selecting [Digital Signature Method].
Conguring the
Ke
y and Certicate for TLS(P. 384)
[Valid for]
Specify how long a session lasts for IKE SA (ISAKMP SA). Enter the time in minutes.
[Authentication]/[Encryption]/[DH Group]
Select an algorithm from the drop-down list. Each algorithm is used in the key exchange.
Managing the Machine
398