
User Manual

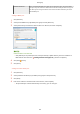
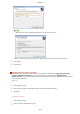
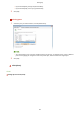


Table Of Contents
- Contents
- Setting Up
- Main Functions
- Preparations Required Before Use
- Preventing Unauthorized Access
- Setting Up Using the Setup Guide
- Setting the Date/Time
- Setting Up the Network Environment
- Installing Drivers
- Configuring Initial Settings for Fax Functions
- Configuring Scan Settings
- Basic Operations
- Parts and Their Functions
- Turning ON the Machine
- Using the Operation Panel
- Logging in to the Machine
- Placing Originals
- Loading Paper
- Loading Paper in the Paper Drawer
- Loading Paper in the Multi-Purpose Tray
- Loading Envelopes
- Loading Preprinted Paper
- Specifying Paper Size and Type
- Specifying Paper Size and Type in the Paper Drawer
- Specifying Paper Size and Type in the Multi-Purpose Tray
- Registering Default Paper Settings for the Multi-Purpose Tray
- Registering a Custom Paper Size
- Limiting the Paper Sizes Displayed
- Automatically Selecting an Appropriate Paper Source for Each Function
- Customizing the Display
- Changing the Default Settings for Functions
- Setting Sounds
- Entering Sleep Mode
- Registering Destinations
- Using a USB Memory Device
- Copying
- Faxing
- Printing
- Scanning
- Linking with Mobile Devices
- Managing the Machine
- Setting Access Privileges
- Configuring the Network Security Settings
- Restricting the Machine's Functions
- Increasing the Security of Documents
- Managing the Machine from a Computer (Remote UI)
- Updating the Firmware
- Initializing Settings
- Setting Menu List
- Maintenance
- Troubleshooting (FAQ)
- Appendix
- SIL OPEN FONT LICENSE

● When the ne
xt screen is displayed, follow the instructions on the screen.
*
When you select the [De
vice Type], select [Canon Network Printing Device with P9100] under [Standard].
5
Click [Finish].
6
Click [Close].
Changing the port type or number
If the printing pr
otocol (LPD or RAW) has been changed on the machine side (
Conguring Printing
Pr
otocols and WSD Functions(P. 41) ) or the port number has been changed (
Changing Port
Numbers(P
. 381) ), the corresponding settings on the computer must also be congured. This operation is
not needed for WSD ports.
MFNP port
1
Click [Congure Port].
2
Under [Protocol Type], select [RAW] or [LPR], and change the [Port Number].
3
Click [OK].
Standard TCP/IP port
1
Click [Congur
e Port].
2
Under [Protocol], select [Raw] or [LPR].
Setting Up
46