
User Manual
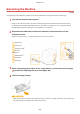
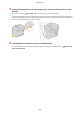
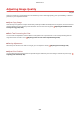

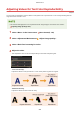
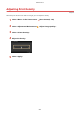
Table Of Contents
- Contents
- Setting Up
- Main Functions
- Preparations Required Before Use
- Preventing Unauthorized Access
- Setting Up Using the Setup Guide
- Setting the Date/Time
- Setting Up the Network Environment
- Installing Drivers
- Configuring Initial Settings for Fax Functions
- Configuring Scan Settings
- Basic Operations
- Parts and Their Functions
- Turning ON the Machine
- Using the Operation Panel
- Logging in to the Machine
- Placing Originals
- Loading Paper
- Loading Paper in the Paper Drawer
- Loading Paper in the Multi-Purpose Tray
- Loading Envelopes
- Loading Preprinted Paper
- Specifying Paper Size and Type
- Specifying Paper Size and Type in the Paper Drawer
- Specifying Paper Size and Type in the Multi-Purpose Tray
- Registering Default Paper Settings for the Multi-Purpose Tray
- Registering a Custom Paper Size
- Limiting the Paper Sizes Displayed
- Automatically Selecting an Appropriate Paper Source for Each Function
- Customizing the Display
- Changing the Default Settings for Functions
- Setting Sounds
- Entering Sleep Mode
- Registering Destinations
- Using a USB Memory Device
- Copying
- Faxing
- Printing
- Scanning
- Linking with Mobile Devices
- Managing the Machine
- Setting Access Privileges
- Configuring the Network Security Settings
- Restricting the Machine's Functions
- Increasing the Security of Documents
- Managing the Machine from a Computer (Remote UI)
- Updating the Firmware
- Initializing Settings
- Setting Menu List
- Maintenance
- Troubleshooting (FAQ)
- Appendix
- SIL OPEN FONT LICENSE

Adjusting Print Position
524J-0A3
If a document is printed off-center or out of the printable r
ange, adjust the print position. You can adjust the print
position for each paper source. You can adjust the print position in the range -0.20" to +0.20" (-5.0 mm to +5.0 mm) in
increments of 0.01" (0.1 mm).
Checking the Direction and Distance to Adjust
When you adjust the print position, specify the direction using "+" and "-" and the distance using "mm." For
<Adjust V
ertically (Front Side)>/<Adjust Vertically (Back Side)>, specify a value with a "+" sign to shift the print
position in the up-to-down direction. For <Adjust Horizontally (Front Side)>/<Adjust Horizontally (Back Side)>,
specify a value with a "+" sign to shift the print position in the left-to-right direction. To shift in the reverse
direction, specify a value with a "-" sign.
<Adjust Vertically (Front Side)>/<Adjust Vertically
(Back Side)>
<Adjust Horizontally (Front Side)>/<Adjust
Horizontally (Back Side)>
1
Select <Menu> in the Home screen. Home Screen(P. 124)
2
Select <Adjustment/Maintenance>
<Adjust Image Quality>.
3
Select <Adjust Print Position>.
4
Select the paper source.
● When the optional cassette feeding module is installed, its paper dr
awer is also displayed.
5
Select the combination of adjustment direction and printing side.
Maintenance
592