
Instruction manual


Advanced Guide
>
Printing Using the Operation Panel of the Machine
>
Printing Photo from Printed Photo (Photo reprint)
>
Printing a Specified Area (Trimming)
U029
Printing a Specified Area (Trimming)
You can edit images displayed on the LCD by cropping them.
Note
The trimming function cannot be available depending on the reprint menu.
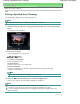
1.
Select an image to crop after scanning the printed photo, press the center Function
button.
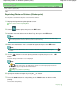
The Trimming screen is displayed.
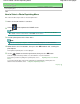
2.
Crop the area to print.
Use the following buttons to crop the area.
, ,
, and buttons:
Positions the cropping frame.
+
or -
buttons, or Scroll Wheel:
Sets the cropping frame size.
Left Function button:
Changes the aspect ratio of the cropping frame.
Center Function button:
Rotates the cropping frame. To switch the cropping frame between portrait and landscape
orientations, press this button.
Note
Some buttons cannot be used depending on the reprint menu.
3.
Press the
OK
button to finalize your selection of cropping area.
The area to be cropped is specified, and the original photo is displayed.
Note
The cropping area is displayed only for photos which have been cropped.
To change the cropped area once it has been set, display the Trimming screen again.
To cancel cropping after cropping has been set, display the Trimming screen again and press the
right Function button.
Page top
Page 444 of 941 pagesPrinting a Specified Area (Trimming)