
Instruction manual

6
Powering up the Remote VideoEye™
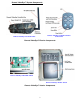
Before turning power on to the Remote VideoEye™ you must connect the LANC cable between
the Remote VideoEye™ controller box and your camcorder (see above). Be sure that power is
turned off to both the Remote VideoEye™ controller box and the camcorder. Next turn your
camcorder on into recording mode and power on the Remote VideoEye™ controller box. The red
LED will turn on for about 10 seconds and power down the camcorder. Next, the red LED will
blink 5 times letting you know that the board is entering a 1 minute automatic walk-test phase.
At this point you can move around the camera setup and check out the range of your setup by
pressing the “On” button on the SlimFire remote control. After the 1 minute automatic walk-test
phase expires the red LED will blink 5 times letting you know the camera system will now become
active and ready for recording.
If you get a constant 10 blinks from the Remote VideoEye™ this means there is a problem with
the connection between the Remote VideoEye™ controller box and the camcorder. Please check
to make sure the LANC cable is connected correctly.
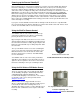
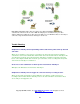
Using the SlimFire Remote Control
Your SlimFire remote control unit is used to power up
your Remote VideoEye™ via a wireless command by
pressing the buttons on the remote control.
By pressing the “On” button, note there are 2 sets of “On”
and “Off” buttons which are redundant. This will power up
the camcorder and start it recording. By pressing the “Off”
button the camcorder will stop recording and power down
the camcorder.
The “Up” and “Down” arrows are used for controlling the
zoom on our camcorder. The Remote VideoEye™ User
DIP switch must be set in Zoom mode in order for this
function to work. Please see below, “User DIP Switch”,
for more information.
Your SlimFire remote control can control your Remote
VideoEye™ from a distance up to about 180 feet “line of
sight”. For best reception be sure to have a clear view of
the Remote VideoEye™ from your controlling location.
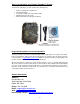
SlimFire Remote Control Unit
Included with the Remote VideoEye™ Unit
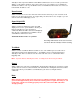
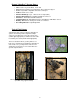
Using the X10 Wireless PIR Motion Sensor
There are 3 models of this sensor made by X10, which
are the HawkEye, EagleEye, and ActiveEye which are
compatible with the Remote VideoEye™. We
recommend the EagleEye sensor because of it's outdoor
use and price. This sensor can be purchased from
www.pixcontroller.com
When the PIR sensor is triggered it will send out a
wireless command the Remote VideoEye™ will respond
to and start the camcorder recording. There is an
adjustable time delay you may set on the X10 PIR sensor
before the “Off” command is sent to stop the camcorder
recording.
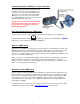
X10 EagleEye Wireless PIR Motion Sensor
Purchase separately. See
www.pixcontroller.com for more information.