
Operating instructions


97
E
Editing
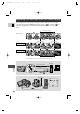
7. Press AUDIO DUB. on the wireless controller.
• AUDIO DUB. and appear on the display.
• If you have the DM-50 microphone (optional) attached, (Connection)
appears in the display.
8. Press the PAUSE button (and start play on the other audio device
if AUDIO IN).
• Audio dubbing starts.
• If MIC. IN, direct your voice into the microphone.
• changes to .
9. When you get to the point where you want to stop dubbing, press
the STOP button (and then stop play on the other audio device if
AUDIO IN).
• Audio dubbing stops and AUDIO DUB. disappears from the display.
• The camera returns to stop mode.
• You can also set zero set memory ( 78) at the place you want to stop
audio dubbing, then every time you return to that position, audio dubbing
will cancel.
• If instead of pressing STOP you press PAUSE, the camera will return to the
playback pause mode.
• You can not use the DV terminal while adding sound.
• You might want to adjust the audio mix ( 98) when playing back a tape with
added sound.
• There may be a loss of sound quality if you add sound to a tape recorded on a
camcorder other than the OPTURA Pi.
• After adding sound three or more times to the same place on a tape, there may
be some loss in sound quality.
C
#4_OPTURA Pi_E(79-99) 1/25/00 13:43 Page 97 (1,1)