
Guide for Windows

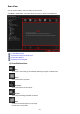


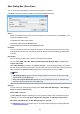


Save Dialog Box (Scan View)
You can make advanced settings for saving scanned images to a computer.
Click Save at the bottom right of the Scan view to display the Save dialog box.
Save in
Displays the folder in which to save the scanned images. To change the folder, click Browse..., then
specify the destination folder.
The default save folders are as follows.
Windows 8.1/Windows Vista: Pictures folder
Windows 8/Windows 7/Windows XP: My Pictures folder
File Name
You can enter the file name of the image to be saved. You cannot enter the file name when saving
multiple files at the same time. They will be saved with the file names automatically generated after
scanning.
Data Format
You can specify the data format in which to save the scanned images.
You can select JPEG, TIFF, PNG, PDF, PDF (Add Page), PDF (Multiple Pages), or Save in the
original data format.
When PDF (Add Page) is selected, click Specify Location... in the displayed message, then specify
the PDF file to which to insert the images. When the PDF file to which to insert the images is protected
with a password, the Password dialog box appears. Enter the password, then click OK.
Note
• PDF (Multiple Pages) appears only when multiple images are selected in the Scanned Image
Thumbnails area of the Scan view.
• Save in the original data format appears only when multiple data formats are selected in the
Scanned Image Thumbnails area of the Scan view.
Settings...
You can make more advanced save settings when JPEG, PDF, PDF (Add Page), or PDF (Multiple
Pages) is selected in Data Format.
When JPEG is selected:
The File Settings dialog box appears and you can specify the image quality (compression type) of
JPEG files. You can select High (Low Compression), Standard, or Low (High Compression).
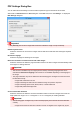
When PDF, PDF (Add Page), or PDF (Multiple Pages) is selected:
The PDF Settings dialog box appears and you can make advanced settings for creating PDF files.
248