MG6400 series Online handleiding Afdrukken Kopiëren Nederlands (Dutch)
Inhoud Afdrukken. . . . . . . . . . . . . . . . . . . . . . . . . . . . . . . . . . . . . . . . . . . . . . . . . . . . . . . 5 Afdrukken vanaf een computer. . . . . . . . . . . . . . . . . . . . . . . . . . . . . . . . . . . . . . . . . . . . . . . 6 Afdrukken met een toepassing die u gebruikt (printerstuurprogramma). . . . . . . . . . . . . . . . . . . . . . . . . . 7 Afdrukken met de basisinstellingen. . . . . . . . . . . . . . . . . . . . . . . . . . . . . . . . . . . . . . . . . . . . . . . . . .
Intensiteit/contrast aanpassen met voorbeeldpatronen (printerstuurprogramma). . . . . . . . . 101 Overzicht van het printerstuurprogramma. . . . . . . . . . . . . . . . . . . . . . . . . . . . . . . . . . . . . . . . . . . 106 Canon IJ-printerstuurprogramma. . . . . . . . . . . . . . . . . . . . . . . . . . . . . . . . . . . . . . . . . . . . . . 107 Het eigenschappenvenster van het printerstuurprogramma openen. . . . . . . . . . . . . . . . . . . 109 Canon IJ-statusmonitor. . . . . . . . . . . . . . . . .
Sjabloonformulieren downloaden en afdrukken. . . . . . . . . . . . . . . . . . . . . . . . . . . . . . . . . . . . . . . . . . . 227 Instellingen voor de webservice. . . . . . . . . . . . . . . . . . . . . . . . . . . . . . . . . . . . . . . . . . . . . . . . . . . . . . . 229 Afdrukken vanaf een digitale camera. . . . . . . . . . . . . . . . . . . . . . . . . . . . . . . . . . . . . . . . 233 Foto's rechtstreeks afdrukken vanaf een PictBridge-compatibel apparaat (draadloos LAN). . . . . . . . .
Afdrukken Afdrukken vanaf een computer Afdrukken met een toepassing die u gebruikt (printerstuurprogramma) Afdrukken met het bedieningspaneel van het apparaat Fotogegevens afdrukken De functie Diashow gebruiken Sjabloonformulieren zoals gelinieerd papier of grafiekpapier afdrukken Documenten (PDF-bestanden) afdrukken die zijn opgeslagen op een geheugenkaart Afdrukken met een webservice Kennisgeving over het afdrukken met een webservice Foto's in een online fotoalbum afdrukken Sjabloonformulieren downloaden
Afdrukken vanaf een computer Afdrukken met een toepassing die u gebruikt (printerstuurprogramma) 6
Afdrukken met een toepassing die u gebruikt (printerstuurprogramma) Afdrukken met de basisinstellingen Basis Verschillende afdrukmethoden De afdrukkwaliteit wijzigen en afbeeldingsgegevens corrigeren Overzicht van het printerstuurprogramma Beschrijving van het printerstuurprogramma MP Drivers bijwerken 7
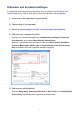
Afdrukken met de basisinstellingen In dit gedeelte wordt de eenvoudige procedure voor het instellen van het tabblad Snel instellen beschreven, zodat u op de juiste manier kunt afdrukken met dit apparaat. 1. Controleer of het apparaat is ingeschakeld 2. Plaats papier in het apparaat 3. Open het eigenschappenvenster van het printerstuurprogramma 4.
Belangrijk De beschikbare instellingen voor de afdrukkwaliteit zijn afhankelijk van het afdrukprofiel. 6. Voltooi de configuratie Klik op OK. Wanneer u het document afdrukt, worden de gewenste instellingen voor het document gebruikt.
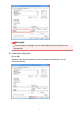
Belangrijk Als u het selectievakje Altijd afdrukken met huidige instellingen (Always Print with Current Settings) inschakelt, worden alle instellingen op de tabbladen Snel instellen (Quick Setup), Afdruk (Main), en Pagina-instelling (Page Setup) opgeslagen en kunt u de volgende keer afdrukken met dezelfde instellingen. Klik in het venster Veelgebruikte instellingen (Commonly Used Settings) op Opslaan... (Save...) om de aangebrachte instellingen op te slaan.
Het mediumtype instellen met het printerstuurprogramma Wanneer u dit apparaat gebruikt, krijgt u het beste afdrukresultaat wanneer u een mediumtype selecteert dat overeenkomt met het soort afdruk. U kunt de volgende mediatypen gebruiken met dit apparaat.
T-Shirt Transfers T-Shirt Transfers Fotostickers Glossy Foto Papier Extra II (Photo Paper Plus Glossy II) 12
Verschillende afdrukmethoden Een Paginaformaat en Afdrukstand opgeven Instellingen voor aantal en afdrukvolgorde opgeven De nietmarge instellen Afdrukken zonder marges starten Passend op papier afdrukken Afdrukken op schaal Pagina-indeling afdrukken Tegels/poster afdrukken Boekje afdrukken Dubbelzijdig afdrukken Stempel/achtergrond afdrukken Een stempel registreren Afbeeldingsgegevens registreren die u als achtergrond wilt gebruiken Instellingen voor het afdrukken van enveloppen Afdrukken op briefkaarten Af
Een Paginaformaat en Afdrukstand opgeven Het papierformaat en de afdrukstand worden in principe bepaald door de toepassing. Als de instellingen voor Paginaformaat (Page Size) en Afdrukstand (Orientation) op het tabblad Pagina-instelling (Page Setup) hetzelfde zijn als de instellingen in de toepassing, hoeft u deze niet te wijzigen op het tabblad Pagina-instelling (Page Setup).
Klik op OK. Het document wordt met het geselecteerde paginaformaat en de geselecteerde afdrukstand afgedrukt. Opmerking Als Normaal formaat (Normal-size) is geselecteerd voor Pagina-indeling (Page Layout), wordt het selectievakje Grote documenten die de printer niet kan afdrukken automatisch verkleinen (Automatically reduce large document that the printer cannot output) weergegeven.
Instellingen voor aantal en afdrukvolgorde opgeven U geeft als volgt het aantal afdrukken en de afdrukvolgorde op: U kunt ook het aantal exemplaren instellen op het tabblad Snel instellen (Quick Setup). 1. Open het eigenschappenvenster van het printerstuurprogramma 2. Geef het aantal exemplaren op dat u wilt afdrukken Geef bij Aantal (Copies) op het tabblad Pagina-instelling (Page Setup) het aantal af te drukken exemplaren op. 3.
• Vanaf de laatste pagina afdrukken (Print from Last Page): /Sorteren (Collate): • Vanaf de laatste pagina afdrukken (Print from Last Page): /Sorteren (Collate): • Vanaf de laatste pagina afdrukken (Print from Last Page): /Sorteren (Collate): 4. Voltooi de configuratie Klik op OK. Het opgegeven aantal exemplaren wordt in de gekozen volgorde afgedrukt. Belangrijk Als de toepassing waarmee het document is gemaakt dezelfde functie heeft, geeft u de instellingen op in het printerstuurprogramma.
Vanaf de laatste pagina afdrukken (Print from Last Page) is niet beschikbaar voor selectie als Tegels/poster (Tiling/Poster) bij Pagina-indeling (Page Layout) is geselecteerd. Als Boekje (Booklet) is geselecteerd voor Pagina-indeling (Page Layout), zijn Vanaf de laatste pagina afdrukken (Print from Last Page) en Sorteren (Collate) niet beschikbaar voor selectie.
De nietmarge instellen De procedure voor het instellen van de nietzijde en de breedte van de marge is als volgt: 1. Open het eigenschappenvenster van het printerstuurprogramma 2. Geef op aan welke zijde de nietjes moeten komen Controleer de positie van de nietmarge met Nietmarge (Stapling Side) op het tabblad Pagina-instelling (Page Setup). De printer selecteert automatisch de beste nietpositie op basis van de instellingen voor Afdrukstand (Orientation) en Pagina-indeling (Page Layout).
Opmerking Het afdrukgebied wordt automatisch door de printer verkleind, afhankelijk van de positie van de nietmarge. 4. Voltooi de configuratie Klik op OK op het tabblad Pagina-instelling (Page Setup). Wanneer u een document afdrukt, worden de opgegeven nietzijde en breedte van de marge toegepast. Belangrijk Nietmarge (Stapling Side) en Marge instellen... (Specify Margin...
Afdrukken zonder marges starten Met de functie voor afdrukken zonder marges kunt u gegevens randloos afdrukken door de gegevens te vergroten, zodat ze net buiten de randen van het papier vallen. Standaard blijven de randen rondom het document leeg. Wanneer u echter de functie voor afdrukken zonder marges gebruikt, wordt het document zonder marges afgedrukt. Als u gegevens, zoals een foto, zonder lege rand eromheen wilt afdrukken, kiest u Afdrukken zonder marges.
Klik op OK in het bevestigingsbericht. Wanneer een bericht verschijnt dat aangeeft dat u het mediumtype moet wijzigen, selecteert u een mediumtype in de lijst en klikt u op OK. 3. Controleer het papierformaat Controleer de lijst Paginaformaat (Page Size). Als u het papierformaat wilt wijzigen, selecteert u een ander formaat in de lijst. In de lijst worden alleen formaten weergegeven die kunnen worden gebruikt voor afdrukken zonder marge. 4.
Klik op OK. De gegevens worden zonder marges op het papier afgedrukt. Belangrijk Als een paginaformaat is geselecteerd dat niet kan worden gebruikt voor het afdrukken zonder marges, wordt het formaat automatisch gewijzigd in een formaat dat geschikt is voor het afdrukken zonder marges. Als Zonder marges (Borderless) is geselecteerd, zijn de instellingen Papierformaat printer (Printer Paper Size), Dubbelzijdig afdrukken (Duplex Printing) en Nietmarge (Stapling Side) en de knop Stempel/Achtergrond...
Belangrijk Als de hoeveelheid uitbreiding wordt verminderd, kan een onverwachte marge ontstaan, afhankelijk van het papierformaat. Opmerking Als de schuifregelaar Hoeveelheid uitbreiding (Amount of Extension) helemaal naar links is geschoven, worden de afbeeldingsgegevens volledig afgedrukt. Als u dit instelt wanneer u afdrukt op de adreszijde van een ansichtkaart, wordt de postcode van de afzender afgedrukt op de juiste positie.
Passend op papier afdrukken De procedure voor het afdrukken van een document dat automatisch is verkleind of vergroot in overeenstemming met het paginaformaat, is als volgt: 1. Open het eigenschappenvenster van het printerstuurprogramma 2. Stel Passend op papier in Selecteer Passend op papier (Fit-to-Page) in de lijst Pagina-indeling (Page Layout) op het tabblad Pagina-instelling (Page Setup). 3.
Selecteer in de lijst Papierformaat printer (Printer Paper Size) het formaat van het papier dat in het apparaat is geplaatst. Als Papierformaat printer (Printer Paper Size) kleiner is dan het Paginaformaat (Page Size), wordt de afbeelding van de pagina kleiner. Als Papierformaat printer (Printer Paper Size) groter is dan het Paginaformaat (Page Size), wordt de afbeelding van de pagina groter.
Afdrukken op schaal De procedure voor het afdrukken van een document met pagina's die zijn vergroot of verkleind is als volgt: 1. Open het eigenschappenvenster van het printerstuurprogramma 2. Stel afdrukken op schaal in Selecteer Op schaal (Scaled) in de lijst Pagina-indeling (Page Layout) op het tabblad Pagina-instelling (Page Setup). 3. Selecteer het papierformaat van het document Geef bij Paginaformaat (Page Size) het paginaformaat op dat in de toepassing is ingesteld. 4.
• Selecteer een instelling voor Papierformaat printer (Printer Paper Size) Als het papierformaat voor de printer kleiner is dan het Paginaformaat (Page Size), wordt de afbeelding van de pagina kleiner. Als het papierformaat voor de printer groter is dan het Paginaformaat (Page Size), wordt de afbeelding van de pagina groter. • Geef een schaalfactor op Typ een waarde in het vak Schaling (Scaling).
5. Voltooi de configuratie Klik op OK. De afbeelding wordt met de opgegeven schaal afgedrukt. Belangrijk Als de toepassing waarin u het origineel hebt gemaakt een functie heeft voor afdrukken op schaal, geeft u de instelling in deze toepassing op. U hoeft deze instelling dan niet in het printerstuurprogramma op te geven. Opmerking Als u Op schaal (Scaled) selecteert, wordt het afdrukgebied van het document gewijzigd.
Pagina-indeling afdrukken U kunt met de functie voor het afdrukken van een pagina-indeling meer dan een paginabeeld op een enkel vel papier afdrukken. De procedure voor het afdrukken van een pagina-indeling is als volgt: 1. Open het eigenschappenvenster van het printerstuurprogramma 2. Stel Pagina-indeling afdrukken in Selecteer Pagina-indeling (Page Layout) in de lijst Pagina-indeling (Page Layout) op het tabblad Pagina-instelling (Page Setup).
Het instellen van de indeling van twee pagina's in het document van links naar rechts is nu voltooid. 4. Stel het aantal af te drukken pagina's op één vel en de paginavolgorde in Klik zo nodig op Opgeven... (Specify...), geef de volgende instellingen op in het dialoogvenster Pagina-indeling afdrukken (Page Layout Printing) en klik op OK. Pagina's (Pages) Als u het aantal pagina’s dat op één vel moet worden afgedrukt wilt wijzigen, selecteert u het gewenste aantal pagina's in de lijst.
Tegels/poster afdrukken Met deze functie kunt u de afbeeldingsgegevens vergroten, over meerdere pagina's verdelen en deze pagina's op afzonderlijke vellen papier afdrukken. U kunt de pagina's ook aan elkaar plakken zodat ze één grote afdruk vormen, zoals die van een poster. De procedure voor het afdrukken van tegels/poster is als volgt: Instellingen opgeven voor tegels/poster afdrukken 1. Open het eigenschappenvenster van het printerstuurprogramma 2.
3. Selecteer het papierformaat Selecteer in de lijst Papierformaat printer (Printer Paper Size) het formaat van het papier dat in het apparaat is geplaatst. Hiermee voltooit u de instellingen om het document in tweeën te delen en tegels/ poster af te drukken. 4. Stel het aantal af te drukken beeldscheidingen en het aantal af te drukken pagina's in Klik zo nodig op Opgeven... (Specify...), geef de volgende instellingen op in het dialoogvenster Tegels/poster afdrukken (Tiling/Poster Printing) en klik op OK.
Opmerking U kunt ook het afdrukbereik opgeven door op de pagina's in het instellingenvoorbeeld te klikken. 5. Voltooi de configuratie Klik op OK op het tabblad Pagina-instelling (Page Setup). Het document wordt bij het afdrukken over meerdere pagina's verdeeld. Alleen bepaalde pagina's afdrukken Als de inkt vager wordt of opraakt tijdens het afdrukken, kunt u als volgt alleen bepaalde pagina's opnieuw afdrukken: 1.
2. Voltooi de configuratie Klik op OK wanneer u de gewenste pagina's hebt geselecteerd. Alleen de opgegeven pagina's worden afgedrukt. Belangrijk Omdat het document wordt vergroot bij het afdrukken van tegels/posters, kan het resultaat korrelig zijn.
Boekje afdrukken Met de functie voor boekjes kunt u afbeeldingsgegevens voor een boekje afdrukken. De gegevens worden afgedrukt op beide zijden van het papier. Bij dit afdruktype wordt ervoor gezorgd dat de pagina's in de juiste volgorde liggen (op paginanummer) wanneer het papier in het midden wordt gevouwen en geniet. De procedure voor het afdrukken van een boekje is als volgt: 1. Open het eigenschappenvenster van het printerstuurprogramma 2.
4. Stel de nietmarge en de breedte van de marge in Klik op Opgeven... (Specify...), geef de volgende instellingen op in het dialoogvenster Boekje afdrukken (Booklet Printing) en klik op OK. Nietmarge (Margin for stapling) Selecteer aan welke zijde de nietmarge moet komen wanneer het boekje wordt voltooid. Lege pagina invoegen (Insert blank page) Als u één bladzijde leeg wilt laten, schakelt u het selectievakje in en selecteert u de pagina die u leeg wilt laten.
Dubbelzijdig afdrukken De procedure voor het afdrukken van gegevens op beide zijden van een vel papier is als volgt: U kunt dubbelzijdig afdrukken ook instellen bij Extra functies (Additional Features) op het tabblad Snel instellen (Quick Setup). Automatisch dubbelzijdig afdrukken U kunt ook dubbelzijdig afdrukken zonder dat u het papier zelf hoeft om te draaien. 1. Open het eigenschappenvenster van het printerstuurprogramma 2.
Selecteer Normaal formaat (Normal-size), Passend op papier (Fit-to-Page), Op schaal (Scaled) of Pagina-indeling (Page Layout) in de lijst Pagina-indeling (Page Layout). 4. Stel het afdrukgebied in Wanneer u dubbelzijdig afdrukken uitvoert, wordt het afdrukgebied van het document iets kleiner dan normaal en is het mogelijk dat het document niet op één pagina past. Klik op Afdrukgebied instellen... (Print Area Setup...), selecteer een van de volgende verwerkingsmethoden en klik daarna op OK.
2. Stel dubbelzijdig afdrukken in Schakel het selectievakje Dubbelzijdig afdrukken (Duplex Printing) in en schakel het selectievakje Automatisch (Automatic) uit op het tabblad Pagina-instelling (Page Setup). 3. Selecteer de indeling Selecteer Normaal formaat (Normal-size), Passend op papier (Fit-to-Page), Op schaal (Scaled) of Pagina-indeling (Page Layout) in de lijst Pagina-indeling (Page Layout). 4.
Klik vervolgens op Afdrukken starten (Start Printing) om op de andere kant af te drukken. Belangrijk Dubbelzijdig afdrukken (Duplex Printing) is niet beschikbaar voor selectie als: • Een ander mediumtype dan Normaal papier (Plain Paper) is geselecteerd in de lijst Mediumtype (Media Type). • Tegels/poster (Tiling/Poster) en Zonder marges (Borderless) zijn geselecteerd in de lijst Pagina-indeling (Page Layout).
Stempel/achtergrond afdrukken De functie Stempel (Stamp) of Achtergrond (Background) is mogelijk niet beschikbaar als een bepaald printerstuurprogramma of besturingssysteem wordt gebruikt. Met de functie Stempel (Stamp) kunt u een stempel bestaande uit tekst of een bitmap over of achter de documentgegevens afdrukken. Verder kunt u hiermee de datum, tijd en gebruikersnaam afdrukken. Met de functie Achtergrond (Background) kunt u een lichte illustratie achter de documentgegevens afdrukken.
Opmerking Bij het XPS-printerstuurprogramma verandert de knop Stempel/Achtergrond... (Stamp/Background...) in de knop Stempel... (Stamp...) en is alleen de stempelfunctie beschikbaar. 3. Selecteer een stempel Schakel het selectievakje Stempel (Stamp) in en selecteer de gewenste stempel in de lijst. De huidige instellingen worden weergegeven in het instellingenvoorbeeld links op het tabblad Pagina-instelling (Page Setup). 4.
Semitransparante stempel afdrukken (Print semitransparent stamp) Schakel dit selectievakje in als u een semitransparante stempel op het document wilt afdrukken. Deze functie is alleen beschikbaar als het XPS-printerstuurprogramma wordt gebruikt. Alleen eerste pagina (Stamp first page only) Schakel dit selectievakje in als u de stempel alleen op de eerste pagina wilt afdrukken. 5. Voltooi de configuratie Klik op OK op het tabblad Pagina-instelling (Page Setup).
5. Voltooi de configuratie Klik op OK op het tabblad Pagina-instelling (Page Setup). Wanneer u de gegevens afdrukt, worden deze met de opgegeven achtergrond afgedrukt. Belangrijk Als Zonder marges (Borderless) is geselecteerd, is de knop Stempel/ Achtergrond... (Stamp/Background...) (Stempel... (Stamp...)) niet beschikbaar voor selectie.
Een stempel registreren Deze functie is mogelijk niet beschikbaar als een bepaald printerstuurprogramma of besturingssysteem wordt gebruikt. U kunt een nieuwe stempel maken en registreren. U kunt ook bepaalde instellingen van een bestaande stempel wijzigen en opnieuw registreren. Stempels die u niet meer nodig hebt, kunt u op elk gewenst moment verwijderen. De procedure voor het opslaan van een nieuwe stempel is als volgt: Een nieuwe stempel registreren 1.
Opmerking Bij het XPS-printerstuurprogramma verandert de knop Stempel/Achtergrond... (Stamp/Background...) in de knop Stempel... (Stamp...) en is alleen de stempelfunctie beschikbaar. 3. Klik op Stempel definiëren... (Define Stamp...) Het dialoogvenster Stempelinstellingen (Stamp Settings) wordt geopend. 4.
• Klik voor Bitmap op Bestand selecteren... (Select File...) en selecteer het te gebruiken bitmapbestand (.bmp). Wijzig zo nodig de instellingen voor Grootte (Size) en Transparant wit gebied (Transparent white area). • Voor Datum/tijd/gebruikersnaam (Date/Time/User Name) worden de aanmaaktijd en -datum en de gebruikersnaam van het afgedrukte object weergegeven in Stempeltekst (Stamp Text).
Klik op OK. Het dialoogvenster Stempel/Achtergrond (Stamp/Background) (Stempel (Stamp)) wordt opnieuw geopend. De geregistreerde naam wordt weergegeven in de lijst Stempel (Stamp). Stempelinstellingen wijzigen en registreren 1. Selecteer de stempel waarvoor u de instellingen wilt wijzigen Klik op het selectievakje Stempel (Stamp) in het dialoogvenster Stempel/ Achtergrond (Stamp/Background) (Stempel (Stamp)). Vervolgens selecteert u in de lijst de naam van de te wijzigen stempel. 2.
Verwijderen (Delete). Klik op OK in het bevestigingsbericht. 3. Voltooi de configuratie Klik op OK. Het dialoogvenster Stempel/Achtergrond (Stamp/Background) (Stempel (Stamp)) wordt opnieuw geopend.
Afbeeldingsgegevens registreren die u als achtergrond wilt gebruiken Deze functie is mogelijk niet beschikbaar als een bepaald printerstuurprogramma of besturingssysteem wordt gebruikt. U kunt een bitmapbestand (.bmp) selecteren en als een nieuwe achtergrond registreren. U kunt ook bepaalde instellingen van een bestaande achtergrond wijzigen en registreren. Achtergronden die u niet meer nodig hebt, kunt u verwijderen.
Opmerking Bij het XPS-printerstuurprogramma is de knop Stempel/Achtergrond... (Stamp/Background...) vervangen door de knop Stempel... (Stamp...) en is de knop Achtergrond (Background) niet beschikbaar. 3. Klik op Achtergrond selecteren... (Select Background...) Het dialoogvenster Achtergrondinstellingen (Background Settings) wordt geopend. 4. Selecteer de afbeeldingsgegevens die u wilt opslaan op de achtergrond Klik op Bestand selecteren... (Select File...). Selecteer het gewenste bitmapbestand (.
U kunt ook de positie van de achtergrond wijzigen door de afbeelding in het voorbeeldscherm te verslepen. Intensiteit (Intensity) Stel de intensiteit van de achtergrond in met de schuifregelaar Intensiteit (Intensity). Wanneer u de schuifregelaar naar rechts schuift, wordt de achtergrond donkerder en wanneer u de schuifregelaar naar links schuift, wordt de achtergrond lichter.
Klik op Opslaan overschrijven (Save overwrite) op het tabblad Instellingen opslaan (Save settings). Als u de achtergrond onder een andere naam wilt opslaan, voert u deze naam in het vak Naam (Title) in en klikt u op Opslaan (Save). Klik op OK in het bevestigingsbericht. 5. Voltooi de configuratie Klik op OK om terug te keren naar het dialoogvenster Stempel/Achtergrond (Stamp/Background). De geregistreerde naam wordt weergegeven in de lijst Achtergrond (Background).
Instellingen voor het afdrukken van enveloppen Vervang bij het lezen van deze informatie 'Canon IJ-statusmonitor' door 'Canon IJ XPSstatusmonitor' als u het XPS-printerstuurprogramma gebruikt. De procedure voor het afdrukken op enveloppen is als volgt: 1. Plaats een envelop in het apparaat 2. Open het eigenschappenvenster van het printerstuurprogramma 3. Selecteer het mediumtype Selecteer Envelop (Envelope) bij Veelgebruikte instellingen (Commonly Used Settings) op het tabblad Snel instellen (Quick Setup).
6. Selecteer de afdrukkwaliteit Selecteer naar wens Hoog (High) of Standaard (Standard) bij Afdrukkwaliteit (Print Quality). 7. Voltooi de configuratie Klik op OK. Wanneer u de afdruk uitvoert, worden de gegevens afgedrukt op de envelop. Belangrijk Wanneer u de afdruk op de envelop uitvoert, worden ondersteunende berichten weergegeven. Als u de berichten wilt verbergen, schakelt u het selectievakje Dit bericht niet meer weergeven (Do not show this message again) in.
Afdrukken op briefkaarten In dit gedeelte wordt beschreven hoe u een briefkaart afdrukt. 1. Plaats een briefkaart in het apparaat 2. Open het eigenschappenvenster van het printerstuurprogramma 3. Selecteer veelgebruikte instellingen Geef het tabblad Snel instellen (Quick Setup) weer en selecteer Standaard (Standard) voor Veelgebruikte instellingen (Commonly Used Settings). 4. Selecteer het mediumtype Selecteer Hagaki A, Ink Jet Hagaki, Hagaki K of Hagaki voor Mediumtype (Media Type).
7. Selecteer de afdrukkwaliteit Selecteer Hoog (High) of Standaard (Standard) voor Afdrukkwaliteit (Print Quality), afhankelijk van het beoogde resultaat. 8. Voltooi de configuratie Klik op OK. Wanneer u het afdrukken start, worden de gegevens op de briefkaart afgedrukt. Belangrijk Wanneer u een briefkaart afdrukt, wordt een bericht met aanwijzingen weergegeven.
Afdrukresultaten weergeven vóór het afdrukken Vervang bij het lezen van deze informatie 'Canon IJ-afdrukvoorbeeld' door 'Canon IJ XPSafdrukvoorbeeld' als u het XPS-printerstuurprogramma gebruikt. U kunt de afdrukresultaten vóór het afdrukken bekijken en controleren. De procedure voor het bekijken van een afdrukvoorbeeld is als volgt: U kunt de weergave van het afdrukresultaat ook instellen op het tabblad Snel instellen (Quick Setup). 1. Open het eigenschappenvenster van het printerstuurprogramma 2.
selectievakje is geselecteerd, is Afdrukvoorbeeld (Preview before printing) niet beschikbaar voor selectie.
Papierformaat instellen (aangepast formaat) U kunt de hoogte en breedte van het papier opgeven als u het formaat niet kunt selecteren bij Paginaformaat (Page Size). Een dergelijk papierformaat wordt een 'aangepast formaat' genoemd. De procedure voor het opgeven van een aangepast papierformaat is als volgt: U kunt een aangepast formaat ook instellen bij Papierformaat printer (Printer Paper Size) op het tabblad Snel instellen (Quick Setup). 1.
Het dialoogvenster Aangepast papierformaat (Custom Paper Size) wordt geopend. 4. Stel het aangepaste papierformaat in Geef de Eenheden (Units) op en voer de Breedte (Width) en Hoogte (Height) van het te gebruiken papier in. Klik vervolgens op OK. 5. Voltooi de configuratie Klik op OK op het tabblad Pagina-instelling (Page Setup). Wanneer u de gegevens afdrukt, worden deze met het opgegeven papierformaat afgedrukt.
Het afdrukdocument bewerken of opnieuw afdrukken vanuit de afdrukgeschiedenis Deze functie is niet beschikbaar als het standaard IJ-printerstuurprogramma wordt gebruikt. In het Canon IJ XPS-voorbeeldvenster kunt u het afdrukdocument bewerken of de afdrukgeschiedenis van het document weergeven om het opnieuw af te drukken.
Als u klikt op Ongedaan maken (Undo), wordt de wijziging die u zojuist hebt aangebracht, ongedaan gemaakt. Een afdrukdocument bewerken en afdrukken Als u meerdere documenten of pagina’s wilt afdrukken, kunt u documenten combineren, de afdrukvolgorde van de documenten of pagina’s wijzigen, en documenten of pagina's verwijderen. 1. Open het eigenschappenvenster van het printerstuurprogramma 2.
• Als u de volgorde van afdrukdocumenten wilt wijzigen, gaat u naar de lijst Documentnaam (Document Name) en selecteert u het afdrukdocument dat u wilt verplaatsen. Vervolgens selecteert u in het menu Bewerken (Edit) de optie Documenten (Documents) en dan Document verplaatsen (Move Document), waarna u het gewenste item selecteert. U kunt ook klikken op een afdrukdocument en dit verslepen om de afdrukvolgorde te wijzigen.
Belangrijk Als u de documenten in de lijst wilt weergeven, opent u het voorbeeldvenster en voert u de afdruktaak opnieuw uit. Als u de afdrukdocumenten wilt terugbrengen naar de originele staat, voordat ze in het voorbeeldvenster werden bewerkt, selecteert u in het menu Bewerken (Edit) de optie Documenten (Documents) en vervolgens Documenten opnieuw instellen (Reset Documents). Als de documenten die u wilt combineren verschillende afdrukinstellingen hebben, wordt mogelijk een bericht weergegeven.
Belangrijk Als u het aantal registraties in de afdrukgeschiedenis wilt beperken, klikt u op Maximumaantal geschiedenisitems (History Entry Limit) in het menu Bestand (File). Als het maximumaantal registraties wordt overschreden, worden de oudste registraties uit de geschiedenis verwijderd. 2. Een afdrukdocument selecteren Selecteer in de lijst Documentnaam (Document Name) het document dat u wilt afdrukken. 3. Afdrukken Klik op Afdrukken (Print).
De afdrukkwaliteit wijzigen en afbeeldingsgegevens corrigeren De Afdrukkwaliteit instellen (Aangepast) Een kleurendocument monochroom afdrukken Kleurcorrectie opgeven Een optimale foto van afbeeldingsgegevens afdrukken De kleuren aanpassen met het printerstuurprogramma Afdrukken met ICC-profielen Het ICC-profiel interpreteren De kleurbalans aanpassen Kleurbalans aanpassen met voorbeeldpatronen (printerstuurprogramma) De helderheid aanpassen De intensiteit aanpassen Het contrast aanpassen Intensiteit/contras
De Afdrukkwaliteit instellen (Aangepast) U kunt de afdrukkwaliteit instellen via Aangepast (Custom). De procedure voor het instellen van een afdrukkwaliteit is als volgt: 1. Open het eigenschappenvenster van het printerstuurprogramma 2. Selecteer de afdrukkwaliteit Selecteer op het tabblad Afdruk (Main) de optie Aangepast (Custom) voor Afdrukkwaliteit (Print Quality) en klik op Instellen... (Set...). Het dialoogvenster Aangepast (Custom) wordt geopend. 3.
Belangrijk Bepaalde niveaus voor afdrukkwaliteit kunnen niet worden geselecteerd bij bepaalde instellingen voor Mediumtype (Media Type).
Een kleurendocument monochroom afdrukken De procedure voor het monochroom afdrukken van een kleurendocument is als volgt: U kunt afdrukken in grijstinten instellen ook bij Extra functies (Additional Features) op het tabblad Snel instellen (Quick Setup). 1. Open het eigenschappenvenster van het printerstuurprogramma 2. Stel afdrukken in grijstinten in Schakel het selectievakje Afdrukken in grijstinten (Grayscale Printing) op het tabblad Afdruk (Main) in. 3. Voltooi de configuratie Klik op OK.
afgedrukte kleuren verschillen van de kleuren in de oorspronkelijke afbeelding. Wanneer u de functie Afdrukken in grijstinten gebruikt om Adobe RGB-gegevens af te drukken, converteert u de gegevens naar sRGB-gegevens in een toepassing. Opmerking Bij Afdrukken in grijstinten (Grayscale Printing) kan zowel kleureninkt als zwarte inkt worden gebruikt.
Kleurcorrectie opgeven U kunt de methode voor kleurcorrectie aanpassen aan het type document dat u wilt afdrukken. Normaal gesproken worden de kleuren aangepast met behulp van Canon Digital Photo Color, zodat de gegevens worden afgedrukt met kleurtinten waaraan de meeste mensen de voorkeur geven. Deze methode is geschikt voor het afdrukken van sRGB-gegevens.
3. Selecteer de kleurcorrectie Klik op de tab Afstemming (Matching), selecteer de instelling voor Kleurcorrectie (Color Correction) die overeenkomt met uw doel en klik op OK. Driververgelijking (Driver Matching) Met Canon Digital Photo Color kunt u sRGB-gegevens afdrukken met kleurtinten waaraan de meeste mensen de voorkeur geven. ICM (ICC-profielvergelijking (ICC Profile Matching)) Past de kleuren aan volgens een ICC-profiel tijdens het afdrukken.
Als het selectievakje Afdrukken in grijstinten (Grayscale Printing) op het tabblad Afdruk (Main) is ingeschakeld, is Kleurcorrectie (Color Correction) niet beschikbaar voor selectie.
Een optimale foto van afbeeldingsgegevens afdrukken Wanneer mensen foto's afdrukken die met een digitale camera zijn gemaakt, krijgen zij soms het gevoel dat de afgedrukte kleuren anders zijn dan de kleuren in de oorspronkelijke foto of de kleuren op het scherm. Om een afdruk te krijgen die de gewenste kleurtinten zo dicht mogelijk benadert, moet u een afdrukmethode kiezen die geschikt is voor de gebruikte software of het doel van de afdruk.
Wanneer de gegevens worden afgedrukt, benadrukt de printer subtiele kleurverschillen tussen donkere en lichte delen, waarbij de donkerste en lichtste gebieden intact blijven. Wanneer de gegevens worden afgedrukt, past de printer het resultaat toe van gedetailleerde aanpassingen die zijn aangebracht met een toepassing, zoals aanpassingen in de helderheid.
De kleuren aanpassen met het printerstuurprogramma U kunt de functie voor kleurcorrectie van het printerstuurprogramma zo instellen dat sRGBgegevens worden afgedrukt met kleurtinten waaraan de meeste mensen de voorkeur geven door gebruik te maken van Canon Digital Photo Color. Als u afdrukt vanuit een toepassing die ICC-profielen kan identificeren en waarvoor u deze kunt opgeven, gebruikt u een ICC-profiel voor afdrukken in de toepassing en selecteert u instellingen voor kleurbeheer.
Helderheid (Brightness), Intensiteit (Intensity) en Contrast aan. Klik vervolgens op OK. 5. Voltooi de configuratie Klik op OK op het tabblad Afdruk (Main). De kleuren van de gegevens worden bij het afdrukken aangepast.
Afdrukken met ICC-profielen Wanneer voor de beeldgegevens een ICC-invoerprofiel is opgegeven, kunt u afdrukken met effectief gebruik van de kleurruimte (Adobe RGB of sRGB) van de gegevens. De procedure voor het instellen van het printerstuurprogramma is afhankelijk van de toepassing die voor het afdrukken wordt gebruikt.
4. Stel de andere items in Klik zo nodig op het tabblad Kleuraanpassing (Color Adjustment) en pas de kleurbalans (Cyaan (Cyan), Magenta en Geel (Yellow)) en de instellingen voor Helderheid (Brightness), Intensiteit (Intensity) en Contrast aan. Klik vervolgens op OK. 5. Voltooi de configuratie Klik op OK op het tabblad Afdruk (Main). Wanneer u afdrukt, wordt de kleurruimte van de beeldgegevens door het apparaat gebruikt.
Het dialoogvenster Handmatige kleuraanpassing (Manual Color Adjustment) wordt geopend. 3. Selecteer de kleurcorrectie Klik op de tab Afstemming (Matching) en selecteer ICM (ICC-profielvergelijking (ICC Profile Matching)) voor Kleurcorrectie (Color Correction). 4. Selecteer het invoerprofiel Selecteer een Invoerprofiel (Input Profile) dat overeenkomt met de kleurruimte van de afbeeldingsgegevens. • Voor sRGB-gegevens of gegevens zonder een ICC-invoerprofiel: Selecteer Standaard (Standard).
• Verzadiging (Saturation) Met deze methode worden afbeeldingen nog levendiger gereproduceerd dan met de methode Perceptueel (Perceptual). • Perceptueel (Perceptual) Met deze methode worden afbeeldingen gereproduceerd met kleurtinten die bij de meeste mensen de voorkeur hebben. Selecteer deze method als u foto's wilt afdrukken.
Verwante onderwerpen De Afdrukkwaliteit instellen (Aangepast) Kleurcorrectie opgeven De kleurbalans aanpassen De helderheid aanpassen De intensiteit aanpassen Het contrast aanpassen 84
Het ICC-profiel interpreteren Als u het apparaatprofiel moet opgeven, selecteert u het ICC-profiel voor het papier waarop u gaat afdrukken. Het ICC-profiel dat voor dit apparaat is geïnstalleerd, ziet er als volgt uit. • (1) is de modelnaam van de printer. • (2) is het mediumtype.
De kleurbalans aanpassen U kunt de kleurtinten tijdens het afdrukken aanpassen. Aangezien deze functie de kleurbalans van de afdruk aanpast door de inktverhoudingen van elke kleur te wijzigen, wordt de gehele kleurbalans van het document gewijzigd. Gebruik de toepassing als u uitgebreide wijzigingen wilt aanbrengen in de kleurbalans. Gebruik het printerstuurprogramma alleen als u kleine wijzigingen in de kleurbalans wilt aanbrengen.
Het dialoogvenster Handmatige kleuraanpassing (Manual Color Adjustment) wordt geopend. 3. Pas de kleurbalans aan Er zijn afzonderlijke schuifregelaars voor Cyaan (Cyan), Magenta en Geel (Yellow). Elke kleur wordt krachtiger wanneer u de bijbehorende schuifregelaar naar rechts schuift en zwakker wanneer u de schuifregelaar naar links schuift. Als bijvoorbeeld cyaan zwakker wordt, wordt de kleur rood sterker. U kunt ook rechtstreeks een waarde invoeren voor de schuifregelaar.
Belangrijk Verschuif de schuifregelaar langzaam. 4. Voltooi de configuratie Klik op OK op het tabblad Afdruk (Main). Wanneer u het document afdrukt, wordt de aangepaste kleurbalans gebruikt. Belangrijk Wanneer het selectievakje Afdrukken in grijstinten (Grayscale Printing) op het tabblad Afdruk (Main) is ingeschakeld, is de kleurbalans (Cyaan (Cyan), Magenta, Geel (Yellow)) niet beschikbaar voor selectie.
Kleurbalans aanpassen met voorbeeldpatronen (printerstuurprogramma) U kunt de kleurbalans aanpassen op basis van het resultaat van een patroonafdruk. Wanneer u de kleurbalans, de intensiteit of het contrast van een document wijzigt, drukt de functie voor patroonafdruk de resultaten van de aanpassing af in een lijst, samen met de aanpassingswaarden. Hieronder wordt de procedure beschreven voor het aanpassen van de kleurbalans aan de hand van het patroon. 1.
4. Stel patroonafdruk in Wanneer het dialoogvenster Patroonafdruk (Pattern Print) wordt geopend, stelt u de volgende items in en klikt u daarna op OK. Aan te passen parameters (Parameters to Adjust) Selecteer Cyaan/Magenta/Geel (Cyan/Magenta/Yellow). Belangrijk Wanneer het selectievakje Afdrukken in grijstinten (Grayscale Printing) op het tabblad Afdruk (Main) is ingeschakeld, is Cyaan/Magenta/Geel (Cyan/ Magenta/Yellow) niet beschikbaar voor selectie.
Aantal patrooninstanties (Amount of Pattern Instances) Selecteer Grootst (Largest), Groot (Large) of Klein (Small) om het aantal af te drukken patronen te selecteren. Opmerking Grootst (Largest) en Groot (Large) kunnen niet worden geselecteerd als bepaalde papierformaten of uitvoerpapierformaten zijn geselecteerd. Kleurvariatie tussen instanties (Color Variation Between Instances) Stel de hoeveelheid kleurvariatie tussen aangrenzende patronen in.
Bekijk de afdrukresultaten en selecteer de afbeelding die u het best bevalt. Geef vervolgens de kleurbalansnummers die onder die afbeelding worden weergegeven op in de velden Cyaan (Cyan), Magenta en Geel (Yellow) op het tabblad Kleuraanpassing (Color Adjustment). Schakel het selectievakje Een patroon afdrukken voor kleuraanpassing (Print a pattern for color adjustment) uit en klik op OK.
U kunt alleen een patroon afdrukken als de instelling Pagina-indeling (Page Layout) op het tabblad Pagina-instelling (Page Setup) Normaal formaat (Normal-size) of Zonder marges (Borderless) is. Als het selectievakje Afdrukken in grijstinten (Grayscale Printing) op het tabblad Afdruk (Main) is ingeschakeld, zijn Cyaan (Cyan), Magenta en Geel (Yellow) niet beschikbaar voor selectie. Deze functie is mogelijk niet beschikbaar, afhankelijk de toepassingssoftware.
De helderheid aanpassen U kunt de helderheid van afbeeldingsgegevens tijdens het afdrukken aanpassen. Puur wit en zwart worden niet veranderd, maar de helderheid van de tussenliggende kleuren wordt wel veranderd. Het volgende voorbeeld toont het afdrukresultaat wanneer de helderheid is aangepast.
Het dialoogvenster Handmatige kleuraanpassing (Manual Color Adjustment) wordt geopend. 3. Geef de helderheid op Selecteer Licht (Light), Normaal (Normal) of Donker (Dark) bij Helderheid (Brightness) en klik op OK. De huidige instellingen worden weergegeven in het instellingenvoorbeeld aan de linkerkant van het printerstuurprogramma. 4. Voltooi de configuratie Klik op OK op het tabblad Afdruk (Main). De opgegeven helderheid wordt bij het afdrukken gebruikt.
De intensiteit aanpassen U kunt de kleuren van de beeldgegevens helderder of donkerder maken tijdens het afdrukken. Het volgende voorbeeld laat zien wat er gebeurt wanneer de intensiteit wordt verhoogd: de kleuren van de afbeeldingsgegevens worden donkerder afgedrukt.
3. Pas de intensiteit aan Wanneer u de schuifregelaar Intensiteit (Intensity) naar rechts verplaatst, worden de kleuren donkerder en wanneer u de schuifregelaar naar links verplaatst, worden de kleuren helderder. U kunt ook rechtstreeks een waarde invoeren voor de schuifregelaar. Voer een waarde in tussen -50 en 50. De huidige instellingen worden weergegeven in het instellingenvoorbeeld aan de linkerkant van het printerstuurprogramma. Klik op OK nadat u alle kleuren hebt aangepast.
Het contrast aanpassen U kunt het beeldcontrast tijdens het afdrukken aanpassen. Wanneer u de verschillen tussen de lichte en donkere gebieden van afbeeldingen groter en duidelijker wilt maken, verhoogt u het contrast. Wanneer u echter de verschillen tussen de lichte en donkere gebieden van afbeeldingen kleiner en minder duidelijk wilt maken, verlaagt u het contrast.
Het dialoogvenster Handmatige kleuraanpassing (Manual Color Adjustment) wordt geopend. 3. Pas het contrast aan Wanneer u de schuifregelaar Contrast naar rechts schuift, wordt het contrast groter en wanneer u de schuifregelaar naar links schuift, wordt het contrast kleiner. U kunt ook rechtstreeks een waarde invoeren voor de schuifregelaar. Voer een waarde in tussen -50 en 50. De huidige instellingen worden weergegeven in het instellingenvoorbeeld aan de linkerkant van het printerstuurprogramma.
Intensiteit/contrast aanpassen met voorbeeldpatronen (printerstuurprogramma) 100
Intensiteit/contrast aanpassen met voorbeeldpatronen (printerstuurprogramma) U kunt de intensiteit en het contrast aanpassen op basis van het resultaat van een patroonafdruk. Wanneer u de kleurbalans, de intensiteit of het contrast van een document wijzigt, drukt de functie voor patroonafdruk de resultaten van de aanpassing af in een lijst, samen met de aanpassingswaarden. Hieronder wordt de procedure beschreven voor het aanpassen van de intensiteit en het contrast aan de hand van het patroon. 1.
4. Stel patroonafdruk in Wanneer het dialoogvenster Patroonafdruk (Pattern Print) wordt geopend, stelt u de volgende items in en klikt u daarna op OK. Aan te passen parameters (Parameters to Adjust) Selecteer Intensiteit/Contrast (Intensity/Contrast). Papierformaat printer (Printer Paper Size) Selecteer het papierformaat dat u wilt gebruiken voor de patroonafdruk.
Opmerking Grootst (Largest) en Groot (Large) kunnen niet worden geselecteerd als bepaalde papierformaten of uitvoerpapierformaten zijn geselecteerd. Kleurvariatie tussen instanties (Color Variation Between Instances) Stel de hoeveelheid kleurvariatie tussen aangrenzende patronen in. Opmerking Groot (Large) is ongeveer tweemaal zo groot als Middel (Medium) en Klein (Small) is ongeveer half zo groot als Middel (Medium). 5.
Schakel het selectievakje Een patroon afdrukken voor kleuraanpassing (Print a pattern for color adjustment) uit en klik op OK. Opmerking U kunt de intensiteit en het contrast ook instellen op het tabblad Snel instellen (Quick Setup) door Foto afdrukken (Photo Printing) te kiezen bij Veelgebruikte instellingen (Commonly Used Settings) en vervolgens Kleur/ intensiteit handmatig aanpassen (Color/Intensity Manual Adjustment) te kiezen bij Extra functies (Additional Features). 7.
Verwante onderwerpen De kleurbalans aanpassen Kleurbalans aanpassen met voorbeeldpatronen (printerstuurprogramma) De intensiteit aanpassen Het contrast aanpassen 105
Overzicht van het printerstuurprogramma Canon IJ-printerstuurprogramma Het eigenschappenvenster van het printerstuurprogramma openen Canon IJ-statusmonitor De inktstatus controleren vanaf uw computer Canon IJ-afdrukvoorbeeld Een ongewenste afdruktaak verwijderen Instructies voor gebruik (printerstuurprogramma) 106
Canon IJ-printerstuurprogramma Het Canon IJ-printerstuurprogramma (hierna het printerstuurprogramma genoemd) is software die op uw computer wordt geïnstalleerd voor het afdrukken van gegevens met dit apparaat. Het printerstuurprogramma converteert de afdrukgegevens die in de toepassing zijn gemaakt, naar gegevens die de printer begrijpt en stuurt de geconverteerde gegevens naar de printer.
De handleiding van het printerstuurprogramma weergeven Als u een beschrijving van een tabblad in het eigenschappenvenster van het printerstuurprogramma wilt weergeven, klikt u op de knop Help op dat tabblad.
Het eigenschappenvenster van het printerstuurprogramma openen U kunt het eigenschappenvenster van het printerstuurprogramma weergeven vanuit de gebruikte toepassing of via het printerpictogram. Het eigenschappenvenster van het printerstuurprogramma via de toepassing openen Volg onderstaande procedure om het afdrukprofiel in te stellen bij het afdrukken. 1.
• Als u Windows Vista gebruikt, selecteert u Start -> Configuratiescherm (Control Panel) -> Hardware en geluiden (Hardware and Sound) -> Printers. • Als u Windows XP gebruikt, selecteert u start -> Configuratiescherm (Control Panel) -> Printers en andere hardware (Printers and Other Hardware) -> Printers en faxapparaten (Printers and Faxes). 2.
Canon IJ-statusmonitor Vervang bij het lezen van deze informatie 'Canon IJ-statusmonitor' door 'Canon IJ XPSstatusmonitor' als u het XPS-printerstuurprogramma gebruikt. De Canon IJ-statusmonitor is een toepassing die de status van het apparaat en de voortgang van het afdrukken weergeeft. U kunt aan de hand van de afbeeldingen, pictogrammen en berichten zien wat de status van het apparaat is.
Voer in dergelijke gevallen de beschreven maatregelen uit.
De inktstatus controleren vanaf uw computer Vervang bij het lezen van deze informatie 'Canon IJ-statusmonitor' door 'Canon IJ XPSstatusmonitor' als u het XPS-printerstuurprogramma gebruikt. U kunt het resterende inktniveau en de soorten inkttanks voor uw model bekijken. 1. Open het eigenschappenvenster van het printerstuurprogramma 2. De Canon IJ-statusmonitor starten Klik op Onderhoud (Maintenance) op het tabblad Printerstatus weergeven (View Printer Status).
Canon IJ-afdrukvoorbeeld Canon IJ-afdrukvoorbeeld is een toepassing die de afdrukresultaten op het scherm laat zien voordat er daadwerkelijk wordt afgedrukt. Hierbij worden de instellingen gebruikt die in het printerstuurprogramma zijn opgegeven. Op deze manier kunt u de indeling, de afdrukvolgorde en het aantal pagina's van een document controleren. U kunt ook de instellingen voor het mediumtype wijzigen.
Een ongewenste afdruktaak verwijderen Vervang bij het lezen van deze informatie 'Canon IJ-statusmonitor' door 'Canon IJ XPSstatusmonitor' als u het XPS-printerstuurprogramma gebruikt. Als de printer niet start met afdrukken, is het mogelijk dat geannuleerde of niet-uitgevoerde afdruktaken in de wachtrij blijven staan. U kunt de ongewenste afdruktaak verwijderen met behulp van de Canon IJ-statusmonitor. 1.
Instructies voor gebruik (printerstuurprogramma) Voor deze versie van het printerstuurprogramma gelden de volgende beperkingen. Houd bij het gebruik van het printerstuurprogramma rekening met het volgende. Beperkingen van het printerstuurprogramma • In sommige toepassingen is de instelling Aantal (Copies) op het tabblad Paginainstelling (Page Setup) van het printerstuurprogramma niet beschikbaar voor selectie.
• In sommige toepassingen wordt het afdrukken in meerdere afdruktaken onderverdeeld. Verwijder al deze taken als u het afdrukken wilt annuleren. • Als afbeeldingsgegevens niet correct worden weergegeven, opent u het dialoogvenster Afdrukopties (Print Options) via het tabblad Pagina-instelling (Page Setup) en wijzigt u de instelling van ICM uitschakelen in de toepassingssoftware vereist (Disable ICM required from the application software). Hiermee kunt u het probleem mogelijk verhelpen.
3. Stel de gewenste optie voor Pagina-indeling (Page Layout) in en klik daarna op OK om het venster te sluiten. 4. Sluit het dialoogvenster Afdrukken (Print) zonder het afdrukken te starten. 5. Open in Word opnieuw het dialoogvenster Afdrukken (Print). 6. Open het eigenschappenvenster van het printerstuurprogramma opnieuw en klik op OK. 7. Start het afdrukken.
Beschrijving van het printerstuurprogramma Beschrijving van het tabblad Snel instellen Beschrijving van het tabblad Afdruk Beschrijving van het tabblad Pagina-instelling Beschrijving van het tabblad Onderhoud Beschrijving van Canon IJ-afdrukvoorbeeld Beschrijving van Canon IJ XPS-afdrukvoorbeeld Beschrijving van Canon IJ-statusmonitor 119
Beschrijving van het tabblad Snel instellen Op het tabblad Snel instellen (Quick Setup) worden veelgebruikte afdrukinstellingen geregistreerd. Wanneer u een geregistreerde instelling selecteert, worden de vooraf ingestelde waarden automatisch toegepast op het apparaat. Veelgebruikte instellingen (Commonly Used Settings) De namen en pictogrammen van veelgebruikte afdrukprofielen worden geregistreerd.
Als Afdrukstand (Orientation) en Aantal (Copies) zijn ingesteld vanuit de toepassing, hebben die instellingen voorrang. Zakelijk document (Business Document) Selecteer deze instelling wanneer u een algemeen document afdrukt. Als Paginaformaat (Page Size), Afdrukstand (Orientation) en Aantal (Copies) zijn ingesteld vanuit de toepassing, hebben die instellingen voorrang. Papier besparen (Paper Saving) Selecteer deze instelling om papier te besparen wanneer u een algemeen document afdrukt.
Naam (Name) Voer de naam in voor het afdrukprofiel dat u wilt opslaan. U kunt maximaal 255 tekens invoeren. De naam wordt, samen met het bijbehorende pictogram, weergegeven in de lijst Veelgebruikte instellingen (Commonly Used Settings) op het tabblad Snel instellen (Quick Setup). Opties... (Options...) Hiermee opent u het Dialoogvenster Veelgebruikte instellingen opslaan (Save Commonly Used Settings). Hier kunt u de details wijzigen van het afdrukprofiel dat u wilt opslaan.
Aantal opslaan (Save the copies setting) Hiermee slaat u de instelling Aantal (Copies) op in het afdrukprofiel in Veelgebruikte instellingen (Commonly Used Settings). Als u de opgeslagen instelling voor aantal afdrukken wilt toepassen wanneer het afdrukprofiel wordt geselecteerd, schakelt u dit selectievakje in. Als dit selectievakje is uitgeschakeld, wordt het aantal afdrukken niet opgeslagen en wordt de instelling voor Aantal (Copies) daarom niet toegepast wanneer het afdrukprofiel wordt geselecteerd.
Voor sommige functies kunt u gedetailleerde instellingen selecteren op de tabbladen Afdruk (Main) en Pagina-instelling (Page Setup). 2 op 1 afdrukken (2-on-1 Printing) Hiermee drukt u twee pagina's van het document naast elkaar af op één vel papier. Als u de volgorde van de pagina's wilt wijzigen, klikt u op het tabblad Pagina-instelling (Page Setup), selecteert u Pagina-indeling (Page Layout) voor Pagina-indeling (Page Layout) en klikt u op Opgeven... (Specify...).
De breedte van het afgedrukte gebied en de hoeveelheid uitbreiding die zijn geconfigureerd in een andere toepassing, worden verticaal en horizontaal omgekeerd. Kleur/intensiteit handmatig aanpassen (Color/Intensity Manual Adjustment) Selecteer deze optie als u de methode voor Kleurcorrectie (Color Correction) en afzonderlijke instellingen zoals Cyaan (Cyan), Magenta, Geel (Yellow), Helderheid (Brightness), Intensiteit (Intensity), Contrast enzovoort wilt opgeven.
Afdrukstand (Orientation) Hier selecteert u de afdrukstand. Als de toepassing waarmee het document is gemaakt een vergelijkbare functie heeft, selecteert u dezelfde afdrukstand als in de toepassing. Staand (Portrait) Het document wordt zo afgedrukt dat de boven- en onderkant ongewijzigd zijn ten opzichte van de invoerrichting van het papier. Dit is de standaardinstelling. Liggend (Landscape) Het document wordt afgedrukt waarbij het 90 graden wordt gedraaid ten opzichte van de invoerrichting van het papier.
Aantal (Copies) Hier geeft u het aantal exemplaren op dat u wilt afdrukken. U kunt een waarde opgeven tussen 1 en 999. Belangrijk Als de toepassing waarmee het document is gemaakt dezelfde functie heeft, geeft u de instellingen op in het printerstuurprogramma. Als de afdrukresultaten echter niet naar wens zijn, geeft u de functie-instellingen op in de toepassing.
Kleurcorrectie opgeven De kleurbalans aanpassen Kleurbalans aanpassen met voorbeeldpatronen (printerstuurprogramma) De helderheid aanpassen De intensiteit aanpassen Het contrast aanpassen Intensiteit/contrast aanpassen met voorbeeldpatronen (printerstuurprogramma) Een veelgebruikt afdrukprofiel registreren 128
Beschrijving van het tabblad Afdruk Op het tabblad Afdruk (Main) kunt u basisafdrukinstellingen opgeven in overeenstemming met het mediumtype. Voor een normale afdruktaak volstaat het instellingen op dit tabblad op te geven. Voorbeeld van instellingen De afbeelding van het vel papier laat zien hoe het origineel eruitziet op een vel papier. Zo kunt u de algemene indeling controleren. Mediumtype (Media Type) Hier selecteert u een type afdrukpapier.
Klad (Draft) Deze instelling is geschikt voor testafdrukken. Aangepast (Custom) Selecteer deze optie als u een aangepaste afdrukkwaliteit wilt instellen. Deknop Instellen... (Set...) wordt ingeschakeld en u kunt het Dialoogvenster Aangepast (Custom) openen om aangepaste instellingen op te geven. Instellen... (Set...) Hiermee opent u het dialoogvenster Aangepast (Custom). Vervolgens kunt u een aangepaste afdrukkwaliteit instellen.
en het tabblad Afstemming van het dialoogvenster Handmatige kleuraanpassing (Manual Color Adjustment) openen om de gewenste instellingen op te geven. Instellen... (Set...
Opmerking De afbeelding is monochroom als het selectievakje Afdrukken in grijstinten (Grayscale Printing) is ingeschakeld. Cyaan (Cyan) / Magenta / Geel (Yellow) Hier past u de sterkte van Cyaan (Cyan), Magenta en Geel (Yellow) aan. Wanneer u de schuifregelaar naar rechts schuift, wordt een kleur sterker en wanneer u de schuifregelaar naar links schuift wordt een kleur zwakker. U kunt ook rechtstreeks een waarde invoeren voor de schuifregelaar. Voer een waarde in tussen -50 en 50.
Een patroon afdrukken voor kleuraanpassing Wanneer de kleurbalans, de intensiteit of het contrast is gewijzigd, drukt de functie voor patroonafdruk een lijst met de resultaten van de aanpassing af, samen met de aanpassingswaarden. Selecteer deze functie als u een patroon voor kleuraanpassing afdrukt. Voorkeuren voor patroonafdruk... (Pattern Print preferences...) wordt ingeschakeld, het Dialoogvenster Patroonafdruk (Pattern Print) wordt geopend en u kunt een patroon instellen. Voorkeuren voor patroonafdruk.
Opmerking Afhankelijk van het geselecteerde papierformaat op het tabblad Pagina-instelling (Page Setup) kunt u sommige formaten mogelijk niet selecteren. Aantal patrooninstanties (Amount of Pattern Instances) Hier stelt u het aantal patronen in dat u wilt afdrukken. U hebt de keuze uit Grootst (Largest), Groot (Large) en Klein (Small).
Tabblad Afstemming (Matching) Hier kunt u de methode selecteren voor het aanpassen van kleuren aan het type document dat u wilt afdrukken. Kleurcorrectie (Color Correction) Hier kunt u kiezen uit Driververgelijking (Driver Matching), ICM (ICCprofielvergelijking (ICC Profile Matching)) of Geen (None), afhankelijk van het doel van de afdrukbewerking. Driververgelijking (Driver Matching) Met Canon Digital Photo Color kunt u sRGB-gegevens afdrukken met kleurtinten waaraan de meeste mensen de voorkeur geven.
Opmerking In het XPS-printerstuurprogramma is ICM veranderd in ICCprofielvergelijking (ICC Profile Matching). Render-intentie (Rendering Intent) Hier geeft u op welke afstemmingsmethode moet worden gebruikt wanneer u ICM (ICC-profielvergelijking (ICC Profile Matching)) selecteert voor Kleurcorrectie (Color Correction). Verzadiging (Saturation) Met deze methode worden afbeeldingen nog levendiger gereproduceerd dan met de methode Perceptueel (Perceptual).
Afdrukken in grijstinten (Grayscale Printing) Deze functie zet de gegevens om in monochrome gegevens wanneer het document wordt afgedrukt. Schakel dit selectievakje in als u een kleurendocument monochroom wilt afdrukken. Schakel dit selectievakje uit als u een kleurendocument in kleur wilt afdrukken. Belangrijk Afhankelijk van de instellingen voor Mediumtype (Media Type) worden mogelijk dezelfde afdrukresultaten geproduceerd, zelfs als Afdrukkwaliteit (Print Quality) is gewijzigd.
Beschrijving van het tabblad Pagina-instelling Op het tabblad Pagina-instelling (Page Setup) kunt u bepalen hoe een document op het papier moet worden geplaatst. Op dit tabblad kunt u ook het aantal afdrukken en de afdrukvolgorde opgeven. Als de toepassing waarmee het document is gemaakt een vergelijkbare functie heeft, geeft u deze instellingen op met de toepassing. Voorbeeld van instellingen De afbeelding van het vel papier laat zien hoe het origineel eruitziet op een vel papier.
Afdrukstand (Orientation) Hier selecteert u de afdrukstand. Als de toepassing waarmee het document is gemaakt een vergelijkbare functie heeft, selecteert u dezelfde afdrukstand als in de toepassing. Staand (Portrait) Het document wordt zo afgedrukt dat de boven- en onderkant ongewijzigd zijn ten opzichte van de invoerrichting van het papier. Dit is de standaardinstelling. Liggend (Landscape) Het document wordt afgedrukt waarbij het 90 graden wordt gedraaid ten opzichte van de invoerrichting van het papier.
Normaal formaat (Normal-size) Dit is de normale afdrukmethode. Selecteer deze optie als u geen pagina-indeling opgeeft. Grote documenten die de printer niet kan afdrukken automatisch verkleinen (Automatically reduce large document that the printer cannot output) Als de printer het papierformaat van een document niet kan afdrukken, kan het apparaat het formaat automatisch verkleinen wanneer het document wordt afgedrukt.
Pagina-indeling (Page Layout) U kunt meerdere documentpagina's afdrukken op één vel papier. Klik op Opgeven... (Specify...) om het Dialoogvenster Pagina-indeling afdrukken (Page Layout Printing) weer te geven en op te geven hoe u pagina's wilt toewijzen. Opgeven... (Specify...) Hiermee opent u het dialoogvenster Pagina-indeling afdrukken (Page Layout Printing). Klik op deze knop om instellingen voor het afdrukken van de pagina-indeling op te geven.
Opgeven... (Specify...) Hiermee opent u het dialoogvenster Tegels/poster afdrukken (Tiling/Poster Printing). Klik op deze knop om instellingen voor het afdrukken van tegels/posters op te geven. Dialoogvenster Tegels/poster afdrukken (Tiling/Poster Printing) In dit dialoogvenster kunt u het formaat selecteren van de afbeelding die u wilt afdrukken. U kunt ook instellingen selecteren voor kniplijnen en plakmarkeringen die handig zijn als u de pagina's aan elkaar wilt plakken om een poster te maken.
Paginabereik afdrukken (Print page range) Hiermee geeft u het afdrukbereik op. Selecteer Alle (All) als u alle pagina’s wilt afdrukken. Selecteer Pagina's (Pages) om een specifieke pagina of een bereik op te geven. Opmerking Als sommige pagina's niet correct zijn afgedrukt, geeft u de pagina's op die u niet wilt afdrukken door erop te klikken in het instellingenvoorbeeld op het tabblad Pagina-instelling (Page Setup). Alleen de pagina's die in het scherm worden weergegeven, worden afgedrukt.
Lege pagina invoegen (Insert blank page) Hiermee selecteert u of u het document wilt afdrukken op één zijde of beide zijden van het boekje. Schakel dit selectievakje in als u het document wilt afdrukken op één zijde van het boekje en selecteer de zijde die u leeg wilt laten in de lijst. Schakel dit selectievakje uit als het document wilt afdrukken op beide zijden van het boekje. Marge (Margin) Hier geeft u de breedte van de nietmarge op. De opgegeven breedte wordt de nietmarge vanaf het midden van het vel.
Dialoogvenster Afdrukgebied instellen (Print Area Setup) Wanneer u dubbelzijdig afdrukt, wordt het afdrukgebied van het document iets kleiner dan normaal. Als een document met kleine marges wordt afgedrukt, past het document daardoor mogelijk niet op één pagina. In dit dialoogvenster kunt u instellen of een pagina bij het afdrukken moet worden verkleind, zodat het document op één pagina past.
Belangrijk Als de toepassing waarmee het document is gemaakt een vergelijkbare functie heeft, geeft u het aantal afdrukken op in de toepassing en niet hier. Vanaf de laatste pagina afdrukken/Sorteren Hier geeft u de volgorde op waarin u de documentpagina's wilt afdrukken. Vanaf de laatste pagina afdrukken (Print from Last Page) Schakel dit selectievakje in als u wilt dat bij het afdrukken met de laatste pagina wordt begonnen.
ICM uitschakelen in de toepassingssoftware vereist (Disable ICM required from the application software) Hiermee schakelt u de ICM-functie uit die is vereist vanuit de toepassing. Als een toepassing Windows ICM gebruikt om gegevens af te drukken, kunnen onverwachte kleuren worden afgedrukt of kan de afdruksnelheid afnemen. Als deze problemen zich voordoen, kunt u de problemen mogelijk oplossen door dit selectievakje in te schakelen. Belangrijk Normaal gesproken schakelt u dit selectievakje uit.
Toepassingen mogen afdrukgegevens niet comprimeren (Do not allow application software to compress print data) Compressie van de afdrukgegevens van de toepassing is niet toegestaan. Als afbeeldingsgegevens ontbreken in het afdrukresultaat of als de kleuren niet correct zijn, kunt u dit mogelijk verbeteren door dit selectievakje in te schakelen. Belangrijk Normaal gesproken schakelt u dit selectievakje uit.
Verlies van afdrukgegevens voorkomen (Prevention of Print Data Loss) U kunt de omvang van de afdrukgegevens die met de toepassing zijn gemaakt, verkleinen en daarna de gegevens afdrukken. Afhankelijk van de gebruikte toepassing kunnen de afbeeldingsgegevens worden afgesneden of niet correct worden afgedrukt. Selecteer in dat geval Aan (On). Selecteer Uit (Off) als u deze functie niet gebruikt. Belangrijk Als u deze functie gebruikt, kan de afdrukkwaliteit afnemen, afhankelijk van de afdrukgegevens.
Dialoogvenster Stempel/Achtergrond (Stamp/Background) (Stempel... (Stamp...)) In het dialoogvenster Stempel/Achtergrond (Stamp/Background) (Stempel... (Stamp...)) kunt u een stempel en/of achtergrond over of achter de documentpagina's afdrukken. Naast de kant-en-klare voorbeelden kunt u uw eigen stempel of achtergrond opslaan en gebruiken. Opmerking Bij het XPS-printerstuurprogramma verandert de knop Stempel/Achtergrond... (Stamp/Background...) in de knop Stempel... (Stamp...
Als Stempeltype (Stamp Type) is ingesteld op Tekst (Text) of Datum/tijd/ gebruikersnaam (Date/Time/User Name) Stempeltekst (Stamp Text) Hier geeft u de tekst van de stempel op. U kunt maximaal 64 tekens invoeren. Voor Datum/tijd/gebruikersnaam (Date/Time/User Name) worden de aanmaaktijd en -datum en de gebruikersnaam van het afgedrukte object weergegeven in Stempeltekst (Stamp Text).
Grootte (Size) Hier past u het formaat aan van het bitmapbestand dat u als stempel wilt gebruiken. Wanneer u de schuifregelaar naar rechts schuift, wordt het formaat groter en wanneer u de schuifregelaar naar links schuift, wordt het formaat kleiner. Transparant wit gebied (Transparent white area) Hier geeft u op of u met wit gevulde delen van de bitmap transparant wilt maken. Schakel dit selectievakje in als u met wit gevulde delen van de bitmap transparant wilt maken.
Opmerking Afdrukstand (Orientation) is alleen ingeschakeld als Tekst (Text) of Datum/tijd/gebruikersnaam (Date/Time/User Name) is geselecteerd voor Stempeltype (Stamp Type) op het tabblad Stempel (Stamp). Opmerking Klik op Standaard (Defaults) om de stempelpositie in te stellen op Centreren (Center) en de positie op 0. Tabblad Instellingen opslaan (Save settings) Op het tabblad Instellingen opslaan (Save settings) kunt u een nieuwe stempel registreren of een overbodige stempel verwijderen.
Opmerking De stempel krijgt prioriteit omdat deze over de documentgegevens heen wordt afgedrukt in de gedeelten waar de stempel en de documentgegevens elkaar overlappen. Als dit selectievakje niet is ingeschakeld, wordt de stempel achter de documentgegevens afgedrukt en in overlappende gedeelten mogelijk niet weergegeven (afhankelijk van de gebruikte toepassing). Semitransparante stempel afdrukken (Print semitransparent stamp) Hier stelt u in hoe de stempel wordt afgedrukt op het document.
U kunt een bitmap registreren als achtergrond en de lay-outmethode en intensiteit van de geselecteerde achtergrond wijzigen. Tabblad Achtergrond (Background) Op het tabblad Achtergrond kunt u een bitmapbestand (.bmp) selecteren dat u wilt gebruiken als achtergrond en aangeven hoe u de geselecteerde achtergrond wilt afdrukken. Voorbeeldvenster Hier wordt de status getoond van de bitmap die is ingesteld op het tabblad Achtergrond (Background).
Tabblad Instellingen opslaan (Save settings) Op het tabblad Instellingen opslaan (Save settings) kunt u een nieuwe achtergrond registreren of een overbodige achtergrond verwijderen. Naam (Title) Voer de titel in om de opgegeven achtergrondafbeelding op te slaan. U kunt maximaal 64 tekens invoeren. Opmerking Spaties, tabs en regeleinden kunnen niet aan het begin of einde van een titel worden ingevoerd. Achtergronden (Backgrounds) Hier ziet u een lijst met geregistreerde achtergronden.
Beschrijving van het tabblad Onderhoud Op het tabblad Onderhoud (Maintenance) kunt u onderhoudswerkzaamheden uitvoeren aan het apparaat of de instellingen van het apparaat wijzigen. Reiniging (Cleaning) Hiermee voert u een reiniging van de printkop uit. Bij het reinigen van de printkop worden de spuitopeningen vrijgemaakt. Voer deze reiniging uit wanneer de afdruk vaag is of een bepaalde kleur niet wordt afgedrukt, ook al zijn alle inktniveaus hoog genoeg.
Inktgroep (Ink Group) Wanneer u klikt op Reiniging (Cleaning) of Diepte-reiniging (Deep Cleaning), wordt het venster Inktgroep (Ink Group) weergegeven. Hier selecteert u de inktgroep waarvoor u de printkop wilt reinigen. Klik op Initiële controle-items (Initial Check Items) om de items te bekijken die u moet controleren voordat u een reiniging of diepte-reiniging uitvoert. Initiële controle-items (Initial Check Items) Controleer of het apparaat is ingeschakeld en open de klep van het apparaat.
Uitlijningswaarde afdrukken (Print Alignment Value) Klik op deze knop om de huidige ingestelde waarde voor de positie van de printkop te controleren. De huidige ingestelde waarde voor de positie van de printkop wordt afgedrukt.
Klik op Controleraster afdrukken (Print Check Pattern). Klik in het bevestigingsbericht op OK. Het dialoogvenster Rastercontrole (Pattern Check) wordt weergegeven. linkerbitmap (goed) De spuitopeningen van de printkop zijn niet verstopt. rechterbitmap (slecht) De spuitopeningen van de printkop zijn mogelijk verstopt. Afsluiten (Exit) Hiermee sluit u het dialoogvenster Rastercontrole (Pattern Check) en keert u terug naar het tabblad Onderhoud (Maintenance).
Reiniging rollen (Roller Cleaning) Hiermee reinigt u de papierinvoerrollen. Het papier wordt mogelijk niet correct ingevoerd als zich stof heeft gehecht op de papierinvoerrollen. Reinig in dat geval de papierinvoerrollen om het afdrukresultaat te verbeteren. Printer uit (Power Off) Hiermee schakelt u de printer uit via het stuurprogramma van het apparaat.
Kies Inschakelen (Enable) om het apparaat automatisch in te schakelen wanneer afdrukgegevens naar het apparaat worden gestuurd. Printer automatisch uit (Auto Power Off) Hier selecteert u de instelling voor automatisch uitschakelen. Als binnen de opgegeven tijd geen bewerking in het printerstuurprogramma of handeling op het apparaat wordt uitgevoerd, wordt het apparaat uitgeschakeld. Stille instellingen (Quiet Settings) Hiermee opent u het Dialoogvenster Stille instellingen (Quiet Settings).
Ongeacht hoe u de stille modus instelt, wordt de modus toegepast als u bewerkingen uitvoert vanuit het bedieningspaneel van het apparaat of als u afdrukt of scant vanaf de computer. Als u een tijd opgeeft voor Stille modus gebruiken op opgegeven tijden (Use quiet mode during specified hours), wordt de stille modus niet toegepast op bewerkingen (zoals kopiëren of direct afdrukken) die rechtstreeks vanaf het apparaat worden uitgevoerd.
Belangrijk Wanneer u deze functie selecteert, neemt de afdruksnelheid af. 90 graden naar links roteren als afdrukstand [Liggend] is (Rotate 90 degrees left when orientation is [Landscape]) Op het tabblad Pagina-instelling (Page Setup) kunt u de draairichting van de optie Liggend (Landscape) bij Afdrukstand (Orientation) wijzigen. Als u het document tijdens het afdrukken 90 graden naar links wilt draaien, schakelt u het selectievakje in.
Opmerking U kunt deze functie alleen gebruiken met het XPS-printerstuurprogramma. Printerstatus weergeven (View Printer Status) Hiermee start u de Canon IJ-statusmonitor. Gebruik deze functie als u de printerstatus en de voortgang van een afdruktaak wilt controleren. Opmerking Als u het XPS-printerstuurprogramma gebruikt, verandert 'Canon IJ-statusmonitor' in 'Canon IJ XPS-statusmonitor'. Info (About) Hiermee opent u Dialoogvenster Info (About).
De stroomvoorziening van het apparaat beheren Verwante functies Het geluidsvolume van het apparaat verlagen De bedieningsmodus van het apparaat wijzigen 166
Beschrijving van Canon IJ-afdrukvoorbeeld Canon IJ-afdrukvoorbeeld is een toepassing die de afdrukresultaten op het scherm laat zien voordat er daadwerkelijk wordt afgedrukt. Hierbij worden de instellingen gebruikt die in het printerstuurprogramma zijn opgegeven. Op deze manier kunt u de indeling, de afdrukvolgorde en het aantal pagina's van een document controleren. U kunt ook het mediumtype wijzigen.
Afsluiten (Exit) Hiermee beëindigt u het Canon IJ-afdrukvoorbeeld. Menu Pagina (Page) Dit menu bevat de volgende opdrachten waarmee u de pagina kunt selecteren die u wilt weergeven. Al deze opdrachten, behalve Pagina selecteren, kunnen ook worden geselecteerd via de werkbalk. Eerste pagina (First Page) Hiermee geeft u de eerste pagina van het document weer. Als de weergegeven pagina de eerste pagina is, is deze opdracht lichtgrijs en kan deze niet worden geselecteerd.
Als dubbelzijdig afdrukken handmatig is ingesteld, worden de voorzijden die als eerste worden afgedrukt samen weergegeven en worden daarna de achterzijden weergegeven. Menu In-/uitzoomen (Zoom) Hier selecteert u de verhouding tussen de werkelijke grootte van de afdruk op het papier en de grootte van het voorbeeld. U kunt de verhouding ook instellen via een vervolgkeuzelijst op de werkbalk. Helemaal (Whole) Hiermee wordt de hele pagina met gegevens weergegeven als één pagina.
Knop Afdrukken annuleren (Cancel Printing) Hiermee beëindigt u het Canon IJ-afdrukvoorbeeld en annuleert u het afdrukken van het document dat wordt weergegeven in het voorbeeldscherm. U kunt op deze knop klikken terwijl documenten in de wachtrij worden geplaatst. Venster Afdrukinformatie voor pagina's (Print Page Information) Hier wordt links van het voorbeeldscherm informatie over elke pagina weergegeven. In dit scherm kunt u ook de instellingen voor het mediumtype en de papierbron wijzigen.
Beschrijving van Canon IJ XPS-afdrukvoorbeeld Canon IJ XPS-afdrukvoorbeeld is een toepassing die de afdrukresultaten op het scherm laat zien voordat er daadwerkelijk wordt afgedrukt. Hierbij worden de instellingen gebruikt die in het printerstuurprogramma zijn opgegeven. Op deze manier kunt u de indeling, de afdrukvolgorde en het aantal pagina's van een document controleren.
Alle documenten afdrukken (Print All Documents) Hiermee drukt u alle documenten in de documentenlijst af en wordt het Canon IJ XPSafdrukvoorbeeld gesloten. Afdrukgeschiedenis opslaan (Save Print History) Hiermee bepaalt u of de documenten die vanuit het Canon IJ XPS-afdrukvoorbeeld zijn afgedrukt, worden opgeslagen in de afdrukgeschiedenis. Maximumaantal geschiedenisitems (History Entry Limit) Hiermee wijzigt u het maximumaantal registraties in de afdrukgeschiedenis.
Deze opdracht heeft dezelfde functie als werkbalk. (Documenten combineren) op de Documenten opnieuw instellen (Reset Documents) Hiermee herstelt u de status van het document dat is geselecteerd in de documentenlijst zoals dit was voordat het werd toegevoegd aan het Canon IJ XPSafdrukvoorbeeld. De gecombineerde documenten worden gescheiden en de originele documenten worden hersteld. Deze opdracht heeft dezelfde functie als werkbalk.
Afdrukken in grijstinten (Grayscale Printing) Hiermee kunt u de instellingen voor monochroom afdrukken wijzigen. Deze opdracht heeft dezelfde functie als het selectievakje Afdrukken in grijstinten (Grayscale Printing) in het gebied met afdrukinstellingen. Pagina-indeling afdrukken... (Page Layout Printing...) Hiermee opent u het dialoogvenster Pagina-indeling afdrukken (Page Layout Printing).
Naar eerste (Move to First) Hiermee verplaatst u de geselecteerde pagina naar het begin van het document. Als de geselecteerde pagina de eerste pagina is, is deze opdracht lichtgrijs en kan deze niet worden geselecteerd. Eén vooruit (Move Forward One) Hiermee verplaatst u de geselecteerde pagina één positie naar voren. Als de geselecteerde pagina de eerste pagina is, is deze opdracht lichtgrijs en kan deze niet worden geselecteerd.
Pagina's (Pages) Gebruik de volgende opdrachten om de pagina te selecteren die u wilt weergeven. Eerste pagina (First Page) Hiermee geeft u de eerste pagina van het document weer. Als de weergegeven pagina de eerste pagina is, is deze opdracht lichtgrijs en kan deze niet worden geselecteerd. Vorige pagina (Previous Page) Hiermee wordt de pagina voor de momenteel weergegeven pagina weergegeven. Als de weergegeven pagina de eerste pagina is, is deze opdracht lichtgrijs en kan deze niet worden geselecteerd.
50% De weergegeven gegevens worden verkleind tot 50% van de werkelijke grootte die wordt afgedrukt. 100% De gegevens worden weergegeven op de werkelijke grootte die wordt afgedrukt. 200% De weergegeven gegevens worden vergroot tot 200% van de werkelijke grootte die wordt afgedrukt. 400% De weergegeven gegevens worden vergroot tot 400% van de werkelijke grootte die wordt afgedrukt. Menu Optie (Option) Hiermee toont of verbergt u de volgende informatie.
Menu Help Wanneer u deze menuoptie selecteert, wordt het Help-venster voor het Canon IJ XPSafdrukvoorbeeld weergegeven en kunt u de versie en copyrightinformatie controleren. (Afdrukken) Hiermee drukt u de geselecteerde documenten in de lijst met documenten af. De afgedrukte documenten worden uit de lijst verwijderd en wanneer alle documenten zijn afgedrukt, wordt het Canon IJ-afdrukvoorbeeld gesloten.
(Eén omhoog) Hiermee verplaatst u het geselecteerde afdrukdocument één positie omhoog. Als het geselecteerde document het eerste document is, is deze opdracht lichtgrijs en kan deze niet worden geselecteerd. (Eén omlaag) Hiermee verplaatst u het geselecteerde afdrukdocument één positie omlaag. Als het geselecteerde document het laatste document is, is deze opdracht lichtgrijs en kan deze niet worden geselecteerd.
Status Hier wordt de status van de afdrukdocumenten weergegeven. Documenten waarvan de gegevens worden verwerkt, worden weergegeven als Gegevens verwerken (Processing data). Belangrijk Documenten die worden weergegeven als Gegevens verwerken (Processing data), kunnen niet worden afgedrukt of bewerkt. Wacht totdat de gegevensverwerking is voltooid. Gebied met afdrukinstellingen Hier kunt u de afdrukinstellingen van de geselecteerde documenten in de documentenlijst controleren en wijzigen.
Cyaan (Cyan)/Magenta/Geel (Yellow) Hier past u de sterkte van Cyaan (Cyan), Magenta en Geel (Yellow) aan. Wanneer u de schuifregelaar naar rechts schuift, wordt een kleur sterker en wanneer u de schuifregelaar naar links schuift wordt een kleur zwakker. U kunt ook rechtstreeks een waarde invoeren voor de schuifregelaar. Voer een waarde in tussen -50 en 50. Deze aanpassing verandert de relatieve hoeveelheid inkt van elke gebruikte kleur, waardoor de gehele kleurbalans van het document wordt gewijzigd.
Afdrukken in grijstinten (Grayscale Printing) Hiermee kunt u de instellingen voor monochroom afdrukken wijzigen. Dubbelzijdig afdrukken (Duplex Printing) Hiermee selecteert of het document op beide zijden of op één zijde van het papier wordt afgedrukt. Als de instellingen voor dubbelzijdig afdrukken niet kunnen worden gewijzigd voor het afdrukdocument, is dit item lichtgrijs en niet beschikbaar.
Beschrijving van Canon IJ-statusmonitor De Canon IJ-statusmonitor toont de status van het apparaat en de voortgang van de afdruktaak. De monitor gebruikt afbeeldingen, pictogrammen en berichten om de status van het apparaat aan te geven. Functies van Canon IJ-statusmonitor De Canon IJ-statusmonitor biedt de volgende voordelen: U kunt de status van de printer controleren op het scherm. De status van het apparaat wordt real-time weergegeven op het scherm.
geeft aan dat de printer werkt. : er is een fout opgetreden die service vereist. Inkttank De Canon IJ-statusmonitor toont een pictogram bij een waarschuwing over weinig of geen inkt. Daarnaast toont deze functie de geschatte inktniveaus van de inkttank. Klik in dit geval op de afbeelding om het dialoogvenster Inktdetails (Ink Details) te openen. Hier kunt u gedetailleerde gegevens controleren, zoals het resterende inktniveau en de soorten inkttanks voor uw printer.
Altijd op voorgrond (Always Display on Top) Hiermee geeft u de Canon IJ-statusmonitor weer boven andere vensters. Gidsbericht weergeven (Display Guide Message) Er worden aanwijzingen weergegeven voor bewerkingen waarbij het instellen van het papier ingewikkeld is. Envelop afdrukken (Envelope Printing) Geeft een bericht met aanwijzingen weer wanneer het afdrukken van de envelop wordt gestart.
Inktgegevens (links weergegeven) Hier worden de soorten inkttanks met afbeeldingen aangegeven. In geval van een waarschuwing of fout met betrekking tot het resterende inktniveau geeft het printerbesturingsbestand een pictogram weer. Als het pictogram wordt weergegeven, bedient u de printer in overeenstemming met de instructies op het scherm. Bericht (rechts weergegeven) Geeft informatie zoals de inktstatus en inktkleuren weer in een tekstbericht.
MP Drivers bijwerken De nieuwste versie van MP Drivers ophalen Onnodige MP Drivers verwijderen Voordat u MP Drivers installeert MP Drivers installeren 187
De nieuwste versie van MP Drivers ophalen MP Drivers omvat een printerstuurprogramma en ScanGear (scannerstuurprogramma). Door MP Drivers bij te werken naar de nieuwste versie van MP Drivers, kunt u onopgeloste problemen mogelijk verhelpen. U kunt vanaf onze website de nieuwste MP Drivers voor uw model downloaden. Belangrijk U kunt MP Drivers gratis downloaden, maar de kosten van de internetverbinding zijn voor uw eigen rekening.
Onnodige MP Drivers verwijderen Als u MP Drivers niet meer nodig hebt, kunt u dit verwijderen. Sluit alle actieve toepassingen voordat u MP Drivers gaat verwijderen. De procedure voor het verwijderen van MP Drivers is als volgt: 1. Start het verwijderprogramma • Als u Windows 8 gebruikt, selecteert u Instellingen (Settings) -> Configuratiescherm (Control Panel) -> Programma's (Programs) -> Programma's en voorzieningen (Programs and Features) via de charms op het bureaublad.
2. Voer het verwijderprogramma uit Klik op Uitvoeren (Execute). Klik op Ja (Yes) in het bevestigingsbericht. Klik op Voltooien (Complete) wanneer alle bestanden zijn verwijderd. Het verwijderen van MP Drivers is voltooid. Belangrijk Wanneer u MP Drivers verwijdert, worden het printerstuurprogramma, het XPSprinterstuurprogramma en ScanGear (het scannerstuurprogramma) verwijderd.
Voordat u MP Drivers installeert In dit onderwerp worden de items beschreven die u moet controleren voordat u MP Drivers installeert. U moet dit gedeelte ook raadplegen als MP Drivers niet kan worden geïnstalleerd. De apparaatstatus controleren • Schakel het apparaat uit. De instellingen van de computer controleren • Sluit alle actieve toepassingen. • Meld u in Windows 8, Windows 7 of Windows Vista aan als een gebruiker met een beheerdersaccount. Meld u in Windows XP aan als de beheerder van de computer.
MP Drivers installeren U kunt vanaf onze website de nieuwste versie van MP Drivers en het XPSprinterstuurprogramma voor uw model downloaden. De procedure voor het installeren van de gedownloade MP Drivers is als volgt: 1. Schakel het apparaat uit 2. Start het installatieprogramma Dubbelklik op het pictogram van het bestand dat u hebt gedownload. Het installatieprogramma wordt gestart.
U kunt MP Drivers en het XPS-printerstuurprogramma gratis downloaden, maar de kosten van de internetverbinding zijn voor uw eigen rekening. Verwijder de oudere versie voordat u de nieuwste versie van MP Drivers installeert.
Afdrukken met het bedieningspaneel van het apparaat Fotogegevens afdrukken De functie Diashow gebruiken Sjabloonformulieren zoals gelinieerd papier of grafiekpapier afdrukken Documenten (PDF-bestanden) afdrukken die zijn opgeslagen op een geheugenkaart 194
Fotogegevens afdrukken Foto's op een geheugenkaart afdrukken Over het menu Geavanc.
Foto's op een geheugenkaart afdrukken U kunt foto's die op een geheugenkaart zijn opgeslagen gemakkelijk afdrukken. In dit gedeelte wordt beschreven hoe u foto´s afdrukt in Foto (Photo). 1. Zorg dat het apparaat is ingeschakeld. 2. Plaats fotopapier. 3. Selecteer Foto (Photo) op het HOME-scherm. LCD en bedieningspaneel 4. Plaats de geheugenkaart in de kaartsleuf. Het selectiescherm voor foto's wordt weergegeven.
Opmerking • Het scherm Papierinstellingen bevestigen (Confirm print paper settings) wordt niet weergegeven wanneer u de volgende foto afdrukt, omdat de afdrukinstellingen in het geheugen van het apparaat zijn opgeslagen. Als u de afdrukinstellingen wilt wijzigen, drukt u op de knop HOME om terug te gaan naar het scherm HOME of om de geheugenkaart opnieuw te plaatsen. 8. Druk op de knop OK. Het apparaat begint af te drukken. Opmerking • Druk op de knop Stoppen (Stop) om het afdrukken te annuleren.
Over het menu Geavanc. foto De volgende menu's kunnen worden geselecteerd in het menu Geavanc. afdrukken (Advanced print) om foto's af te drukken die op de geheugenkaart zijn opgeslagen. Foto select./afdruk. (Select photo print) U kunt voor de gewenste foto ook het aantal kopieën opgeven en afdrukken. Foto's selecteren en afdrukken Bijsnijden en afdruk. (Trimming print) U kunt foto´s op het LCD-scherm bijsnijden en vervolgens afdrukken.
Foto's selecteren en afdrukken U kunt elke foto op de geheugenkaart op het LCD-scherm bekijken en de gewenste foto afdrukken. U kunt voor elke foto ook het aantal kopieën opgeven en de afdruktaak toevoegen. 1. Zorg dat het apparaat is ingeschakeld. 2. Plaats fotopapier. 3. Selecteer Geavanc. afdrukken (Advanced print) op het HOME-scherm. LCD en bedieningspaneel 4. Plaats de geheugenkaart in de kaartsleuf. Opmerking • Als u de geheugenkaart plaatst voordat u Geavanc.
1. Aantal kopieën Geef dit op met de knop + of -. 2. Foto selecteren Selecteer de foto die u wilt afdrukken met de knop . 3. Afdrukinstellingen (Print settings) Wanneer u op de rechter Functie (Function)-knop drukt, wordt het bevestigingsscherm met afdrukinstellingen weergegeven. Op het bevestigingsscherm met afdrukinstellingen kunt u de instellingen voor het paginaformaat, het mediumtype, de afdrukkwaliteit, enzovoort, wijzigen. Items instellen 4.
De afdruktaak toevoegen De afdruktaak toevoegen U kunt het fotoselectiescherm nogmaals weergeven en de afdruktaak toevoegen (Reservefotoafdruk) terwijl u foto's afdrukt. 1. Druk op de rechter Functie (Function)-knop wanneer het scherm met de voortgang van de afdruk wordt weergegeven. Het selectiescherm voor foto's wordt weergegeven. Opmerking • Terwijl het fotoselectiescherm wordt weergegeven, drukt het apparaat de gereserveerde foto's af. 2.
afdrukken van alle foto's annuleren. Als u De laatste reservering annuleren (Cancel the last reservation) selecteert en vervolgens op OK drukt, kunt u de laatste afdruktaak annuleren. • Als er veel afdruktaken zijn, wordt mogelijk het bericht Kan niet meer afdruktaken reserveren. Wacht even en voer de bewerking opnieuw uit. (Cannot reserve more print jobs. Please wait a while and redo the operation.) weergegeven op het LCD-scherm. Wacht even in dit geval en voeg daarna de afdruktaak toe.
Een foto bijsnijden en afdrukken U kunt foto´s op het LCD-scherm bijsnijden en vervolgens afdrukken. 1. Zorg dat het apparaat is ingeschakeld. 2. Plaats fotopapier. 3. Selecteer Geavanc. afdrukken (Advanced print) op het HOME-scherm. LCD en bedieningspaneel 4. Plaats de geheugenkaart in de kaartsleuf. Opmerking • Als u de geheugenkaart plaatst voordat u Geavanc. afdrukken (Advanced print) op het scherm HOME selecteert, wordt het fotoselectiescherm in Foto (Photo) weergegeven.
Gebruik de volgende knoppen om het afdrukgebied bij te snijden. Knoppen , , en : Plaatst het bijsnijdkader in de gewenste positie. De knop + of -: Hiermee stelt u het formaat van het bijsnijdkader in. Middelste Functie (Function)-knop: Hiermee draait u het bijsnijdkader. Druk op deze knop om het bijsnijdkader in te stellen op staand of liggend. 8. Druk op de knop OK om te bevestigen dat het door u geselecteerde gedeelte moet worden bijgesneden.
Items instellen U kunt de instelling voor paginaformaat, mediumtype, fotocorrectie en dergelijke instellen om foto's af te drukken die zijn opgeslagen op de geheugenkaart. U kunt dit doen met het afdrukmenu in Geavanc. afdrukken (Advanced print). Het scherm Afdrukinstellingen De manier waarop u het scherm voor de afdrukinstellingen weergeeft, varieert naar gelang het afdrukmenu. • In Foto select./afdruk.
Opmerking • Sommige instellingen kunnen niet worden geselecteerd, afhankelijk van het afdrukmenu. In dit gedeelte worden de instellingen van Foto select./afdruk. (Select photo print) beschreven. De instelling die niet kan worden geselecteerd, wordt grijs of niet weergegeven. • Sommige instellingen kunnen niet worden opgegeven in combinatie met andere instellingen of de afdrukmenu´s.
Hiermee wordt de afdruk van de datum (opnamedatum) op de foto in- of uitgeschakeld. Opmerking • De opnamedatum wordt afgedrukt volgens de instellingen van Indeling datumweergave (Date display format) bij Gebruikersinstellingen apparaat (Device user settings) onder Apparaatinstellingen (Device settings) onder Instellen (Setup).
Handige weergavefuncties gebruiken Bij sommige fotoafdrukmenu's in Geavanc. afdrukken (Advanced print) kunt u de weergavemethode van de foto's op de geheugenkaart wijzigen en de datum (datum waarop gegevens voor het laatst zijn gewijzigd) opgeven om foto's te selecteren. De weergavemethode wijzigen Een datum opgeven om een foto te selecteren De weergavemethode wijzigen Als u op de linker Functie (Function)-knop op het fotoselectiescherm drukt, wordt het selectiescherm voor een weergavemethode geopend.
Opmerking • De datum wordt weergegeven volgens de instellingen van Indeling datumweergave (Date display format) bij Gebruikersinstellingen apparaat (Device user settings) onder Apparaatinstellingen (Device settings) onder Instellen (Setup).
De functie Diashow gebruiken Foto's afdrukken terwijl u naar de diashow kijkt 210
Foto's afdrukken terwijl u naar de diashow kijkt U kunt alle foto's die zijn opgeslagen op de geheugenkaart bekijken in een diashow. Tijdens de diashow worden de foto's automatisch een voor een weergegeven. Terwijl u naar de diashow kijkt, kunt u uw favoriete foto afdrukken. 1. Zorg dat het apparaat is ingeschakeld. 2. Selecteer Geavanc. afdrukken (Advanced print) op het HOME-scherm. LCD en bedieningspaneel 3. Plaats de geheugenkaart in de kaartsleuf.
Het afspelen van de diashow wordt gestart. Opmerking • Wanneer u op OK drukt terwijl de diashow wordt afgespeeld, wordt de diashow gepauzeerd. U kunt de weergegeven foto afdrukken door op de knop Kleur (Color) te drukken terwijl de diashow is gepauzeerd. • Als u de diashow van een andere groep als de foto´s in groepen van 2.000 zijn opgesplitst, gebruikt u de knop om de groep te wijzigen wanneer de diashow is gepauzeerd.
Sjabloonformulieren zoals gelinieerd papier of grafiekpapier afdrukken U kunt een sjabloonformulier, zoals gelinieerd papier, grafiekpapier of een controlelijst, afdrukken op normaal papier van A4-, B5- of Letter-formaat. Afdrukbare sjabloonformulieren Sjabloonformulieren afdrukken Opmerking • U gebruikt de webservice om het sjabloonformulier te downloaden en af te drukken.
• Muziekpapier U kunt muziekpapier met 10 of 12 notenbalken afdrukken. Instellen op het LCD-scherm: ◦ Muziekpapier 1 (Staff paper 1): Muziekpapier m. 10 notenbalken (Staff paper 10 staves) ◦ Muziekpapier 2 (Staff paper 2): Muziekpapier m. 12 notenbalken (Staff paper 12 staves) • Handschriftpapier U kunt handschriftpapier afdrukken. Instellen op het LCD-scherm: Handschriftpapier (Handwriting paper) • Weekschema U kunt een formulier voor een weekschema afdrukken.
4. Selecteer Sjabloonafdruk (Template print) en druk vervolgens op de knop OK. 5. Selecteer met de knoppen de sjabloon die u wilt afdrukken en druk op de knop OK. Afdrukbare sjabloonformulieren 6. Geef de gewenste instellingen op. 1. Aantal kopieën Gebruik de knop + of - om het aantal exemplaren op te geven. 2. Paginaformaat (Page size) Selecteer het paginaformaat op basis van het geplaatste papier.
Documenten (PDF-bestanden) afdrukken die zijn opgeslagen op een geheugenkaart U kunt PDF-bestanden die zijn gescand met het bedieningspaneel van het apparaat of die zijn gemaakt met Canon IJ Scan Utility of My Image Garden (software die compatibel is met het apparaat) afdrukken vanaf een geheugenkaart. Opmerking • U kunt PDF-bestanden vanaf een geheugenkaart afdrukken als deze aan de volgende voorwaarden voldoen.
Opmerking • Als er foto's en PDF-bestanden op de geheugenkaart zijn opgeslagen en de geheugenkaart wordt geplaatst voordat u PDF-bestand afdruk. (PDF file print) selecteert in het scherm, wordt u in het bevestigingsscherm gevraagd welk bestand u wilt afdrukken. Selecteer Documenten afdrukken (Print documents) op het weergegeven scherm en druk op de knop OK.
1. Aantal kopieën Gebruik de knop + of - om het aantal exemplaren op te geven. 2. Paginaformaat (Page size) Selecteer het paginaformaat op basis van het geplaatste papier. 3. Type (Mediumtype) Het type papier is ingesteld op Normaal papier (Plain paper). 4. Afdr.kwl. (Print qlty) (Afdrukkwaliteit) Geef de afdrukkwaliteit op. 5. Dub.zijdigInst.afdr. (2-sidedPrintSetting) Selecteer dubbelzijdig of enkelzijdig afdrukken. Als Dub.
Zie Een bericht verschijnt op het scherm voor meer informatie.
Afdrukken met een webservice Kennisgeving over het afdrukken met een webservice Foto's in een online fotoalbum afdrukken Sjabloonformulieren downloaden en afdrukken Instellingen voor de webservice 220
Kennisgeving over het afdrukken met een webservice Wanneer u een webservice gebruikt • Canon geeft geen garantie voor de continuïteit en de betrouwbaarheid van de geleverde webservices, de beschikbaarheid van de toegang tot de site of de toestemming om de materialen te downloaden. • Canon kan op elk gewenst moment de informatie die wordt aangeboden via de webservice bijwerken, wijzigen of verwijderen, of de service zonder voorafgaande kennisgeving onderbreken of opheffen.
Auteursrechten en openbaarmakingsrechten Wanneer u afdrukt vanaf de fotodeelsite: • Houd u aan de gebruiksvoorwaarden van de fotodeelsite wanneer u foto´s op de site gebruikt. • Het is onwettig om auteursrechtelijk beschermd werk van anderen te reproduceren of te bewerken zonder toestemming van de houder van het auteursrecht, behalve voor persoonlijk gebruik, gebruik binnenshuis of ander gebruik binnen het beperkte bereik dat wordt gespecificeerd in het auteursrecht.
Foto's in een online fotoalbum afdrukken U kunt via het bedieningspaneel van het apparaat toegang krijgen tot de fotodeelsite op internet en de foto in een online fotoalbum afdrukken (foto's die vanaf apparaten zoals computers zijn geüpload). Belangrijk • Als de firmware van het apparaat is bijgewerkt, zullen het scherm, de bedieningsprocedure en de menufunctie zijn gewijzigd.
Werk de firmware bij volgens het bericht dat wordt weergegeven. Voor meer informatie over de bediening van het menu Cloud na de firmware-update raadpleeg: Gebruik de Cloud-functie van het apparaat 4. Selecteer de fotosite die u wilt gebruiken en druk vervolgens op de knop OK. Het apparaat gaat naar de fotodeelsite. Vervolgens worden de online albums op het LCD weergegeven.
Geef dit op met de knop + of -. Opmerking • Als u het aantal kopieën voor elke foto opgeeft, gebruikt u de knop om de foto weer te geven die u wilt afdrukken en gebruikt u de knop + of - om het aantal kopieën op te geven wanneer de gewenste foto wordt weergegeven. • U kunt het scherm ook weergeven om het aantal kopieën op te geven: druk op OK wanneer de gewenste foto wordt weergegeven.
Opmerking • Standaard wordt automatische correctie toegepast wanneer foto´s op de fotodeelsite worden afgedrukt. • Als Geen corr. (No correction) is geselecteerd, worden foto's zonder correctie afgedrukt. F. Corr. rode ogen (Red-EyeCorrection) Hiermee worden rode ogen in portretfoto's gecorrigeerd die worden veroorzaakt door fotograferen met flitser. Afhankelijk van het type foto worden rode ogen mogelijk niet gecorrigeerd of worden andere delen dan de ogen gecorrigeerd. G.
Sjabloonformulieren downloaden en afdrukken U kunt de sjabloonformulier die u wilt afdrukken, downloaden van de webservice. Raadpleeg de gebruiksvoorwaarden voordat u de webservice gebruikt. Kennisgeving over het afdrukken met een webservice Belangrijk • Voor het gebruik van deze functie hebt u een LAN-verbinding met het apparaat en een internetverbinding nodig. 1. Zorg dat het apparaat is ingeschakeld. 2. Selecteer Cloud op het HOME-scherm.
• Sommige afdrukinstellingen kunnen niet worden opgegeven, afhankelijk van het sjabloonformulier. Als de instelling wordt geselecteerd, wordt Foutdetails (Error details) weergegeven op het LCDscherm. In dit geval drukt u op de linker Functie (Function)-knop om het bericht te bevestigen en wijzigt u de instelling. 8. Plaats papier op basis van de afdrukinstellingen. 9. Druk op de knop Kleur (Color). Het apparaat begint af te drukken.
Instellingen voor de webservice In dit gedeelte worden de instellingen van het apparaat voor de webservice beschreven. Het account op de fotodeelsite registreren De instellingen van de webservice herstellen Raadpleeg de gebruiksvoorwaarden voordat u de webservice gebruikt. Kennisgeving over het afdrukken met een webservice Het account op de fotodeelsite registreren Registreer het account op de fotodeelsite op het apparaat volgens de onderstaande procedure.
6. Selecteer de fotosite waarop u het account wilt selecteren met de knop en druk op de knop OK. Er wordt een bericht met accountgegevens weergegeven. 7. Controleer het bericht en druk op de knop OK. 8. Wanneer het bevestigingsbericht voor accountbeheer wordt weergegeven, drukt u op de linker Functie (Function)-knop. Opmerking • U kunt het bericht voor het accountbeheerbeleid weergeven door op de knop OK te drukken. 9.
Opmerking • Als u de ingevoerde tekens wilt bewerken, selecteert u de invoerkolom (A) met de knop Gebruik de knop om de cursor te verplaatsen onder de positie waar u de tekst wilt bewerken. . 11. Controleer de ingevoerde aanmeldingsnaam of het ingevoerde e-mailadres en druk op de linker Functie (Function)-knop. 12. Controleer of het Wachtwoord (Password) wordt weergegeven en druk op de knop OK. Het scherm voor het invoeren van het wachtwoord wordt weergegeven. 13. Voer het wachtwoord in.
5. Selecteer met de knop de optie Alleen webservice instellen (Web service setup only) en druk vervolgens op de knop OK. Het bevestigingsscherm wordt weergegeven. Opmerking • Wanneer u Alles herstellen (Reset all) selecteert, worden alle standaardinstellingen, inclusief de webservice-instellingen van het apparaat hersteld. 6. Gebruik de knop om Ja (Yes) te selecteren en druk op OK. De instellingen van de webservice zijn hersteld.
Afdrukken vanaf een digitale camera Foto's rechtstreeks afdrukken vanaf een PictBridge-compatibel apparaat (draadloos LAN) Informatie over PictBridge-afdrukinstellingen (draadloos LAN) 233
Foto's rechtstreeks afdrukken vanaf een PictBridge-compatibel apparaat (draadloos LAN) U kunt een PictBridge-compatibel apparaat (draadloos LAN), zoals een digitale camera, een camcorder of een mobiele telefoon, met het apparaat verbinden via een draadloos LAN, zodat u opgeslagen foto's rechtstreeks kunt afdrukken zonder daarbij een computer te gebruiken.
4. Geef de afdrukinstellingen zoals de papiersoort en indeling op. U kunt instellingen opgeven via het menu op het LCD-scherm van het PictBridge-compatibele apparaat (draadloos LAN). Selecteer het papierformaat en de papiersoort die u in het apparaat hebt geplaatst. Instellingen op een PictBridge-compatibel apparaat (draadloos LAN) Als het PictBridge-compatibele apparaat (draadloos LAN) geen menu voor instellingen heeft, wijzigt u de instelling vanaf het apparaat.
Informatie over PictBridge-afdrukinstellingen (draadloos LAN) Instellingen op een PictBridge-compatibel apparaat (draadloos LAN) Instellingen op de printer Instellingen op een PictBridge-compatibel apparaat (draadloos LAN) In dit gedeelte wordt de functie PictBridge (draadloos LAN) van het apparaat beschreven. Raadpleeg de instructiehandleiding van het PictBridge-compatibele apparaat (draadloos LAN) voor informatie over de afdrukinstellingen van het apparaat.
mogelijk niet beschikbaar met sommige PictBridge-compatibele apparaten (draadloos LAN) van Canon.) *3 Afgedrukt in 35 mm filmindeling (indeling afdrukken). Alleen beschikbaar met een PictBridge-compatibel apparaat (draadloos LAN) van Canon. (Deze functie is mogelijk niet beschikbaar met sommige PictBridge-compatibele apparaten (draadloos LAN) van Canon.
Afdrukken met de toegangspuntmodus Als het apparaat schakelt naar de toegangspuntmodus, kunt u afdrukken vanaf een extern apparaat zoals een computer of smartphone, zelfs zonder een toegangspunt. Belangrijk • Voordat u het apparaat met de toegangspuntmodus wilt gebruiken, moet u eerst de naam van het toegangspunt van het apparaat en de beveiligingsinstelling opgeven. Voordat u het apparaat met de toegangspuntmodus gebruikt 1. Zorg dat het apparaat is ingeschakeld. 2. Selecteer WLAN op het HOME-scherm.
Opmerking • Raadpleeg de handleiding van het apparaat of de instructiehandleiding van uw toepassing voor meer informatie over afdrukken vanaf een extern apparaat zoals een computer of smartphone via een draadloos LAN. • U kunt ook afdrukken met PIXMA Printing Solutions. 8. Druk op de linker Functie (Function)-knop wanneer het afdrukken is voltooid. Het apparaat sluit de toegangspuntmodus af. 9. Als het bevestigingsscherm voor het afsluiten van de toegangspuntmodus wordt weergegeven, drukt u op de knop OK.
Kopiëren Kopieën maken Basis Voorbeeldweergave weergeven Items instellen Kopieën verkleinen of vergroten Dubbelzijdig kopiëren Over het menu Speciale kopie Twee pagina’s kopiëren op één pagina Vier pagina’s kopiëren op één pagina Dikke originelen, zoals boeken, kopiëren Kopiëren zonder marges Foto's kopiëren 240
Kopieën maken Plaats het origineel op de glasplaat als u wilt kopiëren. In dit gedeelte wordt de procedure beschreven voor het kopiëren met Standaardkopie (Standard copy). 1. Zorg dat het apparaat is ingeschakeld. 2. Plaats papier. 3. Selecteer Kopiëren (Copy) op het HOME-scherm. LCD en bedieningspaneel Het stand-byscherm voor kopiëren wordt weergegeven. 4. Plaats het origineel op de glasplaat. 5. Geef de gewenste instellingen op. 1. Aantal kopieën Geef dit op met de knop + of -. 2.
Verwijder het origineel van de glasplaat wanneer het kopiëren is voltooid. Belangrijk • Open de documentklep niet en laat het origineel op de glasplaat liggen totdat het scannen is voltooid. Opmerking • Druk op de knop Stoppen (Stop) om het kopiëren te annuleren. De kopieertaak toevoegen (reservekopie) U kunt de kopieertaak toevoegen tijdens het afdrukken (Reservekopie). Het onderstaande scherm wordt weergegeven wanneer u de kopieertaak toevoegt.
Voorbeeldweergave weergeven Wanneer u het origineel op de glasplaat plaatst en Standaardkopie (Standard copy) of Kop. kader wissen (Frame erase copy) in Geavanc. afdrukken (Advanced print) selecteert, kunt u op een Functie (Function)-knop drukken om een voorbeeld van de afdruk weer te geven op het voorbeeldscherm. Wanneer Standaardkopie (Standard copy) is geselecteerd, drukt u op de linker Functie (Function)-knop in het standby-scherm voor kopiëren. Wanneer Kop.
3. Vergroting De vergrotingsinstelling die is ingesteld tijdens weergave van het voorbeeld wordt weergegeven. Als een andere instelling dan Passend (Fit to page) is geselecteerd, kunt u de vergrotingsinstelling wijzigen met de knoppen .
Items instellen U kunt de kopieerinstellingen, zoals vergroting en intensiteit, wijzigen. Het scherm Afdrukinstellingen Opmerking • Zie Foto's kopiëren voor meer informatie over het scherm met afdrukinstellingen of de instellingen voor Foto kopiëren (Photo copy). De manier waarop u het scherm voor de afdrukinstellingen weergeeft, varieert naar gelang het kopieermenu.
Opmerking • Sommige instellingen kunnen niet worden geselecteerd, afhankelijk van het kopieermenu. In dit gedeelte worden de instellingen van Standaardkopie (Standard copy) beschreven. Als een instelling niet kan worden geselecteerd, wordt deze grijs weergegeven. Zie Foto's kopiëren voor meer informatie over de instellingsitems voor Foto kopiëren (Photo copy). • Sommige instellingen kunnen niet worden opgegeven in combinatie met de instelling van andere instellingsitems of het kopieermenu.
4. Type (Mediumtype) Selecteer het mediumtype van het geplaatste papier. 5. Afdr.kwl. (Print qlty) (Afdrukkwaliteit) Pas de afdrukkwaliteit aan op basis van het origineel. Belangrijk • Als u Klad (Draft) selecteert terwijl het Type is ingesteld op Normaal papier (Plain paper) en de kwaliteit niet naar wens is, selecteert u Standaard (Standard) of Hoog (High) voor Afdr.kwl. (Print qlty) en probeert u opnieuw te kopiëren. • Selecteer Hoog (High) voor Afdr.kwl. (Print qlty) om te kopiëren in grijstinten.
Kopieën verkleinen of vergroten U kunt de vergroting optioneel opgeven of een kopie met een vooraf ingestelde verhouding of een kopie passend op het papierformaat selecteren. Het onderstaande LCD-scherm wordt weergegeven wanneer u in het standby-scherm voor kopiëren op de rechter Functie (Function)-knop drukt. Selecteer de methode voor vergroten/verkleinen bij Vergrot. (Magnif.). Opmerking • Sommige verkleinings-/vergrotingsmethoden zijn niet beschikbaar; dit is afhankelijk van het kopieermenu.
U kunt de kopieerschaal opgeven als een percentage om kopieën te vergroten of te verkleinen. Als u een andere optie selecteert dan Passend (Fit to page) en op de rechter Functie (Function)-knop drukt, wordt het scherm Vergroting (Magnification) weergegeven. Gebruik de knop om de vergroting op te geven. Opmerking • Max. 400% (400% MAX) (maximale kopieerverhouding) en Min. 25% (25% MIN) (minimale kopieerverhouding) kunnen worden geselecteerd.
Dubbelzijdig kopiëren Wanneer u Dub.zijdig (2-sided) voor Dub.zijdigInst.afdr. (2-sidedPrintSetting) selecteert bij Standaardkopie (Standard copy), kunt u twee originele pagina's kopiëren naar de twee zijden van één vel papier. Druk op de rechter Functie (Function)-knop om de afdrukstand en de nietmarge te selecteren.
• De instelling voor een dubbelzijdige kopie kan worden gebruikt in combinatie met 2 op 1 kopie (2-on-1 copy) of 4 op 1 kopie (4-on-1 copy) wanneer Standaardkopie (Standard copy) is geselecteerd. Twee pagina’s kopiëren op één pagina Vier pagina’s kopiëren op één pagina • Als u kopieert in zwart-wit kan de afdrukintensiteit van de dubbelzijdige kopie afwijken van die van een enkelzijdige kopie.
Opmerking • Als u niets meer wilt scannen, drukt u op de linker Functie (Function)-knop. Het apparaat begint met kopiëren. • U kunt de kopieertaak toevoegen tijdens het afdrukken.
Over het menu Speciale kopie De volgende menu's kunnen worden geselecteerd in het menu Geavanc. afdrukken (Advanced print) om originelen te kopiëren. Kopie zonder marges (Borderless copy) U kunt afbeeldingen zo kopiëren dat deze de hele pagina vullen zonder marges. Kopiëren zonder marges Kop. kader wissen (Frame erase copy) Wanneer u een dik origineel zoals een boek kopieert, kunt u kopiëren zonder zwarte marges rondom het beeld en schaduwen van rugmarges.
Twee pagina’s kopiëren op één pagina Wanneer u 2 op 1 kopie (2-on-1 copy) selecteert voor Indeling (Layout) in Standaardkopie (Standard copy) kunt u twee originele pagina's op één vel papier kopiëren door de afbeeldingen te verkleinen. Druk op de rechter Functie (Function)-knop op het standby-scherm voor kopiëren om het scherm voor afdrukinstellingen weer te geven en selecteer 2 op 1 kopie (2-on-1 copy) voor Indeling (Layout).
• U kunt deze functie gebruiken in combinatie met dubbelzijdig kopiëren. Als u deze functie in combinatie gebruikt, kunt u vier originele pagina's op één vel papier kopiëren. In dit geval worden twee originele pagina's op elke zijde van het papier gekopieerd. Als u deze functie in combinatie gebruikt, selecteert u Dub.zijdig (2-sided) voor Dub.zijdigInst.afdr. (2-sidedPrintSetting) en selecteert u vervolgens de nietmarge van het afdrukpapier in het scherm Afdrukinstellingen.
Het apparaat begint het tweede vel van het origineel te scannen en te kopiëren. Opmerking • Als u niets meer wilt scannen, drukt u op de linker Functie (Function)-knop. Het apparaat begint met kopiëren. • U kunt de kopieertaak toevoegen tijdens het afdrukken. De kopieertaak toevoegen (reservekopie) • Als u deze functie in combinatie met dubbelzijdig kopiëren gebruikt, wordt het scherm Plaatsing document (Document setting) weergegeven nadat het scannen van het tweede vel van het origineel is voltooid.
Vier pagina’s kopiëren op één pagina Wanneer u 4 op 1 kopie (4-on-1 copy) selecteert bij Indeling (Layout) in Standaardkopie (Standard copy), kunt u vier originele pagina's op één vel papier kopiëren door de afbeeldingen te verkleinen. Er zijn vier verschillende indelingen beschikbaar. Druk op de rechter Functie (Function)-knop op het standby-scherm voor kopiëren om het scherm voor afdrukinstellingen weer te geven en selecteer 4 op 1 kopie (4-on-1 copy) voor Indeling (Layout).
Nadat u de indeling hebt gekozen en op de knop OK hebt gedrukt, kunt u selecteren of u het voorbeeldscherm wilt gebruiken. Als u AAN (ON) selecteert, wordt het voorbeeldscherm weergegeven, waarin u de afdrukstand kunt controleren. Opmerking • Als tijdens het scannen het bericht Apparaatgeheugen is vol. Proces kan niet worden voortgezet. (Device memory is full. Cannot continue process.
Wanneer het scannen is voltooid: Na het scannen van elk origineel, wordt het scherm Plaatsing document (Document setting) weergegeven op het LCD-scherm. Verwijder na het scannen het origineel van de glasplaat, plaats de volgende pagina op de glasplaat en druk op de knop OK. Na het scannen van de vierde pagina van het origineel, begint het apparaat met kopiëren. Opmerking • Als u niets meer wilt scannen, drukt u op de linker Functie (Function)-knop. Het apparaat begint met kopiëren.
Dikke originelen, zoals boeken, kopiëren Wanneer u een dik origineel zoals een boek kopieert, kunt u kopiëren zonder zwarte marges rondom het beeld en schaduwen van rugmarges. Met deze functie vermindert u onnodig inktverbruik. 1. Zorg dat het apparaat is ingeschakeld. 2. Plaats papier. 3. Selecteer Geavanc. afdrukken (Advanced print) op het HOME-scherm. LCD en bedieningspaneel 4. Selecteer Kop. kader wissen (Frame erase copy) en druk vervolgens op de knop OK. 5. Plaats het origineel op de glasplaat.
van de schaduw, waardoor het document mogelijk enigszins wordt bijgesneden of een schaduw in de vouw wordt weergegeven.
Kopiëren zonder marges U kunt afbeeldingen zo op fotopapier kopiëren dat deze de hele pagina vullen zonder marges. 1. Zorg dat het apparaat is ingeschakeld. 2. Plaats het fotopapier. 3. Selecteer Geavanc. afdrukken (Advanced print) op het HOME-scherm. LCD en bedieningspaneel 4. Selecteer Kopie zonder marges (Borderless copy) en druk vervolgens op de knop OK. 5. Plaats het origineel op de glasplaat. 6. Gebruik de knop + of - om het aantal kopieën op te geven.
Foto's kopiëren U kunt afgedrukte foto's scannen en allemaal tegelijk afdrukken. 1. Zorg dat het apparaat is ingeschakeld. 2. Plaats het fotopapier. 3. Selecteer Geavanc. afdrukken (Advanced print) op het HOME-scherm. LCD en bedieningspaneel 4. Selecteer Foto kopiëren (Photo copy) en druk vervolgens op de knop OK. 5. Bevestig de instructies op het scherm en druk op de knop OK. 6. Plaats de afgedrukte foto op de glasplaat volgens de instructies op het scherm en druk op de knop OK.
Selecteer het paginaformaat van het geplaatste papier. 2. Type (Mediumtype) Selecteer het mediumtype van het geplaatste papier. 3. Afdr.kwl. (Print qlty) (Afdrukkwaliteit) Selecteer de afdrukkwaliteit op basis van het origineel. 4. Marge (Border) (Met of zonder marge afdrukken) Hiermee selecteert u afdrukken met of zonder rand. 5. Fotocorr. (Photo fix) Selecteer Geen corr. (No correction), Automat. fotocorr. (Auto photo fix) of Vervagingscorr. (Fade restoration). Opmerking • Wanneer Geen corr.