Quick Start Guide Table of Contents Introduction The following ink tanks are compatible with this printer. For details on ink tank replacement, refer to “Maintenance” in this guide. HT7-0124-000-V.1.0 XX2004XX © CANON INC. 2004 PRINTED IN CHINA 7 Copying 12 Photo Printing From A Memory Card (MP130) 15 Printing from Your Computer 21 Scanning 23 Maintenance 24 Troubleshooting 26 ENG HT7-0124-000-V.1.
Copyright This manual is copyrighted by Canon Inc. with all rights reserved. Under the copyright laws, this manual may not be reproduced in any form, in whole or in part, without the prior written consent of Canon Inc. © 2004 Canon Inc. Disclaimer Canon Inc. has reviewed this manual thoroughly in order that it will be an easy-to-use guide to your Canon MP130/110 Series.
X How To Use The Documentation Provided Easy Setup Instructions (Printed documentation) Be sure to read this sheet first. This sheet includes instructions for setting up your machine and getting it ready for use. Follow all steps in this sheet before using your machine. Quick Start Guide (This guide) Read this guide when starting to use the machine.
Photo Application Guide (Electronic documentation) This guide is available on the Setup CD-ROM. This guide, included as a HTML file, describes the utility software on the Setup CD-ROM, such as Easy-PhotoPrint and Easy-WebPrint, including instructions on how to scan data, various printing methods, and details of functions. Like the Software Guide, this guide is also included on the Setup CD-ROM.
X Reading The Document Symbols Used In This Guide CAUTION Indicates a caution concerning operations that may lead to injury to persons or damage to property if not performed correctly. In order to use the machine safely, always pay attention to these cautions. See User’s Guide Refer to the User’s Guide (included on your Setup CD-ROM) for more information. See Software Guide Refer to the Software Guide (included on your Setup CD-ROM) for more information.
Buttons Used In This Guide [button name] Text enclosed in these brackets indicates a button on the Operation Panel of the machine or an item on the computer to be manipulated. Example: [Color] Text enclosed in these brackets indicates a message or selectable menu item which appears on the LCD (Liquid Crystal Display). Example: , Terms Used In This Guide machine General term used to represent the MP130/110. default A setting that remains in effect unless you change it.
1 Introduction X Features Of Your Machine Thank you for purchasing the Canon MP130/110. Your machine incorporates the following functions in one simple-to-operate device: Desktop photo printer (MP130) Prints photo-quality images from any memory card, without using a computer. Copier Makes color or black & white copies. Also, applies advanced copy features to your copies. PC Printer Prints photographs, vivid color and crisp black and white documents from your computer.
X Main Components And Their Functions Machine z Exterior (1) (6) (3) (2) (5) (7) (4) (1) Paper Support Supports paper loaded in the Auto Sheet Feeder. Open it before loading paper. (2) Paper Support Extension Supports paper loaded in the Auto Sheet Feeder. Pull it out before loading paper. (3) Auto Sheet Feeder Load paper here. Paper feeds automatically, one sheet at a time. (4) Paper Output Tray Printouts are output to this tray. Open the tray before you start copying or printing.
z Rear view and interior (10) (9) (8) (14) (13) (12) (11) (8) USB Connector Used to connect a computer to the machine when printing from or scanning to the computer. (9) Power Connector Used to connect the power cord to the machine. (10) Scan Unit Lift this unit until it locks into place when the Inner Cover needs to be opened. (11) Print Head Holder Used to install a print head. (12) Inner Cover Open this cover when replacing the ink tanks or clearing a paper jam.
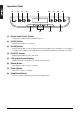
Operation Panel (1) (2) (3) (4) (5) (13) (12) (6) (11) (7) (8) (9) (10) (1) [Photo Index Sheet]* Button Switches the machine to Photo Index Sheet mode. (2) [COPY] Button Switches the machine to copy mode. (3) [SCAN] Button Switches the machine to scan mode. In scan mode, the machine scans a document to your computer according to the settings selected. This button is used when the machine is connected to a computer. (4) [PHOTO]* Button Switches the machine to photo print mode.
(9) [ON/OFF] Button Turns the machine ON and OFF. Before turning ON the machine, make sure the Document Cover is closed. (10) Alarm Lamp Flashes when the machine is turned ON or OFF, when an error occurs, or when paper or ink has run out. (11) [OK] Button Selects or confirms settings. Also, press this button to return to standby mode after correcting paper jams and other errors that stop printing.
2 Copying X Loading Documents 1 Lift the Document Cover. 2 Load your document. • Place your document face down on the Platen Glass. • Align the upper left corner of your document with the alignment mark on the lower right corner of the Platen Glass. 3 Gently close the Document Cover. X Setting The Paper Size And Type For copying or photo printing, on the Operation Panel, you need to set the size and type of paper loaded in the Auto Sheet Feeder. (See page 13) 1 2 3 4 12 Press [COPY].
X Recommended Paper • • • • • • • • • • Plain paper Envelopes High Resolution Paper* Glossy Photo Paper* Matte Photo Paper* Photo Paper Pro* Photo Paper Plus Glossy* Photo Paper Plus Semi-Gloss* Transparencies* T-Shirt Transfers* * Indicates Canon specialty media. For details on the general paper guidelines, see User’s Guide. X Loading Paper 1 Open the Paper Support (1), then pull out the Paper Support Extension (2).
X Making Copies 1 Press [COPY]. 2 Use [W] or [X] to select the number of copies (max. 99 copies). 3 Adjust the settings for your document as necessary. 4 Press [Color] for color copying, or [Black] for black & white copying. Adjusting Image Quality 1 Press [Menu] five times until appears. 2 Use [W] or [X] to select the image quality, and then press [OK]. Adjusting Exposure (Density) 1 Press [Menu] four times until appears.
3 Photo Printing From A Memory Card (MP130) There are several ways you can print photos directly from a memory card, without using a computer. 1 Make sure the machine is turned ON. 2 Load paper into the Auto Sheet Feeder. (See page 13) 3 Insert a memory card. (See page 16) 4 Select the printing method.
X Inserting/Removing A Memory Card Inserting A Memory Card 1 Make sure the machine is turned ON. 2 Insert the memory card or the card adapter containing the memory card into the appropriate Card Slots. Removing A Memory Card CAUTION • If an error occurs during printing from the memory card (e.g. paper runs out), do not remove the memory card or card adapter containing a memory card as this may damage the data on the memory card.
X Printing By Using The Photo Index Sheet With the MP130, you can easily print photographs using a Photo Index Sheet, by filling in the appropriate circles to select print options and photographs you want to print. Simply scanning a Photo Index Sheet prints the selected photographs according to the selections you have made. 1 Turn ON the machine, and load letter- or A4-size paper in the Auto Sheet Feeder. 2 3 4 5 Insert the memory card into the Card Slots. (See page 16) Press [Photo Index Sheet].
6 7 Press [OK]. 8 Load the paper selected on the Photo Index Sheet in the Auto Sheet Feeder. 9 Load the Photo Index Sheet on the Platen Glass. Fill in the appropriate circles ( ) with a dark pencil to select the photographs to print and print settings. CAUTION • Be sure to load the Photo Index Sheet in the correct orientation on the Platen Glass. 10 Press [Photo Index Sheet]. 11 Use [W] or [X] to select , and then press [OK].
X Index Printing With the MP130, you can print an index to check all the image data on the memory card, and select the settings for individual images and print them according to your preference. Single image Prints a specified single image stored on a memory card. Range of images Prints a specified range of images stored on a memory card. 1 Press [PHOTO], and then press [Menu] once until appears. 2 3 4 5 6 Use [W] or [X] to select , and then press [OK].
Printing According To The Selected Photo Print Mode 1 Press [PHOTO], and then press [Menu] once until appears. 2 Use [W] or [X] to select the photo print mode below, and then press [OK]. z If you select : 1. Select the image number and the number of copies. z If you select
4 PC Printing From Your Computer X Printing Documents The print procedure varies slightly depending on the application software. The basic print procedure is explained here. 1 2 Load paper in the Auto Sheet Feeder. (See page 13) 3 In the [Print] dialog box, make sure your machine is selected in the [Printer] box or the drop-down list. 4 Adjust the settings for your document as necessary, then click the print command. Open the document in the application software, and select the command to print.
z Canceling before the machine starts printing 1. In the [Print] dialog box, click the button to cancel printing. z Canceling after the machine starts printing 1. Click [Edit Printer List] from the [Printer] pop-up menu in the [Print] screen. 2. Double-click the printer icon of the machine in the Printer List. 3. Select the print job you wish to cancel and click [Delete]. X Changing Print Settings Your machine is initially installed with factory-predefined settings, enabling you to print immediately.
5 PC Scanning X Scanning Methods • Using the MP Navigator (See below) • Using a TWAIN- or WIA- (Windows XP only) compliant application software (See Software Guide) • Scanning with the Operation Panel of the machine (See Software Guide) Scanning Using The MP Navigator MP Navigator contains menu for scanning documents to your computer and processing and saving them. For details on using the MP Navigator, see Software Guide. 1 2 3 4 Load the document on the Platen Glass.
6 Maintenance X Replacing An Ink Tank 1 Make sure the power is turned ON. 2 Lift the Scan Unit until it locks into place. 3 Open the Paper Output Tray. 4 Open the Inner Cover. CAUTION • Do not try to manually move or stop the Print Head Holder. • Do not touch any metal parts. 5 Hold the empty ink tank’s tab and pull forward to release. Lift out the ink tank. CAUTION • Do not remove the print head from the machine. • Remove one ink tank at a time.
CAUTION • Do not touch the ink port (B). • Do not shake or drop the ink tank as the ink may leak and stain your clothes or hands. • Do not attempt to reattach the protective cap once you remove it. • Do not place the ink port in contact with any other surface. (B) 7 Insert the ink tank into the empty slot on the print head. 8 9 If you need to replace another ink tank, repeat steps 5 to 7. Close the Inner Cover. CAUTION • Press the center of the Inner Cover until the cover locks into place.
7 Troubleshooting X Removing Jammed Paper If is displayed on the LCD, follow this procedure to clear the paper jam. Clearing Jams In The Paper Output Tray 1 Gently pull any jammed paper out of the Paper Output Tray. 2 Press [OK]. Clearing Jams From The Auto Sheet Feeder 1 Gently pull out any jammed paper from the Auto Sheet Feeder. 2 Press [OK]. X More Information For details on other troubleshooting, see User’s Guide.
Copyright This manual is copyrighted by Canon Inc. with all rights reserved. Under the copyright laws, this manual may not be reproduced in any form, in whole or in part, without the prior written consent of Canon Inc. © 2004 Canon Inc. Disclaimer Canon Inc. has reviewed this manual thoroughly in order that it will be an easy-to-use guide to your Canon MP130/110 Series.
Quick Start Guide Table of Contents Introduction The following ink tanks are compatible with this printer. For details on ink tank replacement, refer to “Maintenance” in this guide. HT7-0124-000-V.1.0 XX2004XX © CANON INC. 2004 PRINTED IN CHINA 7 Copying 12 Photo Printing From A Memory Card (MP130) 15 Printing from Your Computer 21 Scanning 23 Maintenance 24 Troubleshooting 26 ENG HT7-0124-000-V.1.