
Operation Manual


5.
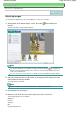
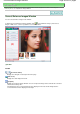
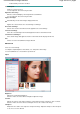
Drag to select the area you want to enhance, then click OK that appears over the
image.
Moles in and around the selected area are removed and the (Correction/Enhancement) mark
appears on the upper left of the image.
Note
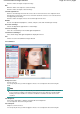
Click Undo to undo the preceding enhancement operation.
6.
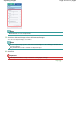
Click Save Selected Image or Save All Corrected Images.
You can save enhanced images as new files.
Note
To save only the image you like, click Save Selected Image. To save all images, click Save All
Corrected Images.
Only JPEG/Exif file format is available for enhanced images.
7.
Click Exit.
Important
The enhancements will be lost if you exit before saving enhanced images.
Page top
Page 201 of 817 pagesUsing the Blemish Remover Function