MX390 series Online kézikönyv Beolvasás magyar (Hungarian)
Beolvasás Beolvasás számítógépről Beolvasás az IJ Scan Utility segédprogrammal Beolvasás a használt szoftveralkalmazással (ScanGear) Hasznos információk letapogatáshoz Egyéb beolvasási módszerek Anyagok elhelyezése (számítógépről történő beolvasás esetén) Beolvasás a készülék kezelőpaneljének használatával A beolvasott adatok továbbítása a számítógépre a készülék kezelőpaneljének segítségével Alapszintű Értékek beállítása a készülék kezelőpaneljén Parancsokra adott válasz kiválasztása a kezelőpanelről, az I
Beolvasás számítógépről Beolvasás az IJ Scan Utility segédprogrammal Beolvasás a használt szoftveralkalmazással (ScanGear) Hasznos információk letapogatáshoz Egyéb beolvasási módszerek Anyagok elhelyezése (számítógépről történő beolvasás esetén)
Beolvasás a készülék kezelőpaneljének használatával A beolvasott adatok továbbítása a számítógépre a készülék kezelőpaneljének segítségével Alapszintű Értékek beállítása a készülék kezelőpaneljén Parancsokra adott válasz kiválasztása a kezelőpanelről, az IJ Scan Utility program segítségével
Beolvasás az IJ Scan Utility segédprogrammal Mi az IJ Scan Utility (lapolvasószoftver)? Az IJ Scan Utility elindítása Egyszerű letapogatás automatikus beolvasással Alapszintű Fotók szkennelése Dokumentumok szkennelése Szkennelés kedvenc beállításokkal Az üveglapnál nagyobb méretű anyagok beolvasása (Összefűzés-segítő) Több anyag egyidejű beolvasása Több dokumentum egyidejű beolvasása az ADF-ből (automatikus lapadagoló) Mentés a beolvasás eredményének ellenőrzése után Beolvasott képek küldése e-mailben A b
Mi az IJ Scan Utility (lapolvasószoftver)? Az IJ Scan Utility egy olyan alkalmazás, amely fényképek, dokumentumok stb. egyszerű beolvasását teszi lehetővé. Az IJ Scan Utility főképernyőjén bármely tevékenységet elvégezhet a beolvasástól a mentésig egyszerűen a megfelelő ikonra történő egyetlen kattintással.
Fontos Bizonyos funkciók csak a My Image Garden telepítésével válnak elérhetővé. Megjegyzés Az együttműködéshez választott alkalmazások beállításának ismertetését lásd: „A Beállítások párbeszédpanel”.
Az IJ Scan Utility elindítása Válassza a Start menü Minden program (All Programs) > Canon Utilities > IJ Scan Utility > IJ Scan Utility parancsát az IJ Scan Utility elindításához.
Egyszerű letapogatás automatikus beolvasással Könnyedén szkennelhet az elemtípus automatikus észlelésével. Fontos A következő típusok esetleg nem olvashatók be megfelelően. Ebben az esetben a ScanGear (lapolvasó illesztőprogram) alkalmazás teljes kép nézetében állítsa be a vágási kereteket (beolvasási területeket), majd ismételje meg a beolvasást. Fehéres hátterű fényképek Fehér lapra nyomtatott anyagok, kézzel írt dokumentumok, névjegyek stb.
Fotók szkennelése Az üveglapra helyezett fényképeket beolvashatja a fényképekhez alkalmas beállításokkal. 1. Helyezze a fényképet az üveglapra. Anyagok elhelyezése (számítógépről történő beolvasás esetén) 2. Indítsa el az IJ Scan Utility alkalmazást. Az IJ Scan Utility elindítása 3. Kattintson a Beáll.-ok... (Settings...) lehetőségre, válassza a Beállítások (Fényképbeolvasás) (Settings (Photo Scan)) párbeszédpanelt, majd szükség szerint állítsa be a papírméretet, a felbontást stb.
Dokumentumok szkennelése Az üveglapra helyezett dokumentumokat beolvashatja a dokumentumokhoz alkalmas beállításokkal. 1. Helyezze a beszkennelendő elemet az üveglapra. Anyagok elhelyezése (számítógépről történő beolvasás esetén) 2. Indítsa el az IJ Scan Utility alkalmazást. Az IJ Scan Utility elindítása 3. Kattintson a Beáll.-ok... (Settings...
Szkennelés kedvenc beállításokkal Az üveglapra helyezett dokumentumokat beolvashatja az előzetesen mentett kedvenc beállításaival. Ez a funkció a gyakran használt beállítások vagy a részletes beolvasási beállítások mentésére alkalmas. 1. Indítsa el az IJ Scan Utility alkalmazást. Az IJ Scan Utility elindítása 2. Kattintson a Beáll.-ok... (Settings...) lehetőségre, válassza a Beállítások (Egyéni beolvasás) (Settings (Custom Scan)) párbeszédpanelt, majd válassza ki a forrást, a felbontást stb.
Az üveglapnál nagyobb méretű anyagok beolvasása (Összefűzés-segítő) A nagyméretű dokumentumok jobb és bal oldali felét beolvashatja külön-külön, majd összefűzheti őket egy képpé. Az üveglapnál legfeljebb körülbelül kétszer nagyobb anyagok beolvasása támogatott. Megjegyzés A következő leírás azt ismerteti, hogyan olvashatja be a behelyezett dokumentum bal oldalát. 1. Indítsa el az IJ Scan Utility alkalmazást. Az IJ Scan Utility elindítása 2. Kattintson a Beáll.-ok... (Settings...
5. Győződjön meg róla, hogy a Beolvasási irány (Scan Direction) beállítás értéke Beolvasás balról (Scan from Left). 6. Helyezze az üveglapra fejjel lefelé fordítva az anyagnak azt az oldalát, amelyet a képernyő bal oldalán kíván megjeleníteni. 7. Kattintson az 1-es kép beolvasásának elindítása (Start Scanning Image 1) gombra.
Kattintson a Mégse (Cancel) gombra a beolvasás megszakításához. 10. Állítsa be a beolvasott képet a kívánt módon. Az eszköztár eszközeivel elforgathatja, nagyíthatja vagy kicsinyítheti a képeket, illetve húzással megváltoztathatja a helyüket. Megjegyzés A Vágási keretek beállítása (Adjust cropping frames) jelölőnégyzettel megadhatja a menteni kívánt területet.
A program menti az egyesített képet. Megjegyzés A Képek egyesítése (Image Stitch) ablak ismertetése a „A Képek egyesítése ablak” című témakörben található. A Beállítások (Beolvasás és egyesítés) (Settings (Scan and Stitch)) párbeszédpanelen speciális beolvasási beállításokat adhat meg, ehhez kattintson a Beáll.-ok... (Settings...) gombra.
Több anyag egyidejű beolvasása Beolvashat egyszerre az üveglapra helyezett két vagy több fotót (kis anyagot), majd külön képként mentheti őket. Fontos A következő típusok esetleg nem vághatók megfelelően. Ebben az esetben a ScanGear (lapolvasó illesztőprogram) alkalmazás teljes kép nézetében állítsa be a vágási kereteket (beolvasási területeket), majd ismételje meg a beolvasást. Fehéres hátterű fényképek Fehér lapra nyomtatott anyagok, kézzel írt dokumentumok, névjegyek stb.
5. A beolvasni kívánt anyagoknak megfelelően adja meg a Forrás kiválasztása (Select Source) értékét. 6. Válassza ki az Automatikus beolvasás (Auto scan) értéket a Papírméret (Paper Size) beállításnál, majd kattintson az OK gombra.
A IJ Scan Utility főképernyője újra megjelenik. Megjegyzés A Beállítások párbeszédpanelen megadható beállításokról a következő oldalakon olvashat. A Beállítások (Fényképbeolvasás) párbeszédpanel A Beállítások (Dokumentumbeolvasás) párbeszédpanel A Beállítások (Egyéni beolvasás) párbeszédpanel 7. Kattintson az Egyéni (Custom) gombra. Az anyagok egyszerre lesznek beolvasva. Megjegyzés Kattintson a Mégse (Cancel) gombra a beolvasás megszakításához. A beolvasott képek a Beáll.-ok... (Settings...
Több dokumentum egyidejű beolvasása az ADF-ből (automatikus lapadagoló) Helyezzen több dokumentumot az ADF-be (automatikus lapadagoló), és végezze el egy művelettel a beolvasást. Megjegyzés Egyszerre több dokumentumot olvashat be az ADF-ből, amikor az Automatikus (Auto), a Dokumentum (Document), az Egyéni (Custom) vagy a ScanGear beállítást használja a beolvasáshoz.
5. A beolvasni kívánt dokumentumoknak megfelelően adja meg a Forrás kiválasztása (Select Source) beállítás értékét. Ha csak a dokumentumok első oldalát szeretné beolvasni, válassza a Dokumentum (ADF/üveglap) (Document (ADF/Platen)) vagy a Dokumentum (ADF egyoldalas) (Document (ADF Simplex)) beállítást. A dokumentum első és hátoldalának beolvasásához válassza a Dokumentum (ADF kétoldalas) (Document (ADF Manual Duplex)) beállítást. 6.
Ha végzett a beállításokkal, kattintson az OK gombra. A IJ Scan Utility főképernyője újra megjelenik. Megjegyzés A Beállítások párbeszédpanelen megadható beállításokról a következő oldalakon olvashat. A Beállítások (Dokumentumbeolvasás) párbeszédpanel A Beállítások (Egyéni beolvasás) párbeszédpanel 7. Kattintson a Dokumentum (Document) gombra. Ezzel a letapogatás elindul. Megjegyzés Kattintson a Mégse (Cancel) gombra a beolvasás megszakításához.
Ha a Kötési oldal (Binding Side) beállítás Rövid szél (Short edge) lehetőségét választja kötési oldalnak a Dokum.beolv. tájolási beállításai... (Document Scan Orientation Settings...) beállításnál Helyezze el a dokumentumokat anélkül, hogy megváltoztatná a kimeneti dokumentumok tájolását. 9. Kattintson az OK gombra. Ezzel a letapogatás elindul. Megjegyzés Kattintson a Mégse (Cancel) gombra a beolvasás megszakításához. A beolvasott képek a Beáll.-ok... (Settings...
Mentés a beolvasás eredményének ellenőrzése után Ellenőrizheti a beolvasás eredményét, majd a számítógépre mentheti a képeket. Fontos Nem ellenőrizheti a beolvasás eredményét Automatikus (Auto) beolvasáskor vagy ha a kezelőpanelről olvas be. Megjegyzés Fényképek beolvasási képernyői szerepelnek példaként a következő leírásokban. 1. Indítsa el az IJ Scan Utility alkalmazást. Az IJ Scan Utility elindítása 2. Kattintson a Beáll.-ok... (Settings...) gombra. Megjelenik a Beállítások párbeszédpanel.
A IJ Scan Utility főképernyője újra megjelenik. Megjegyzés A Beállítások párbeszédpanelen megadható beállításokról a következő oldalakon olvashat. A Beállítások (Fényképbeolvasás) párbeszédpanel A Beállítások (Dokumentumbeolvasás) párbeszédpanel A Beállítások (Egyéni beolvasás) párbeszédpanel A Beállítások (Beolvasás és egyesítés) párbeszédpanel A Beállítások (ScanGear) párbeszédpanel 5. Kattintson a Fénykép (Photo) gombra. Ezzel a letapogatás elindul.
7. Kattintson az OK gombra. A letapogatott képek a beállításoknak megfelelően mentésre kerülnek.
Beolvasott képek küldése e-mailben A beolvasott képeket elküldheti e-mailben. Megjegyzés Fényképek beolvasási képernyői szerepelnek példaként a következő leírásokban. 1. Indítsa el az IJ Scan Utility alkalmazást. Az IJ Scan Utility elindítása 2. Kattintson a Beáll.-ok... (Settings...) gombra. Megjelenik a Beállítások párbeszédpanel. A Beállítások párbeszédpanel 3. Kattintson a Fényképbeolvasás (Photo Scan) gombra. 4.
Megjegyzés A csatoláshoz használni kívánt levelezőprogramokat a legördülő menüből választhatja ki. Ha a Nincs (csatolás kézzel) (None (Attach Manually)) beállítás van kiválasztva, kézzel csatolja e-mailhez a beolvasott és mentett képeket. 5. Kattintson az OK gombra. A IJ Scan Utility főképernyője újra megjelenik. Megjegyzés A Beállítások párbeszédpanelen megadható beállításokról a következő oldalakon olvashat.
A Beállítások (ScanGear) párbeszédpanel 6. Kattintson a Fénykép (Photo) gombra. Ezzel a letapogatás elindul. Ha a beolvasás befejeződik, elindul a megadott levelezőprogram, amelyben a képek egy új üzenethez lesznek csatolva. Megjegyzés Kattintson a Mégse (Cancel) gombra a beolvasás megszakításához. A beolvasott képek mentése a Beállítások párbeszédpanelen megadottak szerint történik.
A beolvasott képeken található szöveg felismerése (OCR) Beolvassa a szöveget a beolvasás alatt álló folyóiratokból és újságokból, majd megjeleníti azt a Jegyzettömb alkalmazásban (a Windows tartozéka). Megjegyzés Lehetősége van a szöveg kinyerésére, amikor a Dokumentum (Document), az Egyéni (Custom) vagy a ScanGear beállítást használja a beolvasáshoz. Dokumentumok beolvasási képernyői szerepelnek példaként a következő leírásokban. 1. Indítsa el az IJ Scan Utility alkalmazást.
Megjegyzés Ha a My Image Garden opciót választja, akkor az alkalmazás kinyeri a képben lévő szöveget a kép beolvasása után, és megjelenik a Jegyzettömb programban (amely a Windows tartozéka). 5. Kattintson az OK gombra. A IJ Scan Utility főképernyője újra megjelenik. Megjegyzés A Beállítások párbeszédpanelen megadható beállításokról a következő oldalakon olvashat. A Beállítások (Dokumentumbeolvasás) párbeszédpanel A Beállítások (Egyéni beolvasás) párbeszédpanel A Beállítások (ScanGear) párbeszédpanel 6.
Ezzel a letapogatás elindul. A beolvasás után a program menti a beolvasott képet a beállítások szerint, a kinyert szöveg pedig megjelenik a megadott alkalmazásban. Megjegyzés Kattintson a Mégse (Cancel) gombra a beolvasás megszakításához. A Jegyzettömb alkalmazásban (a Windows tartozéka) megjelenő szöveg csak tájékoztató jellegű. A következő dokumentumtípusok képeiben lévő szöveg lehet, hogy nem érzékelhető megfelelően.
Az IJ Scan Utility képernyői Az IJ Scan Utility főképernyője A Beállítások párbeszédpanel A Beállítások (Automatikus beolvasás) párbeszédpanel A Beállítások (Fényképbeolvasás) párbeszédpanel A Beállítások (Dokumentumbeolvasás) párbeszédpanel A Beállítások (Egyéni beolvasás) párbeszédpanel A Beállítások (Beolvasás és egyesítés) párbeszédpanel A Beállítások (ScanGear) párbeszédpanel A Beállítások (Mentés számítógépre (automatikus)) párbeszédpanel A Beállítások (Mentés számítógépre (fénykép)) párbeszédpanel A
Az IJ Scan Utility főképernyője Válassza a Start menü Minden program (All Programs) > Canon Utilities > IJ Scan Utility > IJ Scan Utility parancsát az IJ Scan Utility elindításához. Végezze el a műveletet a beolvasástól a mentésig egyszerűen a megfelelő ikonra történő kattintással. • Terméknév (Product Name) Megjeleníti annak a terméknek a nevét, amelyet az aktuális beállítás szerint az IJ Scan Utility használ.
A Beállítások párbeszédpanel A Beállítások párbeszédpanel három lapot tartalmaz: (Beolvasás számítógépről), (Beolvasás a kezelőpanel használatával) és (Általános beállítások). Amikor rákattint az egyik lapra, megváltozik a piros keretben megjelenített tartalom, és megadhatja az egyes lapokon elérhető funkciók speciális beállításait. (Beolvasás számítógépről) lap Megadhatja, hogy mi történjen az IJ Scan Utility programból vagy a My Image Garden alkalmazásból végzett beolvasás esetén.
(Általános beállítások) lap Megadhatja a használt terméket, az e-mail mellékletek fájlméretére vonatkozó korlátozást, a képek lévő szöveg felismeréséhez használt nyelvet, valamint a képek ideiglenes tárolásához használt mappát.
A Beállítások (Automatikus beolvasás) párbeszédpanel A Beállítások (Automatikus beolvasás) (Settings (Auto Scan)) párbeszédpanel megjelenítéséhez a (Beolvasás számítógépről) lapon kattintson az Automatikus beolvasás (Auto Scan) elemre. A Beállítások (Automatikus beolvasás) (Settings (Auto Scan)) párbeszédpanelen megadhatja a dokumentumtípus automatikus meghatározásával végzett beolvasás speciális beállításait.
Megjegyzés A moire minta csökkentéséhez a Beállítások (Dokumentumbeolvasás) (Settings (Document Scan)) vagy a Beállítások (Egyéni beolvasás) (Settings (Custom Scan)) párbeszédpanel Forrás kiválasztása (Select Source) beállításánál válassza a Magazin (Magazine) értéket, majd kattintson a Dokumentum (Document) vagy az Egyéni (Custom) elemre az IJ Scan Utility főképernyőjén.
Válassza ezt a lehetőséget a beolvasott képek helyesbítéséhez vagy javításához. Az alkalmazást a legördülő menüből választhatja ki. • Küldés egy alkalmazásnak (Send to an application) Válassza ezt a beállítást, ha a beolvasott képeket olyan alkalmazásban szeretné használni, amelyben böngészni vagy rendszerezni lehet a képeket. Az alkalmazást a legördülő menüből választhatja ki.
A Beállítások (Fényképbeolvasás) párbeszédpanel A Beállítások (Fényképbeolvasás) (Settings (Photo Scan)) párbeszédpanel megjelenítéséhez a (Beolvasás számítógépről) lapon kattintson az Fényképbeolvasás (Photo Scan) elemre. A Beállítások (Fényképbeolvasás) (Settings (Photo Scan)) párbeszédpanelen speciális beolvasási beállításokat adhat meg az olyan anyagok beolvasásához mint a fényképek.
Ha az Egyéni (Custom) méretet választja, megjelenik egy képernyő, amelyen megadhatja a papírméretet. Válasszon ki egy Mértékegység (Unit) opciót, adja meg a Szélesség (Width) és a Magasság (Height) értékeit, majd kattintson az OK gombra. Megjegyzés Kattintson az Alapértelmezés (Defaults) lehetőségre a megadott beállítások visszaállításához az alapértelmezett értékre. • Felbontás (Resolution) Adja meg a beolvasni kívánt anyag felbontását. Minél magasabb a felbontás (érték), annál részletesebb a kép.
Windows XP: Dokumentumok (My Documents) mappa Fontos Amikor a Beállítások párbeszédpanelt a My Image Garden szolgáltatásból jeleníti meg, ez a lehetőség nem jelenik meg. • Beolvasási eredmények ellenőrzése (Check scan results) Beolvasás után megjeleníti a Beállítások mentése (Save Settings) párbeszédpanelt. A Beállítások mentése párbeszédpanel Fontos Amikor a Beállítások párbeszédpanelt a My Image Garden szolgáltatásból jeleníti meg, ez a lehetőség nem jelenik meg.
A Beállítások (Dokumentumbeolvasás) párbeszédpanel A Beállítások (Dokumentumbeolvasás) (Settings (Document Scan)) párbeszédpanel megjelenítéséhez a (Beolvasás számítógépről) lapon kattintson a Dokumentumbeolvasás (Document Scan) elemre. A Beállítások (Dokumentumbeolvasás) (Settings (Document Scan)) párbeszédpanelen speciális beolvasási beállításokat adhat meg az olyan anyagok beolvasásához, mint a dokumentumok.
Megjegyzés Ha a Dokumentum (ADF/üveglap) (Document (ADF/Platen)) beállítás van kiválasztva, és az üveglapra és az ADF-be is helyezett dokumentumokat, a készülék az ADF-be helyezett dokumentumokat fogja beolvasni. • Színmód (Color Mode) Válassza ki a színmódot az anyag beolvasásához. Fontos A Fekete-fehér (Black and White) beállítás választásához törölje a Beolvasott képek tömörítése továbbításkor (Compress scanned images upon transfer) jelölőnégyzet jelölését.
• Beolvasott képek tömörítése továbbításkor (Compress scanned images upon transfer) Tömöríti a beolvasott képeket a számítógépre történő továbbításkor. Ez akkor hasznos, ha a lapolvasó vagy a nyomtató lassú interfésszel, például USB1.1-kapcsolattal van csatlakoztatva a számítógéphez. • Képfeldolgozás beállításai (Image Processing Settings) A következők beállításához kattintson a (plusz) gombra.
Dokumentumok, amelyek vízszintes és függőleges szöveget is tartalmaznak Különösen nagy vagy kicsi betűket tartalmazó dokumentumok Kevés szöveget tartalmazó dokumentumok Ábrákat vagy képeket tartalmazó dokumentumok Kézírásos szöveg Dokumentumok, amelyek vízszintes és függőleges vonalakat is tartalmaznak (táblázatok) Megjegyzés A beolvasás a szokásosnál hosszabb ideig tart, ha engedélyezi a Ferde szöveges dokumentumok javítása (Correct slanted text document) funkciót.
Fontos Amikor a Beállítások párbeszédpanelt a My Image Garden szolgáltatásból jeleníti meg, ez a lehetőség nem jelenik meg. • Beolvasási eredmények ellenőrzése (Check scan results) Beolvasás után megjeleníti a Beállítások mentése (Save Settings) párbeszédpanelt. A Beállítások mentése párbeszédpanel Fontos Amikor a Beállítások párbeszédpanelt a My Image Garden szolgáltatásból jeleníti meg, ez a lehetőség nem jelenik meg.
A Beállítások (Egyéni beolvasás) párbeszédpanel A Beállítások (Egyéni beolvasás) (Settings (Custom Scan)) párbeszédpanel megjelenítéséhez a (Beolvasás számítógépről) lapon kattintson az Egyéni beolvasás (Custom Scan) elemre. A Beállítások (Egyéni beolvasás) (Settings (Custom Scan)) párbeszédpanelen speciális beolvasási beállításokat adhat meg az egyéni igényei szerinti beolvasáshoz.
A4 méretű fotók A 2L méretnél (127 x 178 mm) (5 x 7 hüvelyk) kisebb szöveges dokumentumok, például a puhafedelű regények a gerinc kivágásával Vékony fehér papírra nyomtatott anyagok Hosszú, keskeny anyagok, például panorámafotók Tükröződő lemezcímkék beolvasása nem biztos, hogy a vártnak megfelelő lesz. Helyezze el megfelelően az anyagokat a beolvasni kívánt anyag típusa szerint. Máskülönben lehet, hogy az anyagok beolvasása nem lesz megfelelő.
Kattintson erre a gombra a Dokum.beolvasás tájolási beállításai (Document Scan Orientation Settings) párbeszédpanel megnyitásához, amelyen megadhatja az ADF használatával beolvasandó dokumentumok tájolását és kötési oldalát. Fontos A Kötési oldal (Binding Side) nem adható meg, ha csak a dokumentumok elülső oldalának beolvasása van beállítva. • Beolvasott képek tömörítése továbbításkor (Compress scanned images upon transfer) Tömöríti a beolvasott képeket a számítógépre történő továbbításkor.
Akkor jelölje be ezt a négyzetet, ha a dokumentum vagy magazin szövegét élesíteni kívánja a jobb olvashatóság érdekében. Fontos Csak akkor érhető el, ha a Beolvasott képek tömörítése továbbításkor (Compress scanned images upon transfer) jelölőnégyzet nincs bejelölve. A javítások miatt a kép színtónusa eltérhet az eredetitől. Ebben az esetben törölje a négyzet jelölését, és hajtsa végre a letapogatást. Megjegyzés A letapogatás a szokásosnál hosszabb ideig tart, ha engedélyezi ezt a funkciót.
Automatikusan elforgatja a képet a tájolás helyesbítéséhez a beolvasott dokumentum szövegének tájolása alapján. Fontos Csak a Beállítások (Általános beállítások) (Settings (General Settings)) párbeszédpanel Dokumentum nyelve (Document Language) beállításánál megadott nyelven írt szöveges dokumentumok támogatottak. A Beállítások (Általános beállítások) párbeszédpanel Előfordulhat, hogy a következő típusú beállításoknál vagy dokumentumoknál a tájolás nem javítható, mivel a szöveg nem észlelhető helyesen.
• Beolvasási eredmények ellenőrzése (Check scan results) Beolvasás után megjeleníti a Beállítások mentése (Save Settings) párbeszédpanelt. A Beállítások mentése párbeszédpanel Fontos Ez nem jelenik meg, ha a Forrás kiválasztása (Select Source) értéke Automatikus (Auto). Amikor a Beállítások párbeszédpanelt a My Image Garden szolgáltatásból jeleníti meg, ez a lehetőség nem jelenik meg.
A Beállítások (Beolvasás és egyesítés) párbeszédpanel A Beállítások (Beolvasás és egyesítés) (Settings (Scan and Stitch)) párbeszédpanel megjelenítéséhez a (Beolvasás számítógépről) lapon kattintson az Beolvasás és egyesítés (Scan and Stitch) elemre. A Beállítások (Beolvasás és egyesítés) (Settings (Scan and Stitch)) párbeszédpanelen speciális beolvasási beállításokat adhat meg az üveglapnál nagyobb anyagok beolvasásához.
Adja meg a beolvasni kívánt anyag felbontását. Minél magasabb a felbontás (érték), annál részletesebb a kép. Felbontás • Képfeldolgozás beállításai (Image Processing Settings) A következők beállításához kattintson a (plusz) gombra. Az elérhető beállítási lehetőségek a Forrás kiválasztása (Select Source) értékétől függenek. Fontos A Képfeldolgozás beállításai (Image Processing Settings) nem használható, ha a Színmód (Color Mode) értéke Fekete-fehér (Black and White).
Amikor a Beállítások párbeszédpanelt a My Image Garden szolgáltatásból jeleníti meg, ez a lehetőség nem jelenik meg. • Beolvasási eredmények ellenőrzése (Check scan results) Beolvasás után megjeleníti a Beállítások mentése (Save Settings) párbeszédpanelt. A Beállítások mentése párbeszédpanel Fontos Amikor a Beállítások párbeszédpanelt a My Image Garden szolgáltatásból jeleníti meg, ez a lehetőség nem jelenik meg.
A Beállítások (ScanGear) párbeszédpanel A Beállítások (ScanGear) (Settings (ScanGear)) párbeszédpanel megjelenítéséhez a számítógépről) lapon kattintson a ScanGear elemre. (Beolvasás A Beállítások (ScanGear) (Settings (ScanGear)) párbeszédpanelen megadhatja a képek mentési beállításait a ScanGear (lapolvasó illesztőprogram) használatával beolvasott anyagokhoz, valamint azt, hogy mi történjen a mentésük után.
Erre a gombra kattintva jelenítheti meg az Adatformátum-beállítások (Data Format Settings) párbeszédpanelt, amelyen megadhatja a mentendő képek minőségét, beállíthatja a PDF-fájlok kulcsszavas keresését és tömörítési típusát, illetve kiválaszthatja az automatikus módban beolvasott képek mentéséhez használandó adatformátumot. Az Adatformátum-beállítások párbeszédpanel • Mentés ide (Save in) Megjeleníti azt a mappát, ahová a letapogatott képek mentésre kerülnek.
Az alkalmazást a legördülő menüből választhatja ki. • Ne indítson el alkalmazást (Do not start any application) A képeket a Mentés ide (Save in) beállításnál megadott mappába menti. Megjegyzés Adja meg az alkalmazást vagy a mappát a legördülő menü Hozzáadás... (Add...) elemének választásával megjeleníthető Alkalmazás választása (Select Application) vagy Célmappa választása (Select Destination Folder) párbeszédpanelen. • Utasítások (Instructions) Megnyitja ezt a kézikönyvet.
A Beállítások (Mentés számítógépre (automatikus)) párbeszédpanel A Beállítások (Mentés számítógépre (automatikus)) (Settings (Save to PC (Auto))) párbeszédpanel megjelenítéséhez kattintson a Mentés számítógépre (automatikus) (Save to PC (Auto)) gombra a (Beolvasás a kezelőpanel használatával) lapon.
• Képfeldolgozás beállításai (Image Processing Settings) A következők beállításához kattintson a (plusz) gombra. • Ajánlott képjavítások alkalmazása (Apply recommended image correction) Automatikusan alkalmazza az anyag típusának megfelelő javításokat. Fontos A javítások miatt a kép színtónusa eltérhet az eredetitől. Ebben az esetben törölje a négyzet jelölését, és hajtsa végre a letapogatást. Megjegyzés A letapogatás a szokásosnál hosszabb ideig tart, ha engedélyezi ezt a funkciót.
Válassza ezt a lehetőséget a beolvasott képek helyesbítéséhez vagy javításához. Az alkalmazást a legördülő menüből választhatja ki. • Küldés egy alkalmazásnak (Send to an application) Válassza ezt a beállítást, ha a beolvasott képeket olyan alkalmazásban szeretné használni, amelyben böngészni vagy rendszerezni lehet a képeket. Az alkalmazást a legördülő menüből választhatja ki.
A Beállítások (Mentés számítógépre (fénykép)) párbeszédpanel A Beállítások (Mentés számítógépre (fénykép)) (Settings (Save to PC (Photo))) párbeszédpanel megjelenítéséhez kattintson a Mentés számítógépre (fénykép) (Save to PC (Photo)) gombra a (Beolvasás a kezelőpanel használatával) lapon. A Beállítások (Mentés számítógépre (fénykép)) (Settings (Save to PC (Photo))) párbeszédpanelen megadhatja, hogy mi történjen, amikor a kezelőpanelről történő beolvasás után fényképként menti a képeket a számítógépre.
Írja be a menteni kívánt kép fájlnevét. Fájl mentésekor a megadott fájlnévhez a dátum és 4 számjegy lesz hozzáfűzve „_20XX0101_0001” formátumban. • Adatformátum (Data Format) Beállítva a kezelőpanelről. • Beáll.-ok... (Settings...) Kattintson az Adatformátum-beállítások (Data Format Settings) párbeszédpanel megjelenítéséhez, amelyen beállíthatja a képek mentési minőségét, a PDF fájlok keresési kulcsszavait, valamint az adatformátumot az Automatikus beolvasással beolvasott képek mentéséhez.
A Beállítások (Mentés számítógépre (dokumentum)) párbeszédpanel A Beállítások (Mentés számítógépre (dokumentum)) (Settings (Save to PC (Document))) párbeszédpanel megjelenítéséhez kattintson a Mentés számítógépre (dokumentum) (Save to PC (Document)) gombra a (Beolvasás a kezelőpanel használatával) lapon.
• Beolvasott képek tömörítése továbbításkor (Compress scanned images upon transfer) Tömöríti a beolvasott képeket a számítógépre történő továbbításkor. Ez akkor hasznos, ha a lapolvasó vagy a nyomtató lassú interfésszel, például USB1.1-kapcsolattal van csatlakoztatva a számítógéphez. • Képfeldolgozás beállításai (Image Processing Settings) A következők beállításához kattintson a (plusz) gombra.
Kevés szöveget tartalmazó dokumentumok Ábrákat vagy képeket tartalmazó dokumentumok Kézírásos szöveg Dokumentumok, amelyek vízszintes és függőleges vonalakat is tartalmaznak (táblázatok) Megjegyzés A beolvasás a szokásosnál hosszabb ideig tart, ha engedélyezi a Ferde szöveges dokumentumok javítása (Correct slanted text document) funkciót.
A mappát a legördülő menüből választhatja ki. • Ne indítson el alkalmazást (Do not start any application) A képeket a Mentés ide (Save in) beállításnál megadott mappába menti. Megjegyzés Adja meg az alkalmazást vagy a mappát a legördülő menü Hozzáadás... (Add...) elemének választásával megjeleníthető Alkalmazás választása (Select Application) vagy Célmappa választása (Select Destination Folder) párbeszédpanelen. • Utasítások (Instructions) Megnyitja ezt a kézikönyvet.
A Beállítások (Általános beállítások) párbeszédpanel A Beállítások (Általános beállítások) (Settings (General Settings)) párbeszédpanel megjelenítéséhez kattintson az (Általános beállítások) lapra. A Beállítások (Általános beállítások) (Settings (General Settings)) párbeszédpanelen megadhatja a használt terméket, az e-mail mellékletek fájlméretére vonatkozó korlátozást, a képek lévő szöveg felismeréséhez használt nyelvet, valamint a képek ideiglenes tárolásához használt mappát.
Az Adatformátum-beállítások párbeszédpanel Az Adatformátum-beállítások (Data Format Settings) párbeszédpanelt a következő műveletek valamelyikének végrehajtásával jelenítheti meg. • A Beállítások párbeszédpanel lapjain a Beállítások mentése (Save Settings) elemhez tartozó Beállítások... (Settings...) elemre kattinthat.
Normál (Standard) beállítással lesznek mentve akkor is, ha a Magas (High) beállítás van megadva. • Az automatikus beolvasáskor dokumentumként felismert elemek formátuma (Format for Item Detected as Document in Auto Scan) Megadhatja az automatikus beolvasás közben dokumentumként felismert eredeti példányok automatikus mentéséhez használandó adatformátumot.
A Beállítások mentése párbeszédpanel Ha a beolvasást követően meg szeretné jeleníteni a Beállítások mentése (Save Settings) párbeszédpanelt, jelölje be a Beolvasási eredmények ellenőrzése (Check scan results) jelölőnégyzetet a Beállítások párbeszédpanel Beállítások mentése (Save Settings) részében. A beolvasási eredmények indexképeinek megtekintése közben megadhatja az adatformátumot és a célt.
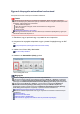
(3) Mentési beállítások terület • Fájlnév (File Name) Írja be a menteni kívánt kép fájlnevét. Fájl mentésekor a megadott fájlnévhez a dátum és 4 számjegy lesz hozzáfűzve „_20XX0101_0001” formátumban. • Adatformátum (Data Format) Megadja a beolvasott képek mentésekor használt adatformátumot. A választható lehetőségek: JPEG/Exif, TIFF, PNG, PDF vagy PDF (több oldal) (PDF (Multiple Pages)). Fontos A PDF vagy a PDF (több oldal) (PDF (Multiple Pages)) beállítás nem választható a következő esetekben.
A Képek egyesítése ablak A Képek egyesítése (Image Stitch) ablak megjelenítéséhez az IJ Scan Utility főképernyőjén kattintson az Egyesítés (Stitch) elemre. A nagyméretű dokumentumok jobb és bal oldali felét beolvashatja külön-külön, majd összefűzheti a két részt egy képpé. Az üveglapnál legfeljebb körülbelül kétszer nagyobb anyagok olvashatók le.
• Beolvasás jobbról (Scan from Right) A jobb oldalon jeleníti meg az első beolvasott képet. • 1-es beolvasott kép (Scan Image 1) • 1-es kép beolvasásának elindítása (Start Scanning Image 1) Beolvassa az első részt. • 2-es beolvasott kép (Scan Image 2) • 2-es kép beolvasásának elindítása (Start Scanning Image 2) Beolvassa a második részt. • Vágási keretek beállítása (Adjust cropping frames) A megtekintési területen beállíthatja a beolvasási területet.
Két beolvasott képet egy képként ment. • Mégse (Cancel) Megszakítja az Egyesítés (Stitch) beállítással végrehajtott beolvasást. (2) Eszköztár • Eszköztár Törölheti a beolvasott képeket vagy módosíthatja az előzetesen megtekintett képeket. • (Törlés) Törli a beolvasott képet. • (Nagyítás/kicsinyítés) Nagyíthatja vagy kicsinyítheti az előnézeti képet. A megjelenített kép nagyításához kattintson az egér bal gombjával a megtekintési területre.
• Az 1-es kép beolvasásának elindítása (Start Scanning Image 1) elemre kattintva beolvasott első rész A lapolvasó beolvassa a képet a Beolvasási irány (Scan Direction) beállításnál megadott irányban, és a 2 számot jeleníti meg mellette. • A 2-es kép beolvasásának elindítása (Start Scanning Image 2) elemre kattintva beolvasott második rész Megjelenik a két beolvasott kép.
Beolvasás a használt szoftveralkalmazással (ScanGear) Mi a ScanGear (Lapolvasó illesztőprogram)? Beolvasás a ScanGear (Lapolvasó illesztőprogram) speciális beállításaival A ScanGear (Lapolvasó illesztőprogram) indítása Letapogatás Alap módban Letapogatás Különleges módban Több dokumentum letapogatása az ADF-ből (Automatikus lapadagoló) Különleges módban Több dokumentum egyidejű letapogatása a ScanGear (Lapolvasó illesztőprogram) alkalmazással Képek javítása és a színek beállítása a ScanGear (Lapolvasó illes
Mi a ScanGear (Lapolvasó illesztőprogram)? A ScanGear (lapolvasó illesztőprogram) egy dokumentumok beolvasásához szükséges szoftver. Lehetővé teszi a kimeneti méret megadását és képkorrekciók végzését a letapogatás során. A ScanGear elindítható a My Image Garden vagy az IJ Scan Utility alkalmazásból. Elindítható más olyan alkalmazásokból is, amelyek kompatibilisek a TWAIN nevű szabványos felülettel. (A ScanGear egy TWAIN-kompatibilis illesztőprogram.
Beolvasás a ScanGear (Lapolvasó illesztőprogram) speciális beállításaival A ScanGear (Lapolvasó illesztőprogram) indítása A ScanGear (Lapolvasó illesztőprogram) indítása Dokumentumok letapogatása egyszerű képkorrekciók után Letapogatás Alap módban Dokumentumok letapogatása speciális képkorrekciók és fényesség-/színigazítások után Letapogatás Különleges módban Az ADF-be (automatikus lapadagoló) helyezett több dokumentum egyidejű beolvasása a képek speciális korrekciója, valamint a világosság és a színek beál
A ScanGear (Lapolvasó illesztőprogram) indítása A ScanGear (lapolvasó illesztőprogram) használatával képkorrekciót és színigazítást végezhet a beolvasás során. A ScanGear elindítható a My Image Garden vagy egy másik alkalmazásból. Megjegyzés Állítsa be a hálózati környezetet, ha egynél több lapolvasója van, illetve ha hálózatkompatibilis modellje van, és USB-kapcsolatról hálózati kapcsolatra váltott.
Letapogatás Alap módban Az Alap mód (Basic Mode) lap segítségével egyszerűen végezheti el a beolvasást a képernyőn megjelenő lépések végrehajtásával. Tudnivalók a több dokumentum egyszerre történő beolvasásáról a tálcáról: „Több dokumentum egyidejű letapogatása a ScanGear (Lapolvasó illesztőprogram) alkalmazással”. Ha a beolvasást az ADF-ből (automatikus lapadagoló) végzi, akkor a dokumentumok beolvasása előnézet nélkül történik.
Megjegyzés Sok színes képet tartalmazó folyóiratok beolvasásához válassza a Magazin (Színes) (Magazine (Color)) elemet. Auto kétoldalas ADF-fel rendelkező modell használatakor a Beállítások (Preferences) párbeszédpanel Letapogatás (Scan) lapján a ADF kétoldalas papírkimeneti beállítások (ADF Duplex Paper Output Settings) pontjában megadható, hogy milyen legyen a papír kimenete olyankor, amikor az ADF-ből mindkét oldal beolvasása történik. Letapogatás lap 3. Kattintson a Megtekintés (Preview) gombra.
Megjegyzés Kattintson ide (Információ), ha meg szeretne nyitni egy párbeszédpanelt, ahol ellenőrizni tudja a jelenlegi letapogatási beállításokat (dokumentum típusa stb.). A ScanGear beolvasás utáni válasza A ScanGear párbeszédpanel állapota a letapogatás után (Status of ScanGear dialog after scanning) opciónál, a Letapogatás (Scan) lapon, a Beállítások (Preferences) párbeszédpanelen adható meg.
Letapogatás Különleges módban A Különleges mód (Advanced Mode) lap használatával történő beolvasáskor megadhatja a színes módot, a kimeneti felbontást, a kép fényességét, a színtónust stb. Több dokumentum egyszeri szkenneléséről lásd: „Több dokumentum egyidejű letapogatása a ScanGear (Lapolvasó illesztőprogram) alkalmazással". Az ADF-be (automatikus lapadagoló) helyezett több dokumentum egyidejű beolvasásáról lásd: „Több dokumentum letapogatása az ADF-ből (Automatikus lapadagoló) Különleges módban”.
4. Kattintson a Megtekintés (Preview) gombra. Megjelenik a megtekintési területen a kép egy megtekintési képe. 5. Állítsa be a Kimeneti beállítások (Output Settings) értékét. Kimeneti beállítások 6. Szükség szerint állítsa be a vágási keretet (letapogatási területet), javítsa a képet vagy állítsa be a színeket. Vágási keretek beállítása (ScanGear) Kép beállításai Színbeállítás gombok 7. Kattintson a Letapogatás (Scan) gombra. Ezzel a letapogatás elindul.
Több dokumentum letapogatása az ADF-ből (Automatikus lapadagoló) Különleges módban A Különleges mód (Advanced Mode) lapon megadhatja a képek világosságát, színtónusát stb., és a dokumentumokat az ADF-be (automatikus lapadagoló) helyezve egyidejűleg beolvashatja őket. Auto kétoldalas ADF-fel rendelkező modellek használatakor a dokumentumok mindkét oldala automatikusan beolvasható az ADF-ből. Ha a beolvasást az ADF-ből végzi, akkor a dokumentumok beolvasása előnézet nélkül történik. 1.
4. Állítsa be a Kimeneti beállítások (Output Settings) értékét. Kimeneti beállítások 5. Végezze el a kívánt képkorrekciókat és színigazításokat. Kép beállításai Színbeállítás gombok 6. Kattintson a Letapogatás (Scan) gombra. Ezzel a letapogatás elindul. Megjegyzés Kattintson ide (Információ), ha meg szeretne nyitni egy párbeszédpanelt, ahol ellenőrizni tudja a jelenlegi letapogatási beállításokat (dokumentum típusa stb.).
Több dokumentum egyidejű letapogatása a ScanGear (Lapolvasó illesztőprogram) alkalmazással Az Alap mód (Basic Mode) és Különleges mód (Advanced Mode) lapon egyszerre beolvashatja az üveglapra helyezett két vagy több fotót (kis dokumentumot). Ebben a részben elmagyarázzuk, hogyan lehet letapogatni több dokumentumot az Alap mód (Basic Mode) lapon. Fontos Ha több dokumentumot szeretne beolvasni egyetlen képként, a letapogatást teljes kép nézetben hajtsa végre.
3. Kattintson a Megtekintés (Preview) gombra. A megtekintési területen megjelennek a képek indexképei. A vágási keretek meghatározása automatikusan történik a dokumentum méretének megfelelően. 4. Állítsa be a Cél (Destination) értékét. 5. A célnak megfelelően határozza meg a Kimeneti méret (Output Size) beállítást. 6. Állítsa be a vágási kereteket, és adja meg szükség szerint a Képkorrekciók (Image corrections) beállításokat. Megjegyzés A képek javítását egymástól függetlenül is elvégezheti.
Megjegyzés Ha a teljes kép van megjelenítve, az ikon (Teljes kép) alakúra változik. 2. Állítsa be a Cél (Destination) értékét. 3. A célnak megfelelően határozza meg a Kimeneti méret (Output Size) beállítást. Az Oldalarány felcserélése (Invert aspect ratio) funkció akkor áll rendelkezésre, ha a Kimeneti méret (Output Size) nem Rugalmas (Flexible) értékű. Kattintson erre a gombra a vágási keret elforgatásához. Kattintson újra az eredeti tájolás visszaállításához. 4. Állítsa be a vágási kereteket.
Képek javítása és a színek beállítása a ScanGear (Lapolvasó illesztőprogram) segítségével Rosszul fókuszált fényképek élesítése, por és karcolások csökkentése, halvány színek javítása Képek javítása (Élesítő maszk, Por és karcolások csökkentése, Halványulási korrekció stb.
Képek javítása (Élesítő maszk, Por és karcolások csökkentése, Halványulási korrekció stb.) A ScanGear (lapolvasó illesztőprogram) Különleges mód (Advanced Mode) lapjának Kép beállításai (Image Settings) funkciói képek beolvasásakor a tárgyak körvonalának kiemelését, a foltok, karcolások csökkentését és a halvány színek javítását teszik lehetővé. Beállítási lehetőségek Kattintson az eszközhöz tartozó nyílra, és válasszon egy elemet a legördülő menüről.
A szövegdokumentumok átlátszóságának csökkentése, illetve az újrahaszonosított papír, újságpapír stb. alapszínének világosítása dokumentumok szkennelésekor Állítsa az Átnéző csökkentése (Reduce Show-through) beállítást BE (ON) értékre. KI (OFF) BE (ON) Rosszul fókuszált képek élesítése Állítsa az Élesítő maszk (Unsharp Mask) értékét BE (ON) állásra. KI (OFF) BE (ON) Átmenetek és vonalas minták csökkentése Állítsa a Rácshiba eltávolítása (Descreen) értékét BE (ON) állásra.
Nincs (None) Közepes (Medium) Azon fotók javítása, melyek az idővel kifakultak vagy túlszínezettségük van Állítsa a Halványulási korrekció (Fading Correction) lehetőséget Kicsi (Low), Közepes (Medium) vagy Nagy (High) értékre a fakulás vagy túlszínezettség mértékének megfelelően. Nincs (None) Közepes (Medium) Szemcsék csökkentése Állítsa a Szemcsekorrekció (Grain Correction) lehetőséget Kicsi (Low), Közepes (Medium) vagy Nagy (High) értékre a szemcsézettség mértékének megfelelően.
Színek beállítása a színmintázat segítségével A ScanGear (lapolvasó illesztőprogram) Alap mód (Basic Mode) lapjának színmintázat funkciójával előzetesen megtekintheti a színek módosítását, és visszaadhatja a természetes színeket. Színigazítás Javítja azokat a színeket, melyek az idővel kifakultak vagy túlszínezettségük van. „Túlszínezettség” esetén egy adott szín meghatározza az egész kép színvilágát az időjárás vagy erős környezeti színek miatt.
Az alábbi példa egy kékes kép javítását mutatja. Mivel a Kék (Blue) és a Zöld (Green) színek túl erősek, javításukhoz kattintson a Sárga (Yellow) és a Bíbor (Magenta) nyilakra. Előtte Utána Megjegyzés A színbeállítások csak a vágási keretekre (beolvasási területekre) vagy az indexkép nézetben kiválasztott képkockára vonatkoznak. Több képkockát vagy vágási keretet is kiválaszthat, ha a Ctrl billentyű lenyomása közben kattint rájuk.
A telítettség és a színegyensúly beállítása Kattintson a ScanGear (lapolvasó illesztőprogram) Különleges mód (Advanced Mode) lapján a (Telítettség/Színegyensúly) gombra. Megjegyzés Az aktuális ablak összes beállításának visszaállításához kattintson az Alapért. (Defaults) pontra. Telítettség Állítsa be a kép telítettségét (élénkség). Fényesítheti azokat a színeket, melyek az idővel kifakultak stb.
(1) Világos terület Több adat oszlik meg a világos részen. (2) Sötét terület Több adat oszlik meg az árnyas részen. (3) Teljes kép Az adatok széles tartományban oszlanak meg a világos és a sötétebb részek között. Hisztogramok beállítása (A csúszka használata) Válasszon ki egy Csatorna (Channel) opciót, majd állítsa be az árnyék és a világos részek szintjét a (Fekete-pont) csúszka, illetve a (Fehér-pont) csúszka mozgatásával. - Minden rész, amely balra van a (Fekete pont) csúszkától, fekete lesz (0.
A Középpont-csúszka mozgatása A középpont csúszka mozgatásával állítsa be a tónustartomány közepének szintjét. Képek több megoszló adattal a világos részen Mozgassa a középpont csúszkát a világos oldal felé. Képek több megoszló adattal az árnyas részen Mozgassa a középpont csúszkát az árnyas oldal felé.
A tónusgörbe beállítása Kattintson a ScanGear (lapolvasó illesztőprogram) Különleges mód (Advanced Mode) lapján a (Tónusgörbe-beállítások) ikonra. Megjegyzés Az aktuális ablak összes beállításának visszaállításához kattintson az Alapért. (Defaults) pontra. Csatorna A kép minden pontja a piros, a zöld és a kék adott arányú (gradiens) keveréke. Ezek a színek egyenként, „csatornaként” állíthatók. • Mester (Master) A piros, a zöld és a kék színt együtt állítja be. • Piros (Red) A Piros csatornát állítja be.
A tónusgörbe beállítása A Tónusgörbe kiválasztása (Select Tone Curve) listában válasszon egy tónusgörbét a Nincs korrekció (No correction), Túlexponált (Overexposure), Alulexponált (Underexposure), Nagy kontraszt (High contrast), Negatív/pozitív filmek megfordítása (Reverse the negative/positive image) és az Egyéni görbe szerkesztése (Edit custom curve) lehetőségek közül.
Egyéni görbe szerkesztése (Edit custom curve) Megfoghatja a Tónusgörbe bizonyos pontjait, mellyel szabadon állíthatja a megfelelő terület fényességét.
A küszöb beállítása A színes és szürkeárnyalatos képeken a fényesség egy 0 és 255 közötti értékkel van kifejezve. Feketefehér kép létrehozásakor azonban a színek fekete (0) vagy fehér (255) színre vannak leképezve. A küszöb egy határvonal, amely egy színt feketének vagy fehérnek határoz meg. A küszöb szintjének állításával szöveges dokumentumban élesítheti a szöveget, vagy csökkentheti az átütés hatását újságoknál.
A ScanGear (Lapolvasó illesztőprogram) képernyői Alap mód lap Különleges mód lap Bemeneti beállítások Kimeneti beállítások Kép beállításai Színbeállítás gombok Beállítások párbeszédpanel Lapolvasó lap Megtekintés lap Letapogatás lap Színbeállítások lap
Alap mód lap Ezen mód segítségével a képernyőn megjelenő lépéseket követve könnyedén elvégezheti a letapogatást. Ez a szakasz az Alap mód (Basic Mode) lapon elérhető beállításokat és funkciókat írja le. Ha a beolvasást az ADF-ből (automatikus lapadagoló) végzi, akkor a dokumentumok beolvasása előnézet nélkül történik. (1) Beállítások és műveleti gombok (2) Eszköztár (3) Megtekintési terület Megjegyzés A megjelenített elemek a dokumentum típusától és a nézettől függnek.
Fekete-fehérben olvassa be az ADF-be helyezett dokumentumok mindkét oldalát. A dokumentumok letapogatása a hosszú szél menti kötésnek megfelelő formátumban történik, az ADF-hez érő végük a felső végük. Fontos Bizonyos alkalmazások nem támogatják az ADF-ből történő folytonos beolvasást. Részleteket az alkalmazás kézikönyvében talál. Megjegyzés Amikor kiválaszt egy dokumentumtípust, bekapcsol az élesítő maszk funkció.
Indexkép nézetben Az indexképeken az egér húzásával jeleníthet meg vágási keretet. Ha a vágási keret meg van jelenítve, a képnek csak a kereten belüli része lesz letapogatva. Ha nincs megjelenített vágási keret, minden keret önálló képként lesz beolvasva. Teljes kép nézetben Ha nincs vágási keret, a teljes megtekintési terület le lesz tapogatva. Ha a vágási keret meg van jelenítve, a képnek csak a kereten belüli része lesz letapogatva. • Papírméret (L, A4 stb.) Válasszon ki egy kimeneti papírméretet.
• Oldalarány felcserélése (Invert aspect ratio) Akkor érhető el, ha a Kimeneti méret (Output Size) beállítása nem Rugalmas (Flexible). Kattintson erre a gombra a vágási keret elforgatásához. Kattintson újra az eredeti tájolás visszaállításához. • Vágási keretek beállítása (Adjust cropping frames) A megtekintési területen lehet beállítani a letapogatási területet. Ha nincs terület megadva, a dokumentum a dokumentumméret szerint lesz letapogatva (Automatikus vágás).
• Bezárás (Close) A ScanGear (lapolvasó illesztőprogram) bezárása. (2) Eszköztár • Eszköztár Módosíthatja és forgatja a megtekintési képeket. Az eszköztár megjelenített gombjai a nézettől függnek. Indexkép nézetben Teljes kép nézetben • (Indexkép) / (Teljes kép) Átváltja a megtekintési terület nézetét. Megtekintési terület • (Forgatás balra) A megtekintési képet 90 fokkal elfordítja az óramutató járásával ellenkező irányban. - Az eredmény tükröződik majd a letapogatott képen.
• (Információk) A ScanGear program verziójának és a jelenlegi beolvasási beállításoknak a megjelenítése. • (Útmutató megnyitása) Megnyitja ezt az oldalt. (3) Megtekintési terület • Megtekintési terület Ez az a terület, ahol egy próbakép megjelenik a Megtekintés (Preview) gombra kattintva. Itt ellenőrizheti a „Beállítások és műveleti gombok” részben ismertetett beállítások (képkorrekciók, színigazítások stb.) eredményét is.
Megjegyzés Megadhatja a vágási keretet a megjelenített képen. Az indexkép nézetben képenként csak egy vágási keretet lehet megadni. A teljes kép nézetben több vágási keret is megadható.
Különleges mód lap Lehetővé teszi olyan speciális beállítások megadását, mint a színmód, a kimeneti felbontás, a kép fényessége és a színtónus. Ez a szakasz a Különleges mód (Advanced Mode) lapon elérhető beállításokat és funkciókat írja le. Ha a beolvasást az ADF-ből (automatikus lapadagoló) végzi, akkor a dokumentumok beolvasása előnézet nélkül történik.
Lépjen be a Név beállítása (Setting Name) menübe és kattintson rá a Hozzáadás (Add) gombra; megjelenik a név a Kedvenc beállítások listája (Favorite Settings List) listában. Ha a Mentés (Save) gombra kattint, az elem megjelenik Kedvenc beállítások (Favorite Settings) listán, ahol kiválasztható az előre megadott beállításokkal együtt. A Kedvenc beállítások listája (Favorite Settings List) egy elemének törléséhez válassza azt ki, majd kattintson a Törlés (Delete) gombra.
• Letapogatás (Scan) A beolvasás elkezdése. Megjegyzés Miután a letapogatás elkezdődött, a program jelzi annak előrehaladását. Kattintson a Mégse (Cancel) gombra a letapogatás megszakításához. Ha a letapogatás befejeződött, egy párbeszédpanel jelenik meg, melyben kiválaszthatja a következő műveletet. Kövesse a felszólításokat a befejezéshez.
Átváltja a megtekintési terület nézetét. Megtekintési terület • (Törlés) Törli a megtekintési képet a Megtekintés területről. Az eszköztárat és a színbeállításokat is visszaállítja. • (Vágás) Lehetővé teszi a letapogatási terület egérrel való kijelölését. • (Kép mozgatása) Lehetővé teszi a kép húzását, amíg a kívánt rész meg nem jelenik, ha a Megtekintés területen látható nagyított kép nem fér el a képernyőn. A képet a gördítősávokkal is mozgathatja.
• (Útmutató megnyitása) Megnyitja ezt az oldalt. (3) Megtekintési terület • Megtekintési terület Ez az a terület, ahol egy próbakép megjelenik a Megtekintés (Preview) gombra kattintva. Itt ellenőrizheti a „Beállítások és műveleti gombok” részben ismertetett beállítások (képkorrekciók, színigazítások stb.) eredményét is. Ha az (Indexkép) gomb látható az eszköztáron A vágási keretek a dokumentum mérete szerint vannak beállítva, és a beolvasott képek indexképe látható.
Megjegyzés Megadhatja a vágási keretet a megjelenített képen. Az indexkép nézetben képenként csak egy vágási keretet lehet megadni. A teljes kép nézetben több vágási keret is megadható.
Bemeneti beállítások A Bemeneti beállítások (Input Settings) segítségével állíthatja be a következő elemeket: • Forrás kiválasztása (Select Source) Megjelenik a letapogatni kívánt dokumentum típusa. A tálcáról történő beolvasáshoz válassza a Tálca (Platen) lehetőséget; ADF (automatikus lapadagoló) használatakor válassza a Dokum. (ADF egyoldalas) (Document (ADF Simplex)) vagy a Dokum. (ADF kétoldalas) (Document (ADF Duplex)) értéket.
A Tájolás (Orientation) párbeszédpanel megnyitásához kattintson a Beállítások... (Settings...) gombra. Fontos A Tájolás (Orientation) párbeszédpanel csak akkor nyitható meg, ha a Forrás kiválasztása (Select Source) értéke Dokum. (ADF egyoldalas) (Document (ADF Simplex)) vagy Dokum. (ADF kétoldalas) (Document (ADF Duplex)). A Kötés helye (Binding Location) nem adható meg, ha a Forrás kiválasztása (Select Source) Dokum. (ADF egyoldalas) (Document (ADF Simplex)).
A vágási keretekről lásd a „Vágási keretek beállítása (ScanGear)” részt.
Kimeneti beállítások A Kimeneti beállítások (Output Settings) segítségével állíthatja be a következő elemeket: • Kimeneti felbontás (Output Resolution) Adja meg a letapogatási felbontást. Minél magasabb a felbontás (érték), annál részletesebb a kép. A gombra való kattintással válasszon ki egyet a megjelenített lehetőségek közül, vagy adjon meg egy értéket (1 dpi-s lépésekkel). További részleteket az Online kézikönyv kezdőlapján található, az adott típusra vonatkozó „Felbontás” című részben talál.
Teljes kép nézetben Ha nincs vágási keret, a teljes megtekintési terület le lesz tapogatva. Ha a vágási keret meg van jelenítve, a képnek csak a kereten belüli része lesz letapogatva. Megjegyzés A letapogatott kép nagyításához/kicsinyítéséhez, adja meg a (Szélesség) és (Magasság) értékét a Kimeneti beállítások (Output Settings) panelen, vagy adjon meg értéket (1%-os lépésekben) a % mezőben.
A vágási keret egy megtekintési képen történő eredeti megjelenítésének beállításairól lásd az „Megtekintés lap” Vágási keret a megtekintési képeken (Cropping Frame on Previewed Images) részét (Beállítások (Preferences) párbeszédpanel) • (Oldalarány váltása) Akkor érhető el, ha a Kimeneti méret (Output Size) beállítása nem Rugalmas (Flexible). Kattintson erre a gombra a vágási keret elforgatásához. Kattintson újra az eredeti tájolás visszaállításához.
Kép beállításai Fontos Ezeket a funkciókat ne alkalmazza olyan képekre, melyeken nincsenek moire-minták, foltok/ karcolások vagy halvány színek. A színtónus hátrányosan módosulhat. A képjavítás eredményei esetleg nem látszanak a megtekintési képen. Megjegyzés A választható beállítások a Színmód (Color Mode) beállításaitól függenek. A szkennelés tovább tarthat a megszokottnál a Kép beállításai (Image Settings) használata miatt.
Megjegyzés Ha a képjavítás eredménye nem megfelelő az Automatikus (Auto) beállítás esetén, adja meg a dokumentum típusát. A képjavítási művelet miatt a kép színtónusa eltérhet az eredetitől. Ebben az esetben állítsa a Képjavítás (Image Adjustment) beállítást Nincs (None) értékűre.
Fontos Bizonyos típusú fotóknál ez a funkció nem biztos, hogy hatékony. Megjegyzés Ajánlott, hogy Nincs (None) értékűre állítsa nyomtatványok letapogatásánál. • Halványulási korrekció (Fading Correction) Használja ezt a funkciót idővel megfakult vagy túlszínezett fotók javításához. „Túlszínezettség” esetén egy adott szín meghatározza az egész kép színvilágát az időjárás vagy erős környezeti színek miatt. • Nincs (None) A halványulási korrekció nem lesz alkalmazva.
Fontos Ne helyezzen 2,0 kg (4,4 font) vagy annál nagyobb tömegű tárgyat a tálcára. Ne nyomja továbbá 2,0 kg (4,4 font) meghaladó erővel a dokumentumot. Ha erősen nyomja, akkor lehet, hogy a szkenner nem tud megfelelően működni, illetve betörhet az üveg. Igazítsa a dokumentumot a tálca széléhez. Ha nem így tesz, az árnyék korrigálása nem lesz megfelelő. A dokumentumtól függően az árnyék korrekciója nem biztos, hogy megfelelő lesz.
Színbeállítás gombok A Színbeállítások gombok lehetővé teszik a kép fényerejének és színtónusainak finom javítását, beleértve a kép globális fényerejét/kontrasztját, illetve a fényes és sötét területek beállítását (hisztogram) vagy az egyensúlyt (tónusgörbe). Fontos A színbeállítási gombok nem használhatók, ha a Színegyeztetés (Color Matching) értéket választotta a Beállítások (Preferences) párbeszédpanel Színbeállítások (Color Settings) lapján.
Állítsa be egy kép fényességét a tónusgörbe alakjának kiválasztásával, mely görbe a bemeneti és kimeneti tónus egyensúlyát mutatja. Egy adott területen fényesség finombeállítást végezhet. A tónusgörbe beállítása • (Végső megtekintés) Ellenőrizze a végső színbeállításokat. A következő képfeldolgozásból származó végső szintetikus tónusgörbe és hisztogram jelenik meg. Ezen a képernyőn nincsenek beállítási lehetőségek.
Settings List) vagy a Küszöbbeállítások listája (Threshold Settings List) által mutatott beállítások elmentéséhez. Az elmentett tónusgörbe- és küszöbbeállításokat azután betöltheti és alkalmazhatja a megtekintési képre. A beállítások betöltéséhez válassza ki a mentett nevet a legördülő menüből. Megjegyzés Legfeljebb 20 elem menthető el. • Alapért. (Defaults) Minden beállítás (telítettség/színegyensúly, fényesség/kontraszt, hisztogram és tónusgörbe) visszaállítása.
Beállítások párbeszédpanel Kattintson a Beállítások... (Preferences...) gombra a ScanGear (szkenner-illesztőprogram) képernyőjén a Beállítások (Preferences) párbeszédablak megnyitásához. A Beállítások (Preferences) párbeszédpanel Lapolvasó (Scanner), Megtekintés (Preview), Letapogatás (Scan) és Színbeállítások (Color Settings) lapján speciális beállításokat adhat meg a ScanGear funkcióihoz.
Lapolvasó lap A Lapolvasó (Scanner) lapon a következő beállításokat adhatja meg. • Csendes beállítások (Quiet Settings) A csendes működés funkciójának segítségével csökkentheti a készülék működési zaját. Használja ezt a zajok csökkentéséhez, ha éjszaka szkennel vagy nyomtat. A csendes mód beállításához kattintson a Beállítások... (Settings...) gombra. Megjegyzés Beállíthatja a csendes módot a készülék kezelőpaneljéről, a nyomtató-illesztőprogramból, illetve a ScanGear programból.
• Az ideiglenes fájlok tárolási mappájának kiválasztása (Select Folder Where Temporary Files are Saved) Megjeleníti azt a mappát, ahová ideiglenesen el lehet menteni a képeket. Másik mappa megadásához kattintson a Tallózás... (Browse...) gombra. • Hangbeállítások (Sound Settings) Beállíthatja azt, hogy a készülék zenéljen a beolvasás alatt/végén.
Megtekintés lap A Megtekintés (Preview) lapon a következő beállításokat adhatja meg. • Megtekintés ScanGear indításakor (Preview at Start of ScanGear) Válassza ki, hogyan történjen a megtekintés a ScanGear (lapolvasó illesztőprogram) indulásakor. • Megtekintés automatikus végrehajtása (Automatically Execute Preview) A ScanGear program automatikusan megtekintő üzemmódban indul. • Mentett megtekintési kép megjelenítése (Display Saved Preview Image) Az előzőleg megtekintett kép kerül megjelenítésre.
• Normál (Standard) Ez a szabványos méret. • Kisebb (Smaller) A normál méret területének 95%-át (szélességben és magasságban) jeleníti meg. Megjegyzés Ha módosítja a Vágási keret a Vázlat nézethez (Cropping Size for Thumbnail View) beállítást, a megtekintési kép frissítve lesz és az új méretre lesz vágva. Mivel frissül a megtekintési kép, a rá alkalmazott szín- és egyéb beállítások vissza lesznek állítva.
Letapogatás lap A Letapogatás (Scan) lapon a következő beállításokat adhatja meg. • A ScanGear párbeszédpanel állapota a letapogatás után (Status of ScanGear dialog after scanning) Állítsa be, hogy mi történjen a ScanGear (lapolvasó illesztő) szoftverrel a képek beolvasása után. • A ScanGear automatikus bezárása (Close ScanGear automatically) Ezt kiválasztva a letapogatás után visszatér az eredeti alkalmazásba.
• Hátlap/előlap(Gyors) kimenet (Output by back/front(Fast)) Ez a legelőnyösebb, ha fontos a sebesség, ugyanis a dokumentumok kimenete gyors. Azonban a letapogatott dokumentumok kimenete nem az oldalsorrend szerint történik. • Kimenet oldalanként (Output by page) A letapogatott dokumentumok kimenete az oldalsorrend szerint történik.
Színbeállítások lap A Színbeállítások (Color Settings) lapon a következő beállításokat adhatja meg. • Színigazítás Válassza ki a következők egyikét. Akkor választhat ki ilyen beállítást, amikor a Színmód (Color Mode) értéke Színes (Color) vagy Szürkeárnyalatos (Grayscale). • Javasolt (Recommended) Használatával a dokumentum tónusait élénken állíthatja elő a képernyőn. Ajánlott, hogy általában ezt a beállítást használja.
Tekintse meg a monitor kézikönyvében a monitor gamma értékét. Ha nem szerepel a kézikönyvben, lépjen kapcsolatba a gyártóval.
Anyagok elhelyezése (számítógépről történő beolvasás esetén) Tekintse át, hogyan helyezheti az anyagot a lapolvasó vagy nyomtató üveglapjára vagy az ADF-be (az automatikus lapadagolóba). Helyezze el megfelelően az anyagokat a beolvasni kívánt anyag típusa szerint. Máskülönben lehet, hogy az anyagok beolvasása nem lesz megfelelő. Fontos Ne helyezzen tárgyakat a dokumentumfedélre. Amikor kinyitja a dokumentumfedelet, az anyagok beeshetnek a lapolvasóba vagy a nyomtatóba, ami hibás működést okozhat.
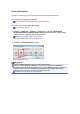
A nagyméretű anyagok (például az A4 méretű fotók), amelyek nem helyezhetők az üveglap széleitől/nyilaitól (igazítási jeleitől) távolabbra, PDF fájlként menthetők. Ha nem PDF formátumban szeretné menteni a dokumentumokat, akkor a beolvasás előtt adja meg a megfelelő adatformátumot. hogy az adott típus esetében a dokumentumok melyik részeit nem lehet beolvasni. Több anyag elhelyezése Hagyjon 1 cm (0,4 hüvelyk) helyet az anyag és az üveglap szélei (a harántcsíkos rész), valamint az egyes anyagok között.
Helyezze el a dokumentumokat arccal felfelé, amíg jelzőhangot nem hall. Helyezze el a dokumentumokat arccal felfelé, ha a dokumentumok mindkét oldalát le szeretné tapogatni.
Vágási keretek beállítása (ScanGear) A „körbevágás” műveletével kiválaszthatja azt a területet, amelyet beolvasáskor meg szeretne tartani a képből, illetve a maradékot, amelyre nincs szüksége. Az Alap mód (Basic Mode) lapon és a Különleges mód (Advanced Mode) lapon megadhatja a vágási kereteket (beolvasási területeket) a megtekintési területen megjelenített képen. Amikor elindítja a beolvasást, a készülék a vágási keretekkel megadott területeket külön képként olvassa be.
Vágási keretek beállítása (IJ Scan Utility) A „körbevágás” műveletével kiválaszthatja azt a területet, amelyet beolvasáskor meg szeretne tartani a képből, illetve a maradékot, amelyre nincs szüksége. A Képek egyesítése (Image Stitch) ablakban megadhatja a megtekintési területen megjelenített kép vágási keretét.
Felbontás A letapogatott képben lévő adat nem más, mint képpontok halmaza, mely a fényességről és a színről hordoz információkat. Ezen pontok sűrűségét nevezik „felbontásnak”, s a felbontás fogja meghatározni a részletek mennyiségét, melyet a kép tartalmaz. A felbontás mértékegysége a képpont/hüvelyk (dpi). Ez a képpontok száma 2,5 cm-enként (hüvelykenként). Magasabb felbontásnál (értéknél) a kép részletesebb lesz; alacsonyabb felbontásnál (értéknél) kevésbé lesz részletes.
a memória hiánya. A felbontást a letapogatott kép felhasználásának megfelelően az igényelt minimális értékre állítsa be. Megjegyzés Ha a beolvasott képet felnagyítva szeretné kinyomtatni, a beolvasáshoz válasszon a fent ajánlott értéknél nagyobb felbontást.
Adatformátumok A beolvasott képek mentésekor kiválaszthat egy adatformátumot. A legmegfelelőbb adatformátumot célszerű választani annak megfelelően, hogy milyen alkalmazással és hogyan kerülnek majd felhasználásra a képek. A rendelkezésre álló adatformátumok az alkalmazástól és az operációs rendszertől (Windows vagy Mac OS) függően változhatnak. Alább találhatja az egyes képi adatformátumok jellemzőit. PNG (szabványos fájlkiterjesztés: .png) Webhelyeken használt adatformátum.
Színegyeztetés A „Színegyeztetés” funkcióval a színtónust módosíthatja, hogy az eredeti, a képernyőn megjelenő és a kinyomtatott kép színei megfeleljenek egymásnak. A lapolvasón vagy a nyomtatón a színtónusok az alábbiak szerint módosulnak.
Egyéb beolvasási módszerek Beolvasás WIA-illesztőprogrammal Beolvasás a Vezérlőpult használatával (csak Windows XP esetén)
Beolvasás WIA-illesztőprogrammal Az anyagokat WIA-kompatibilis (Windows Image Acquisition) alkalmazásból olvashatja be. A WIA a Windows XP és az újabb rendszereken implementált illesztőmodell. Lehetővé teszi anyagok beolvasását külön alkalmazás használata nélkül. Az eljárás az adott alkalmazástól függ. A következő eljárások csak példák. Részleteket az alkalmazás kézikönyvében talál. Fontos Bizonyos alkalmazások nem támogatják az ADF-ből (automatikus lapadagoló) történő folytonos beolvasást.
Válasszon ki egy lapolvasó típust. Az üveglapról történő beolvasáshoz válassza a Fektetett (Flatbed) lehetőséget. Az ADF-ből történő beolvasáshoz válassza az Adagoló (Egy oldal letapogatása) (Feeder (Scan one side)) lehetőséget. • Papírméret (Paper size) Válassza ki a papírméretet. A Papírméret (Paper size) beállítás csak akkor adható meg, ha a Forrás (Source) az Adagoló (Egy oldal letapogatása) (Feeder (Scan one side)). • Színformátum (Color format) Válassza ki a színmódot az anyag beolvasásához.
Megjegyzés A beolvasott kép minőségének megadása (Adjust the quality of the scanned picture) párbeszédpanelen korábban megadott beállításokkal történő beolvasáshoz válassza az Egyéni beállítások (Custom Settings) pontot. Ha a Lapadagoló (Document Feeder) lehetőséget választja a Papírforrás (Paper source) beállításnál, akkor beállíthatja a Papírméret (Page size) értékét. 4.
6. Kattintson a Letapogatás (Scan) gombra. Ha a letapogatás befejeződött, a kép megjelenik az alkalmazásban.
Beolvasás a Vezérlőpult használatával (csak Windows XP esetén) Elvégezheti a képek beolvasását a Windows XP vezérlőpultjáról, a WIA-illesztő segítségével. 1. A Start menüben válassza a Vezérlőpult (Control Panel) pontot. 2. Kattintson a Nyomtatók és más hardverek (Printers and Other Hardware) > Képolvasók és fényképezőgépek (Scanners and Cameras) pontra, majd kattintson duplán a Canon XXX series pontra (ahol az „XXX” a típus neve).
• Fényesség (Brightness) A csúszka segítségével állítsa be a fényességet. Mozgassa a csúszkát balra a kép sötétítéséhez, jobbra pedig a világosításához. Értékeket is megadhat (-127-től 127-ig). • Kontraszt (Contrast) A csúszka segítségével állítsa be a kontrasztot. A csúszkát balra mozgatva csökken a kép kontrasztja, ezzel lágyítva a képet. A csúszkát jobbra mozgatva nő a kép kontrasztja, ezzel élesítve a képet. Értékeket is megadhat (-127-től 127-ig).
Anyagok elhelyezése (számítógépről történő beolvasás esetén) Tekintse át, hogyan helyezheti az anyagot a lapolvasó vagy nyomtató üveglapjára vagy az ADF-be (az automatikus lapadagolóba). Helyezze el megfelelően az anyagokat a beolvasni kívánt anyag típusa szerint. Máskülönben lehet, hogy az anyagok beolvasása nem lesz megfelelő. Fontos Ne helyezzen tárgyakat a dokumentumfedélre. Amikor kinyitja a dokumentumfedelet, az anyagok beeshetnek a lapolvasóba vagy a nyomtatóba, ami hibás működést okozhat.
A nagyméretű anyagok (például az A4 méretű fotók), amelyek nem helyezhetők az üveglap széleitől/nyilaitól (igazítási jeleitől) távolabbra, PDF fájlként menthetők. Ha nem PDF formátumban szeretné menteni a dokumentumokat, akkor a beolvasás előtt adja meg a megfelelő adatformátumot. hogy az adott típus esetében a dokumentumok melyik részeit nem lehet beolvasni. Több anyag elhelyezése Hagyjon 1 cm (0,4 hüvelyk) helyet az anyag és az üveglap szélei (a harántcsíkos rész), valamint az egyes anyagok között.
Helyezze el a dokumentumokat arccal felfelé, amíg jelzőhangot nem hall. Helyezze el a dokumentumokat arccal felfelé, ha a dokumentumok mindkét oldalát le szeretné tapogatni.
Beolvasás a készülék kezelőpaneljének használatával A beolvasott adatok továbbítása a számítógépre a készülék kezelőpaneljének segítségével Alapszintű Értékek beállítása a készülék kezelőpaneljén Parancsokra adott válasz kiválasztása a kezelőpanelről, az IJ Scan Utility program segítségével
A beolvasott adatok továbbítása a számítógépre a készülék kezelőpaneljének segítségével A beolvasott adatok továbbítása a számítógépre a készülék kezelőpaneljének segítségével történik. A beolvasott adatok számítógépre való továbbítása előtt ellenőrizze a következőket: • Az MP Drivers telepítve van. Ha az MP Drivers még nincs telepítve, helyezze be a Telepítő CD-ROM lemezt a számítógép lemezmeghajtójába, majd telepítse az MP Drivers programot. • A készülék megfelelően csatlakozik a számítógéphez.
Fontos Az eredetiket a típusuknak megfelelően töltse be; ellenkező esetben előfordulhat, hogy néhány dokumentum beolvasása nem lesz megfelelő.
• Ha a JPEG vagy a TIFF lehetőséget választja az Adatformátum (Data format) beállításnál, a készülék elkezdi a beolvasást, és továbbítja a beolvasott adatokat a számítógépre. • Ha a PDF vagy a Tömörített PDF (Compact PDF) lehetőséget választja az Adatformátum (Data format) beállításnál, miután befejeződött a beolvasás, megjelenik a jóváhagyási képernyő a beolvasás folytatásával kapcsolatban. Ha az Igen (Yes) lehetőséget választja, majd megnyomja az OK gombot, folyamatosan beolvashatja az eredetiket.
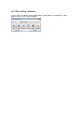
Értékek beállítása a készülék kezelőpaneljén Módosítani lehet a beolvasás beállításait, például a méretet, a felbontást és az adatformátumot. A gomb segítségével válassza ki a kívánt beállítást, és nyomja meg az OK gombot. Adja meg az egyes beállításokat következő beállítás. gomb segítségével, és nyomja meg az OK gombot. Megjelenik a Megjegyzés Az LCD kijelzőn megjelenő * (csillag) az aktuális beállítást jelöli.
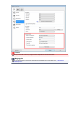
Parancsokra adott válasz kiválasztása a kezelőpanelről, az IJ Scan Utility program segítségével Az IJ Scan Utility alkalmazásban megadhatja, hogy mi történjen a kezelőpanelről történő beolvasás esetén. Megjegyzés A következő leírásokban a kezelőpanelről végrehajtott automatikus beolvasás esetén választható lehetőségek képernyői szerepelnek példaként. 1. Indítsa el az IJ Scan Utility alkalmazást. Az IJ Scan Utility elindítása 2. Kattintson a Beáll.-ok... (Settings...) gombra.
A Beállítások (Mentés számítógépre (dokumentum)) párbeszédpanel 4. Adja meg a képkorrekciókat a Beolvasási beállítások (Scan Options) párbeszédpanelen. 5. Adja meg a fájlnevet és az egyéb beállításokat a Beállítások mentése (Save Settings) párbeszédpanelen. 6. Válassza ki a beolvasás után elindítandó alkalmazást az Alkalmazás-beállítások (Application Settings) párbeszédpanelen.
7. Kattintson az OK gombra. A kezelőpanelről indított beolvasáskor a rendszer a beállított műveletet hajtja végre.