Printer User Guide C Y P O ENGLISH O Make sure you read this guide before using the printer. O Store this guide safely so that you can use it in the future.
Save Your Memories with SELPHY Compact, Stylish, Powerful! Save your precious moments with SELPHY.
What You Can Do with Your SELPHY Necessary Preparations to Use SELPHY pp. 10 – 12 Compatible Memory Cards and Images That Can Be Printed p. 14 Print a Single Image p. 15 Print All Images Various Prints Y P O pp. 20 – 31 Print Images from a Computer C Package Contents p. 17 pp.
Package Contents Check if the following items are included in your printer package, using the □ check boxes. If anything is missing, contact the retailer where you purchased the printer. 1 Remove the contents from the box. 2 Remove the contents from the basket. Release the catch on either side of the basket, and remove SELPHY. Remove the included accessories from the basket.
Ink and Paper (Sold Separately) Before using the printer, be sure to purchase a Color Ink cassette/Paper Set separately.
For Your Safety Before using SELPHY, please ensure that you read this “For Your Safety” section. Always ensure that SELPHY is operated correctly. The safety precautions noted on the following pages are intended to prevent injuries to yourself and other persons, or damage to the equipment. Be sure to also check the guides included with any separately sold accessories you use. WARNING Denotes the possibility of serious injury or death. CAUTION Denotes the possibility of injury.
CAUTION Do not stick any part of your hand into the printer interior. This could lead to injury or damage the printer. Do not use the power cord for any other equipment except this printer, use it beyond its rated capacity or voltage, or leave the plug partially inserted into a power outlet. This could result in electrical shock or fire. Avoid using, placing or storing the printer in the following places. -Places subject to strong sunlight. -Places subject to temperatures above 40° C (104° F).
Getting Familiar with SELPHY Learn more about the parts names and displays on the screen in this section. Components Guide Controls Memory Card Slots Ink Cassette Lever Paper Cassette Compartment Ink Cassette Compartment Cover Paper Cassette Compartment Cover Ink Cassette Compartment USB Terminal for Camera Connection Battery Cover (Air vents are behind the battery cover) Paper Ejection Slot Screen (LCD Monitor) Display images, settings screens, or error messages. C Turn the power on or off.
Changing the Information Displayed on the Screen You can change the information that is displayed on the screen. However, if SELPHY’s power is turned off the setting will return to [Tool Tips]. Change the information displays. While in the image display screen (p. 15), press the m(EDIT) button. Press the udbuttons, or turn the w wheel to choose [Info Display] and press the o button. Press the udbuttons, or turn the w wheel to choose a settings, then press the o button.
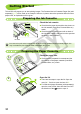
Getting Started This section will prepare you to start printing images. The Postcard size Ink Cassette/ Paper Set (sold separately) (p. 5) will be used as an example. However, in places where the operation differs for other paper sizes, an explanation will be given. Preparing the Ink Cassette Check the ink cassette Check that the paper size and the size shown on the ink cassette (Card Size, Postcard Size etc.) match. Check that the ink sheet is taut with no slack.
Set the paper. 3 ShinShiny side Set the paper into the paper cassette that you prepared in Step 1. You can place up to 18 sheets in the paper cassette (up to 12 for Wide size). Inserting 19 or more sheets (13 or more for Wide size) may damage the printer or cause malfunction. Hold the paper stack as shown in the illustration, with the shiny side facing up. Do not touch the print side (shiny side) of the paper with your fingers. Doing so may prevent you from making clean prints.
Inserting the Ink and Paper Cassettes 1 Open the covers. 2 Insert the ink cassette. Open the covers for the ink cassette and paper cassette compartments. Insert the ink cassette into the printer in the direction indicated by the arrow on the cassette until it clicks and locks into place. Close the ink cassette compartment cover. Y P O Insert the paper cassette. 3 Making sure that the outer lid is open (p. 11), insert the paper cassette all the way into the compartment.
Setting the Display Language You can change the language displayed in the LCD monitor menus and messages. Display the setting screen. 1 Press the m(MENU) button. Press the ud buttons, or turn the w wheel to choose [Change Settings], then press the o button. Press the ud buttons, or turn the w wheel to choose [Printer Setup], then press the o button. 3 Y P O Display the language setting screen. 2 Press the ud buttons, or turn the w wheel to choose [Language]. Press the o button.
Printing Images You can print images on a memory card when it is inserted into SELPHY. Compatible Memory Cards Memory Card Slots (p. 8, p.
Choosing and Printing Images You can choose an image and specify the number of copies for printing. SD memory cards will be used as an example, but you can print from other memory cards using the same steps. 1 Turn on the power. 2 Insert a single memory card into the slot. Press and hold the q button until the screen on the left displays. To turn the power off, press and hold the q button.
Choose the number of copies. 4 Press the u button once, and then press the u d buttons to choose a value. You can specify 99 copies per image (or a total of 999 copies). To print another image, repeat Steps 3 and 4. Total number of images currently set to be printed Number of copies of the displayed image 6 7 Y P O Print. 5 C Press the p button to start printing. During printing, the paper will pass in and out from the back of SELPHY several times.
Printing All Images You can print all images on a memory card at once. 1 Display the menu. 2 Display the setting screen. 3 Press the m(MENU) button. Press the ud buttons, or turn the w wheel to choose [Print All Images], then press the o button. C Y P O Choose the number of copies. Press the ud buttons to set the number of copies. You can specify up to 99 copies per image.
Cleaning Up After Printing After you finish printing, follow the steps below to clean up and store SELPHY. Turn the power off (p. 15), then remove the memory card. Unplug the power cord from the power outlet and disconnect the adapter plug from SELPHY. If the compact power adapter is hot, wait until it has cooled down before you store it. Remove the paper cassette and close the paper cassette compartment cover. Keep the remaining paper inside the cassette. Keep the ink cassette inside SELPHY.
Storing SELPHY 1 Place SELPHY in the basket. 2 Fasten the catch. Make sure the catches are open, then place SELPHY in the basket. Take care not to pinch your fingers between SELPHY and the basket. Y P O Lift the catches and fasten them into place. You should hear a clicking sound when they lock. When carrying SELPHY, be sure you have fastened the catches as instructed above. Carry SELPHY by using the handle on the basket. Store SELPHY in a level, dark place where it will not get dusty.
Printing a Variety of Images You can set various printing features, such as imprinting the shooting date or adjusting the color of an image. You do not need to repeat the settings for each image because once the settings are made, they are applied for all images. Making Settings Display the change settings screen. 1 2 20 Press the m(MENU) button. Press the ud buttons, or turn the w wheel to choose [Change Settings], then press the o button. C Y P O Display the print settings screen.
Choose the item and change the settings. 3 Press the ud buttons, or turn the w wheel to choose an item. Press the l r buttons to make a selection, then press the m(BACK) button and the confirmation screen will appear. Refer to (pp. 21 – 23) for information about each setting. 5 Y P O Make the settings. 4 Press the l r buttons, or turn the w wheel to choose [OK], then press the o button to make the settings. The menu screen will appear.
Printing with the File Number (File No.) Prints images with the file number. Off (Default setting) / On 0100-0002 Printing With or Without Border (Borders) Set images to print with or without a border. Borderless (Default setting) / Bordered Y P O When printing on card sized paper (p. 5), images printed in [8-up] layouts will not be printed with borders, even if [Bordered] is selected.
Correcting Red Eyes and Printing (Correct Red-Eye) Correct images with red-eye. Off (Default setting) / On Red-eye may not be automatically detected or optimally corrected when faces appear extremely small, large, dark or bright in relation to the overall image, with faces turned to the side or at a diagonal, or faces with a portion hidden. Portions other than the eyes may be mistakenly corrected. Set [Correct Red-Eye] to [On] only when printing images with red-eye. If you set [Page Layout] (p.
Trimming Photos You can print part of an image by using the trimming feature. 1 Choose an image (p. 15) 2 Display the trimming setting screen. 3 4 24 Y P O Press the m(EDIT) button. Press the ud buttons, or turn the w wheel to choose [Trimming], then press the o button. The frame showing the part of the image that will be printed will appear on the image. Choose a horizontal or vertical trimming C frame.
5 Make the setting. 6 Print. Once you have pressed the o button, the trimming frame is set and the printer restores the image display screen. To trim other images before printing at the same time, repeat Steps 1 to 5. To cancel trimming after the trimming frame has been set, press the m(EDIT) button, then choose [Reset trimming] from the menu and press the o button. Press the o button again to confirm. Press the ud buttons to choose the number of copies. Press the p button to start printing.
Printing with Frames You can decorate your favorite images with frames. Display the frame screen. 1 Press the m(MENU) button. Press the ud buttons, or turn the w wheel to choose [Frame Print], then press the o button. 3 26 Y P O Choose an image. 2 C Press the l r buttons or turn the w wheel to choose an image, then press the o button. Press the m(EDIT) button to bring up the Edit menu, where you can use the jump function (p. 33), or change the display information (p. 9). Choose a frame.
Choose the size and placement of the 4 image. Turn the w wheel to the right to make the image bigger, and turn to the left to make the image smaller. Press the udl r buttons to move the image. The image will rotate 90° each time the m(EDIT) button is pressed. Press the o button to accept the setting. Print. 5 Press the ud buttons to choose the number of copies. Press the p button to start printing. Y P O With the exception of [Correct Red-Eye] (p. 23), [Image Optimize] (p.
Creating Calendars You can turn your favorite images into calendars. Display the calendar screen. 1 Press the m(MENU) button. Press the ud buttons, or turn the w wheel to choose [Calendar Print], then press the o button. 3 4 Y P O Choose a layout. 2 C Press the udl r buttons, or turn the w wheel to choose a layout, then press the o button.
5 Choose whether or not to add holidays. 6 Add holidays. 7 8 To add holidays, press the l r buttons, or turn the w wheel to choose [Yes], and press the o button. If you do not wish to add holidays, press the l r buttons, or turn the w wheel to choose [Next], and press the o button. Skip to Step 7. Press the udl r buttons, or turn the w wheel to choose a date, then press the o button. The selected date will turn red. Pressing the o button again will clear the selection.
Creating a Photo Diary You can insert the shooting date into your images and print them as a photo diary. You can also print with stamps (Up to 2). Display the photo diary screen. 1 Press the m(MENU) button. Press the ud buttons, or turn the w wheel to choose [Photo Diary Print], then press the o button. 3 30 Y P O Choose a layout. 2 C Press the udl r buttons, or turn the w wheel to choose a layout, then press the o button.
Choose stamps. 4 Press the udl r buttons, or turn the w wheel to choose the stamp to be printed in the area marked [] and press the o button. Follow the same steps to choose a stamp to be printed in the area marked [] and press the o button. To print without stamps, press the udl r buttons, or turn the w wheel to display the screen on the left, and choose the blank space in the bottom right hand corner. 6 Y P O Choose an image.
Searching Images Search Images Using Auto Play You can play all the images on your memory card in order of their file number (images will display for 3 seconds each), and search for images to print. Auto play images. 1 Press the m(MENU) button. Press the ud buttons, or turn the w wheel to choose [Auto Play], then press the o button. The loading image screen appears, and then auto play begins. 3 Y P O Viewing your images. 2 C Each image will be shown for about 3 seconds.
Using the Jump Function to Search Images You can jump to an image using a specified search key. 1 Display the jump screen. 2 Choose a search key. While in the image display screen (p. 15), press the m(EDIT) button. Press the ud buttons, or turn the w wheel to choose [Jump], then press the o button. Y P O Press the ud buttons to choose a search key, and press the l r buttons, or turn the w wheel to jump.
Printing from Your Computer If you connect your computer to SELPHY and use the supplied software, you can view all images at once and take advantage of various printing functions that cannot be done with just SELPHY alone. Following the audio guidance will allow inexperienced computer users to print easily. Choose favorite images from the list and print You can choose images you wish to print from a list, and print them all at once.
Install and start the software Windows XP and Mac OS X 10.5 are used for these explanations. Install the software. 1 Windows Place the CD-ROM in the computer’s CD-ROM drive and click [Easy Installation] when the screen on the left appears. Follow the onscreen instructions to proceed. If the User Account Control window appears, follow the on-screen instructions to proceed. Proceed with the installation to display the screen on the left.
Turn on SELPHY. 4 Press the q button to turn on SELPHY. Windows When the installation finishes, click [Restart] to restart the computer and complete the installation. Confirm that the software has been 5 started properly. The software will start and the screen on the left will appear when a connection between SELPHY and the computer is established. From now on, the software will automatically start when you perform Steps 2 to 4.
Printing from Your Computer Use the installed software (SELPHY Photo Print) to print images from the computer. The [Simple print] feature will be explained in this guide. Using this feature you can view all your images at once and choose which ones you want to print. If your computer is equipped with speakers, set the volume so that the audio guidance for necessary operations can be heard. Display the print menu. 1 Click [Print menu].
Choose the number of prints. 4 Choose the number of copies for each image. Click [Print] to start printing. Y P O Press the - or + buttons to set the number of prints. Close the program. 5 Windows When all printing is finished, Click right corner of the screen. at the top Macintosh C When all printing is finished, Click left corner of the screen. at the top Turning off the Voice Guidance The voice guidance may not play properly on some computers.
Printing from Your Digital Camera Choose and print images directly from a camera that supports the PictBridge standard. A Canon brand camera will be used as an example to explain the print method. If operations are different for the camera you use, refer to the user guide for your camera. Check that there is no memory card 1 inserted and that no computer is connected to SELPHY. Connect SELPHY to the camera using the 2 USB cable included with the camera.
Printing Images Using Camera Specified Settings (DPOF Print) You can make print settings and choose images to print on your camera and then print the images all at once. For details, refer to the user guide provided with your camera. Insert a memory card containing DPOF 1 settings made with the camera into the memory card slot. [DPOF images remain Print images?] appears on the screen. 2 3 C Y P O Press the o button. Check the settings.
Printing from Your Mobile Phone You can print pictures taken with infrared (IrSimple or IrDA IR) or Bluetooth compatible mobile phones without using a cable. You cannot establish a wireless connection between a computer and SELPHY. The maximum file size that can be transmitted is 2 – 3 MB (varies depending on mobile phone). Data transmission time increases when data size is large. Therefore, the amount of time before printing will also increase.
Bluetooth Printing Use the (separately sold) Bluetooth Unit BU-30 for wirelessly printing images from Bluetooth enabled mobile phones. For details on how to use the mobile phone or on printing methods via Bluetooth refer to the user guide provided with the mobile phone. Make sure that there is no memory 1 card inserted and that no computer is connected to SELPHY. Insert the Bluetooth unit. 2 Remove the cover attached to BU-30, and insert it as shown. Turn on SELPHY. (p.
Using the Battery Pack Use the (separately sold) battery pack NB-CP2L for printing images in places without a power outlet. With a fully charged battery, you can print approximately 36 sheets of Postcard size paper. Installing the Battery Remove the battery cover. 1 Slide and hold the cover lock towards , then remove the cover towards . Air Vents Y P O Remove the battery terminal cover. 2 Attach the battery.
SELPHY Settings You can personalize SELPHY to suit your tastes. The basic operation is explained first. For a detailed explanation of each setting, please see (p. 45). These settings will be saved even if SELPHY’s power is turned off. Display the Change Settings screen. 1 Press the m(MENU) button. Press the ud buttons, or turn the w wheel to choose [Change Settings], then press the o button. 3 4 44 Y P O Display the printer setup screen.
Turn Off Auto Rotate Images taken in vertical orientation will display on the printer vertically when the auto rotation feature on the camera is turned on. When this feature is turned off, all images display in horizontal orientation. Set [Auto Rotate] to [Off]. Press the ud buttons, or turn the w wheel to choose [Auto Rotate], then press the l r buttons to choose [Off].
Troubleshooting If you think there is a problem with SELPHY, first check the following. If the items below do not solve your problem, contact a Canon Customer Support Help Desk as listed on the included customer support list. Power Power will not turn on • Confirm that the plug is connected. (p. 12) • When using a (separately sold) battery, use a charged battery. (p. 43) • Hold the q button pressed until the start-up image appears on the screen. (p.
Cannot print the date Printing from memory cards • Is the date imprint option set? (p. 21) If you are using DPOF printing, the date imprint settings are configured on the camera used for the DPOF settings. Printing from mobile phones • The date cannot be printed on images sent from a mobile phone (pp. 41 - 42). Printing from cameras • Confirm that the date setting in your camera is set to [On]. However, if the setting is [Default], the date imprint settings of SELPHY will be used.
Error Messages If a problem occurs with SELPHY, a message and a possible solution appear on the screen. Follow the on-screen instructions to solve the problem. If a problem occurs while SELPHY is connected to a camera, the camera may also display an error message. Be sure to check both devices. If following the instructions does not solve the problem and the same error message appears, contact your Canon Customer Support Help Desk. Handling Precautions Do not apply excessive force to the printer.
Specifications All data is measured according to standard Canon testing procedures. We reserve the right to change specifications without notice. SELPHY CP790 Printing Method Dye-sublimation thermal transfer (with overcoating) Print Resolution 300 x 300 dpi Gradation 256 shades per color Ink Dedicated ink cassette (Y/M/C/overcoating) Paper Postcard Size, L Size, Card Size (including full page label sheets, 8-label sheets), Wide Size Print Size Borderless Bordered 100.0 x 148.0 mm (3.94 x 5.
Compact Power Adapter CA-CP200 W Rated Input Rated Output Dimensions Operating Temperatures Weight 100 - 240 V AC (50/60 Hz) 1.5 A (100 V) - 0.75 A (240 V) 24 V DC, 2.2 A 122.0 x 60.0 x 30.5 mm (4.80 x 2.36 x 1.20 in.) (excluding power cord) 0 - 45°C (32 - 113°F) Approx. 310 g (10.9 oz.) As an ENERGY STAR Partner, Canon Inc. has determined that this product meets the ENERGY STAR guidelines for energy efficiency. For voltages of 100 to 120V only.
Trademark Acknowledgments O The SDHC logo and miniSDHC logo are trademarks. O Portions of the code used in this firmware are based in part on the work of the Independent JPEG Group. About This Guide O Reprinting, transmitting, or storing in a retrieval system any part of this guide without the permission of Canon is prohibited. O Canon reserves the right to change the contents of this guide at any time without prior notice.
C CDI-E405-010 Y P O © CANON INC.