Getting Started ENGLISH CEL-SW5WA210
Package Contents Before use, make sure the following items are included in the package. If anything is missing, contact your camera retailer. Camera Battery Pack Battery Charger NB-13L* CB-2LHE * Do not peel off the adhesive covering from a battery pack. • Printed matter is also included. • A memory card is not included. Wrist Strap Compatible Memory Cards No memory card is included. Purchase one of the following kinds of card as needed. The following memory cards can be used, regardless of capacity.
Initial Preparations 1 Attach the strap. Thread the end of the strap through the (2) (1) strap mount (1), and then pull the other end of the strap through the loop on the threaded end (2). 2 Insert the battery pack. (1) After aligning the marks on the battery pack and charger, insert the battery pack by pushing it in (1) and down (2). (2) 3 Charge the battery pack. Plug the power cord into the charger, then plug the other end into a power outlet.
Initial Preparations 5 Insert the battery pack. Holding the battery pack with the (1) (2) (3) (1) terminals in the position shown (1), hold the battery lock toward (2) and insert the battery pack toward (3) until the lock clicks shut. If you insert the battery pack facing the wrong way, it cannot be locked into the correct position. Always confirm that the battery pack is facing the right way and locks when inserted.
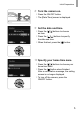
Initial Preparations 8 Turn the camera on. Press the ON/OFF button. The [Date/Time] screen is displayed. 9 Set the date and time. Press the [ ][ ] buttons to choose an item. Press the [ ][ ] buttons to specify the date and time. When finished, press the [ ] button. 10 Specify your home time zone. Press the [ ][ ] buttons to choose your home time zone. Press the [ ] button when finished. After a confirmation message, the setting screen is no longer displayed.
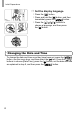
Initial Preparations 11 Set the display language. Press the [ ] button. Press and hold the [ ] button, and then immediately press the [ ] button. Press the [ ][ ][ ][ ] buttons to choose a language, and then press the [ ] button. Changing the Date and Time • To change the date and time once they have been set, press the [ ] button, use the zoom lever, and then select the [ ] tab.
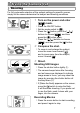
Trying the Camera Out Shooting For fully automatic selection of the optimal settings for specific scenes, simply let the camera determine the subject and shooting conditions. 1 Turn on the power and enter [ ] mode. Press the ON/OFF button. Set the mode switch to [ ]. Press the [ ] button, press the [ ][ ] ], and then buttons to choose [ press the [ ] button again. Press the [ ][ ] buttons to choose ], and then press the [ ] button. [ 2 Compose the shot.
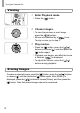
Trying the Camera Out Viewing 1 Enter Playback mode. Press the [ ] button. 2 Choose images. To view the previous or next image, press the [ ][ ] buttons. Movies are identified by a [ ] icon. To play movies, go to step 3. 3 Play movies. Press the [ ] button, press the [ ][ ] buttons to choose [ ], and then press the [ ] button again. Playback now begins, and after the movie ] is displayed. is finished, [ To adjust the volume, press the [ ][ ] buttons during playback.
Trademarks and Licensing ● Microsoft and Windows are trademarks or registered trademarks of Microsoft Corporation in the United States and/or other countries. ● Macintosh and Mac OS are trademarks of Apple Inc., registered in the U.S. and other countries. ● App Store, iPhone, and iPad are trademarks of Apple Inc. ● The SDXC logo is a trademark of SD-3C, LLC. ● HDMI, the HDMI logo and High-Definition Multimedia Interface are trademarks or registered trademarks of HDMI Licensing, LLC.
Graphical symbols placed on the equipment Class II equipment Direct current 10
© CANON INC.