
User's Manual


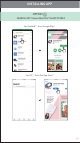

①
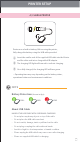
Remove the top cover by sliding it forward in the direction of the arrow.
②
Open a single pouch of photo paper (10 sheets + blue SMART SHEET™).
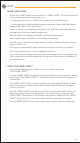
C) LOAD PAPER
③
Place all 10 photo paper sheets and the one SMART SHEET™ into the photo
paper compartment.
− Stack the photo paper on top of the blue SMART SHEET™, making sure the
blue barcode and the photo paper logos are facing down.
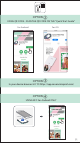
④
Place the top cover back onto the printer. It should click into place when
closed properly.
− The blue SMART SHEET™ will be sent through the printer automatically
before the rst print.
B) POWER ON
①
Press and hold the Power button ( ) until the LED
indicator light turns on.
− The LED indicator will ash as the printer is powering on.
②
When the LED indicator turns to a steady white light,
the printer is ready to print.
Blue SMART SHEET™
on bottom with photo
papers on top.
All logos facing down.
7