
User's Manual


Basic Functions
& Features
Contents
Things to
Remember
Mastering
the Basics
More Advanced
Techniques
Appendices
22
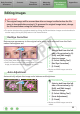
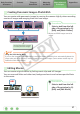
Editing Images
IMPORTANT
•Theoriginalimagewillbeoverwrittenafteranimageiseditedunlessthefile
name is changed before saving it. To preserve the original image intact, change
the file name when saving the edited image.
•ThissectionintroducestheproceduresstartedbyclickingtheEdittaskbutton.Imagescanalsobeeditedin
asimilarwaybyclickingthe[Edit]buttonintheViewerWindow.
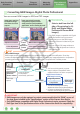
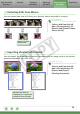
Red Eye Correction
Restoreseyeappearancetotheoriginalcolorwhenlightreflectedfromtheflash
makesthemappearred.
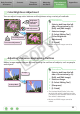
Procedures
1
Select a task from the left
side of the window (p. 9):
[Edit] and [Edit Image].
2
Select an image.
3
[2. Select Editing Tool]
4
[Red Eye Correction]
5
[3. Finish]
•MoviesandRAWimagescannotbe
edited.
•Click[Start]whenAutomodeisselected.
•SwitchtoManualmodeifAutomodecannotcorrectthe
image,andselectthelocationoftheeyetocorrect.
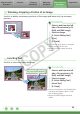
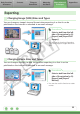
Auto Adjustment
Automaticallyadjuststheimagecolorbalanceandbrightness.
Procedures
1
Select a task from the left
side of the window (p. 9):
[Edit] and [Edit Image].
2
Select an image.
3
[2. Select Editing Tool]
4
[Auto Adjustment]
5
[3. Finish]
•MoviesandRAWimagescannotbe
edited.
COPY