Canon SPEEDLITE INSTRUCTION MANUAL MODE D'EMPLOI MANUAL DE INSTRUCCIONES
Thank you for purchasing a Canon product. The Canon Speed lite 320EX is a multi-feature flash unit for Canon EOS cameras. It works automatically with E-TTL II and E-TTL autoflash systems. It can be used as an on-camera flash that attaches to the hot shoe of the camera or as part of a wireless flash system used at a distance from the camera. It is also equipped with an LED light for movie shooting. • Read this instruction manual while also referring to your camera's instruction manual.
Contents 1 Getting Started and Basic Operations ................................. 7 Installing the Batteries ............................................................................................. 8 Attaching and Detaching the Flash ......................................................................... 9 Turning on the Power Switch ............................ ~ ................................................... 10 Fully Automatic Flash Shooting....................................................
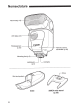
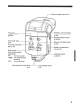
Nomenclature Wireless sensor ----+--+--ca~non -~==:;;::..--+J-.- Remote control (p.35) transmitter (p.39) ------ Locking pin (p.9) Mini stand pocket Case 4 320EX mini stand (p.
Bounce angle index (p.21) Firing group ------!~-=-=-=--.----=~;;~~~\U~'f__- Wireless communication selection switch channel selection switch (p.34/36) (p.34) ~..---------.1_ Remote release button Gr. lTL;:--~-diCH. (p.38/39) Flash-ready lamp ------!!-------=:- .. (p.1 0) ..--------H--~- Manual LED light button Flash head extended (p.23) lamp (p.19) aJ:----1---- Battery compartment cover (p.8) Power switch/--- --t----' Slave function switch ' - - - - - - r r , - ; c - - - LED light switch (p.
Conventions Used in this Manual Icons in this Manual 016: Indicates that the respective function remains active for 16 sec. after you let go of the button. If shown on the upper right of the page, it indicates that the function is available only in the Creative Zone modes of the camera. (p. **):Reference page numbers for more information. *: O: [iJ: Warning to prevent shooting problems. Supplemental information.
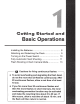
Getting Started and Basic Operations Installing the Batteries ............................................ 8 Attaching and Detaching the Flash ......................... 9 Turning on the Power Switch ................................ 10 Fully Automatic Flash Shooting ............................. 11 Flash Shooting in Each Camera Mode ................. 13 ,....----- 0 Cautions for firing continuous flashes ----.
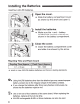
Installing the Batteries Install four AA/LR6 batteries. 1 Open the cover. • Slide the battery compartment cover as shown by the arrow and open it. 2 Install the batteries. 3 Close the cover. • Make sure the + and - battery contacts are correctly oriented as shown in the battery compartment. • Close the battery compartment cover and slide it as shown by the arrow. Recycling Time and Flash Count • Based on new AA/LR6 alkaline batteries and Canon's testing standards.
Attaching and Detaching the Flash 1 Attach the Speedlite. • Insert the Speedlite's mounting foot into the camera's hot shoe all the way. (The mounting foot will protrude slightly from the hot shoe.) 2.Secure the Speed lite. • On the mounting foot, slide the lock lever to the right. ._,. When the lock lever clicks in place, .it will be locked. 3 Detach the Speedlite. • While pressing the lock-release button, slide the lock lever to the left and detach the Speedlite.
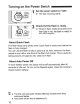
Turning on the Power Switch 1 Set the power switch to . ...,. The flash recycling starts. 2 Check that the flash is ready. • When the flash-ready lamp blinks and then lights in red, the flash is ready to fire (fully charged). About Quick Flash The flash-ready lamp blinks when Quick Flash is ready even before the flash is fully charged. · You can use the flash to take a picture at that time; however, the flash output is only half or one-third of the flash's full charge.
Fully Automatic Flash Shooting R.eaCIY:'irig·fl'\e·· earn erE~ When you set the camera's shooting mode to < P > (Program AE) or Full Auto, you can shoot in E-TTL 11/E-TTL fully automatic flash mode. Cameras with external flash function settings External flash tunc. setting Flash mode E- TTL II Shutter sync. 1st curtam ••exp como -3. .2 .. 1..f£.. 1.. 2.~3 E--TTL II meter. Evaluative • Press the camera
Taking the Picture L # ,- ,-, ,_:,_, ,- ,.:•. 0 1 Focus the subject. • Press the shutter button halfway to focus . .._ The shutter speed and aperture will be set as displayed in the viewfinder. • Check that < ~ > is lit in the viewfinder. 2 [jJ 12 Take the picture . ..., When you press the shutter button completely, the flash will fire and the picture will be taken. After taking the picture, check the image. on the LCD monitor of the camera. If the light from.
Flash Shooting in Each Camera Mode With the flash mode set toE-TTL 11/E-TTL autoflash, just set the camera's shooting mode to (Shutter priority AE), < Av > (Aperture priority AE), or < M > (Manual exposure) and you can use E-TTL 11/E-TTL autoflash. On EOS digital cameras without the [Flash control] menu function or EOS film cameras, E-TTL 11/E-TTL autoflash is set automatically. -, c ,-:.,_,,-, Select this mode when you want to set the shutter speed manually.
Av: Aperture Priority AE ,- ,-, 0 ,_, Select this mode when you want to set the aperture manually. The camera will then automatically set the shutter speed matching the aperture to obtain a standard exposure. If the background is dark, such as in a night scene, a slow sync speed will be used to obtain a standard exposure of both the main subject and background.
DEP: Depth-of-field AE, A·DEP: Auto Depth·of-field A.E I • The result will be the same as using < P > (Program AE). Flash Sync Speeds and Apertures Used Full Auto,
Set automatically ( 1/X sec. - 1/60 sec.) Automatic Tv Set manually ( 1/X sec. - 30 sec.) Automatic Av M Set automatkally (1/X sec.- 30 sec.) Manual Set manually (1/X sec.- 30 sec., Bulb) Manual • 1/X sec. is the camera's maximum flash sync speed. ~.
Using Flash *FE Lock ............................................................ Switching the Flash Coverage.............................. Bounce Flash ......................................................... AF-assist Beam .................................................... Movie Shooting Using the LED Light....................
*FE Lock* FE (flash exposure) lock locks the correct flash exposure setting for any part of the scene. With the flash mode set toE-TTL 11/E-TTL autoflash, press the camera's < > button to enable FE lock. On some cameras, press the < M-Fn > or button. * 1 Focus the subject. D D l Press the < * > button. ( 816) * • Aim the center of the viewfinder over the subject and press the < > button . ._ The Speedlite fires a preflash, and the required flash output is retained in memory. ,.
Switching the Flash Coverage The flash head can be extended or retracted manually to match the lens focal length. As the focal length of EF lenses and EF-S lenses differs, extend or retract the flash head while referring to the table below (the flash head position in relationship to the lens focal length). I Flash head position Normal position Extended position Guide number 24/79 (ISO 100 in m/ft.) Guide number 32/105 (ISO 100 in m/ft.
Flash Shooting Range Guidelines When using EF-S 18-55mm f/3.5-5.6 IS [approx. m I ft.] 100 1 - 6.9 I 3.3-22.6 1 - 4.3 I 3.3-14.1 1 - 5. 7 I 3.3- 18.7 200 1 - 9. 7 I 3.3-31.8 1 - 6.1 I 3.3- 20 1 - 8.1 I 3.3-26.6 400 1-13.71 3.3-44.9 1 - 8.6 I 3.3-28.2 1-11.41 3.3- 37.4 800 1.2-19.41 3.9-63.6 1 - 12.1 I 3.3- 39.7 1-16.21 3.3- 53.1 1600 1.7- 27.4 I 5.6-89.9 1-17.11 3.3- 56.1 1 - 22.9 I 3.3- 75.1 3200 2.4- 38.8 I 7.9-127.3 1.5- 24.2 I 4.9- 79.4 1.4-32.3 I 4.6- 106 6400 3.4- 54.9 I 11.
Bounce Flash By pointing the flash head toward a wall or ceiling, the flash will bounce off the surface before illuminating the subject. This can soften shadows behind the subject for a more natural-looking shot. This is called bounce flash. Change the Bounce Direction • You can turn the flash head as shown. • Bounce flash is normally done with the flash head in the extended position.
AF-assist Beam When autofocus cannot achieve focus on the subject in low-light conditions, the AF-assist beam activates automatically. AF-assist Beam Using Continuous Flashes When autofocus cannot achieve focus on the subject in low-light conditions while taking pictures using the viewfinder, pressing the shutter button halfway fires the flash continuously to assist autofocus.
Auto light • If you use a camera that has an automatic LED light up function, set the LED light switch to . • When the shutter button is pressed halfway in low-light conditions, the LED light turns on automatically" to assist autofocus. Movie Shooting Using the LED Light LED light Manual light button The LED light is for use with EOS digital cameras that have a movie shooting function.
Turning on the Light Automatic ally If you use a camera that has an automatic LED light up function, the LED light turns on automatically when taking pictures in low-light conditions. • Set the LED light switch to . • The LED light turns on or off automatically according to the ambient light when the shooting image is displayed on the LCD monitor. is displayed on the LCD monitor when the LED • The symbol light is turned on automatically.
Flash Function Settings by Camera Operations Flash Control from Camera Menu Screen............ ~Flash Exposure Compensation .. .. .. .. .. .. .. .. .. .. .. . High-speed Sync.................................................. Second~curtain Sync ............. ... ..................... ....... Manual Flash........................................................ Setting Custom Functions .. .. .. .. .. .. .. .. .. .. .. .. .. .. .. .. .. ..
Flash Control from Camera Menu Screen* By attaching the 320EX to an EOS digital camera with an external Speedlite control function, you can set various flash function settings with the camera's menu screen. 1 Select [Flash control]. ~ • Press the camera
~Flash Exposure Compensation* In the same way as normal exposure compensation, you can set exposure compensation for flash. The flash exposure compensation amount can be set up to ±3 stops in 1/3-stop increments. (If the camera's exposure compensation is set to 1/2-stop increments, flash exposure compensation will be in 1/2-stop increments.) External flash func. setting Flash mode E-·TTLII Shutter sync. 1st curtain ·.exp. comp -3..2 .. 1..~.. 1..2.~3 I Evaluative E--TTL II meter. 1 Select [-.exp.
High-speed Sync* With high-speed sync (FP flash), the flash can synchronize with all shutter speeds. This is convenient when you want to use aperture priority for fill-flash portraits. External flash tunc. setting Flash mode Shutter sync E- TTL II 1st curtain ••exp. camp. -3. .2 .. 1. -~·. 1.. 2.~3 E- TIL II meter. Evaluative 1 Select [Shutter sync.]. • Select [Shutter sync.] and press <@>. m:l1tJ Clear flash settings 2 Set [Hi-speed]. • Set [Hi-speed] and press <@ > . ..,. High-speed sync is set.
Second-cur tain Sync* With a slow shutter speed, you can create a light trail following the subject. The flash fires right before the shutter closes. External flash func setting Flash mode Shutter sync E- TTL II 1st curtatn ••exp. comp "3..2 . .1 ..~.. 1..2.~3 E·-TTL II meter. Evaluative 1 Select [Shutter sync.]. • Select [Shutter sync.] and press <@>. I l:lm!J Clear flash settings 2 Set [2nd curtain]. • Set [2nd curtain] and press <@ > . ._ Second-curtain sync is set.
Manual Flash* You can set the flash output from 1/64 power to 1/1 full power in 1/3stop increments. Use a hand-held flash meter to determine the required flash output to obtain a correct flash exposure. Setting the camera's shooting mode to < Av > or< M > is recommended. External flash func. setting Flash mode Shutter sync. E-" TTL II .,.exp. comp . -3. .2..1..~.. 1..2.~3 E-TTL II meter. Evaluative I 1 Select [Flash mode]. • Select [Flash mode] and press <@>.
Metered Manual Flash Exposures When the Speed lite is attached to an EOS-1 D series camera, you can also set the flash exposure level manually. 1 Set the camera and Speed lite settings. • • Setting the camera's shooting mode to < Av > or < M > is recommended. Set [Flash mode] to [Manual flash] for the Speedlite. I 2 Focus the subject. • Focus manually. 3 Set up an 18o/o gray card. • • 4 Place the gray card at the subject's position.
Setting Custom Functions* You can customize the Speedlite features to suit your shooting preferences with Custom Functions. Setting External Flash Custom Functions 1 Select [External flash C.Fn setting] on the [Flash control] menu screen and press<@>. l Select the Custom Function number in the same way as with Custom Functions for the camera, and change the setting. C.Fn-01 Auto power off C.Fn-06 Quickflash w/continuous shot C.Fn-10 Slave auto power off timer C.
Wireless Flash Shooting Wireless Flash Shooting.......................................
Wireless Flash Shooting* To perform wireless flash shooting, the camera or the Speed lite attached to the camera must have a master function. The 320EX fires as a slave flash when controlled from a master unit. For the detailed shooting method, refer to the instruction manual of the camera or the Speed lite with a master function. 1 Set the camera or Speed lite as the master unit. • Refer to the instruction manual of the camera or Speedlite. 2 Set the 320EX as the slave unit.
5 Attach the 320EX to the provided mini stand and position the flash. • Use the horizontal bounce function and point the sensor of the slave unit toward the master unit. • Indoors, you can perform wireless flash shooting using the reflection of the surrounding walls without having the wireless sensor of the 320EX facing the camera. Position the 320EX while checking that it can fire. the picture. 6 Take • Set the camera and take the picture, in the same way as with normal flash shooting.
Using. Fun¥ Automatic Wireless Flash Flash exposure compensation and other settings set with the master unit will also be automatically set in the slave unit(s). Thus, you need not operate the slave unit(s). Wireless flash shooting with the following settings can be done in the same way as with normal flash shooting. • Flash exposure compensation • FE lock • Manual flash fE¥1.· L.il With .FE lock. ifeven one.Speedliteresults inunderexposure,.the <\>icon will blink inthe viewfinder. Open .
~(~l~JI§!ri~f!.a·.:Ft@~ll Modeling flash enables you to see the shadow effects on the subject and the lighting balance. You can use modeling flash with a master flash unit or Speedlite Transmitter (sold separately) attached to the camera. Modeling flash can be used for wireless flash shooting as well as normal flash shooting. Press the depth-of-field preview button on the camera. ~ The flash fires continuously for about one second.
Using ,t he 320EX for Rernote Control Shooting During Wireless Flash Shooting The 320EX can be used for remote control shooting with cameras compatible with Remote Controller RC-1, RC-5, or RC-6. When wireless flash shooting is enabled, remote control shooting is possible while changing easily the position of the 320EX. Example of using the flash for wireless flash shooting I I I ' I I I I • Press the remote release button on the 320EX and position the 320EX within two seconds.
2 I § - 'fB.ulb Take the picture. • Check that the < ~ > lamp is lit, point the remote control transmitter toward the camera, and press the remote release button. f8.. The picture is taken two seconds later. • When wireless flash shooting is enabled and the power switch on the 320EX is set to , the 320EX fires. '~png EJ
Reference 320EX System Wireless Flash Shooting------ ---, Camera/Speedlite with master function @ 8 I I 9-'111111111111~ ® '+ Speedlite with slave function CD Speedlite 320EX (On-camera/Slave unit) @ Mini stand (included with 320EX) @ EOS camera with wireless master function @ Speedlite 580EX II ® Speed lite Transmitter ST-E2 Dedicated transmitter for wireless control of 320EX set as slave units. ® Macro Ring Lite MR-14EX I(]) Macro Twin Lite MT-24EX Flash for macro photography.
Troubleshooting Guide If a problem occurs with the flash, first refer to this Troubleshooting Guide. If this Troubleshooting Guide does not resolve the problem, contact your dealer or nearest Canon Service Center. v'frtlf$@-pdlite.d.oes . rl~~fire. • Make sure that the batteries are installed in the correct orientation. (p.8) • Insert the mounting foot into the camera's hot shoe all the way, slide the lock lever to the right, and secure the Speed lite to the camera. (p.
The picture is "~ry blurred. • When the shooting mode is set to < Av > and the scene is dark, slow sync is enabled automatically and the shutter speed becomes slower. Use a tripod or set the shooting mode to < P >. (p.12) The slave unit does not fire. • When using the built-in flash of the camera as the master unit: • Raise the camera's built-in flash. • Use [Built-in flash func. setting] on the camera to set the wireless flash functions. • Set the power switch to . (p.
Specifications •Type Type: Compatible cameras: Guide No.
• LED Light Brightness: Coverage: Range: Approx. 75 lux EF50mm lens angle of view At ISO 3200 fl1.4: Approx. 4 m 113.1 ft., fl2.8: Approx. 2 m I 6.6 ft., fl4: Approx. 1.4 m 14.6 ft., fl5.6: Approx. 1 m I 3.3 ft. • Remote Release Function Compatible cameras: Cameras compatible with Remote Controller RC-6, RC-5, or RC-1 Release mode: Release after 2 sec. Operating range: Approx. 5 m I 16.4 ft.
Manual Flash Guide No. (ISO 100, in meters/feet) 22.61 74.1 161 52.5 11.31 37.1 5.7 I 18.7 4I 13.
This device complies with Part 15 of the FCC Rules. Operation is subject to the following two conditions: (1) This device may not cause harmful interference, and (2) this device must accept any interference received, including interference that may cause undesired operation. Do not make any changes or modifications to the equipment unless otherwise specified in the instructions. If such changes or modifications should be made, you could be required to stop operation of the equipment.
The apparatus shall not be exposed to dripping or splashing. Batteries shall not be exposed to excessive heat such as sunshine, fire or the like. Dry batteries shall not be subjected to charging. European Union (and EEA) only. - This symbol indicates that this product is not to be disposed of with your household waste, according to the WEEE Directive (2002/96/ EC) and your national law. This product should be handed over to a designated collection point, e.g.
cano n This Instructions booklet is dated January 2011. For information on the camera's compatibility with system accessories marketed after this date, contact your nearest Canon Service Center.
Canon CANON INC. 30-2, Shimomaruko 3-chome, Ohta-ku, Tokyo 146-8501, Japan U.S.A. - - - - CANON U.S.A. INC. One Canon Plaza, Lake Success, NY 11042-1198, U.S.A. For all inquires concerning this product, call toll free in the U.S. 1-800-0K-CANON CANADA - - - CANON CANADA INC. HEADQUARTERS 6390 Dixie Road, Mississauga, Ontario L5T 1P7, Canada CANON CANADA INC. MONTREAL BRANCH 5990, Cote-de-Liesse, Montreal Quebec H4T 1V7, Canada CANON CANADA INC. CALGARY OFFICE 2828, 16th Street, N.E.
Canon Dealer Record of Canon Purchase Fiche d' Achat pour Concessionnaire Canon Complete this card at time of salit. ,~y' .
Ca- 0 ... 'I I ~~I CANON PHOTOGRAPHIC PRODUCTS INTERNATIONAL SERVICE NETWORK ~1? .1":.J :1J Y.7!1!1e if- ~AI! ~ll}..l.\ftt.:l.\ft:f-1? .1/~~0JM:J!Ict. ""FIC:f-1"' .1/!f~bOI<:""CiJS~I:t l,. ""Ci!S'J*~" lll~filiE8 (J:Ir!Canon Int ernational Warrant y SystemOJV/ilfJV~ - ?) MOJII~Ict. a.A.cnn::JII~ll$1-r'tJ. a::r~-?Q>Mt..\lt.Jile!DI<:""CUJ1i:l·ll~a5!i!l:tWZ"tl'J*~" £iliiJ'3·11~i1.3 !!l:tl <:tJ:QJ&~ I ct. ®""§'£ilii.~Mffl'-' Z"""Fc!l..\o £iliE.OJMiF:1:J'1J:t..\:ll~~£iliE.I<:IiJI!~~ . .IIAB1Jtt.J:l.