
Network Video Recording Software RM Series Administrator’s Manual


7
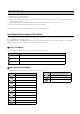
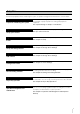
The flow from preparation before introducing the system, to operation management and maintenance is shown below.
Setup Flow
Step 1
Consider the video storage period and recording conditions, determine
the hard disk capacity required for recording and prepare the
equipment.
See “System Design” in Chapter 1: Introduction.
Prepare for introducing the system
Step 2
Set up your cameras for live video display or recording.
See your camera manuals.
Set up your cameras
Step 3
Install this software product on your computer.
See Chapter 2: Setup.
Install
Step 4
Set up the Storage Server Group and Storage Servers.
See Chapter 3: Storage Server Settings.
Set up the Storage Servers
Step 5
Add cameras to the Storage Server Groups.
See Chapter 3: Storage Server Settings.
Add cameras
Step 6
Configure the Viewer to match your environment and use.
See Chapter 4: Viewer Settings.
Configure the Viewer
Step 7
Set the recording conditions for using the cameras, including regular
recording and motion detection recording.
See Chapter 5: Setting a Recording Schedule.
Set a recording schedule
Step 8
Control cameras while viewing live video, check events, and play back
recorded video. You can set up your own layouts for the video windows.
See Chapter 6: Day-to-Day Operations.
Day-to-day operation
Step 9
We recommend that you set up a management and maintenance
process, such as taking regular backups of recording files, to reduce
the impact of network failures on system operation.
See Chapter 7: Operation and Management and Chapter 8:
Backup.
Operation management and
maintenance