
Network Video Recording Software RM Series Administrator’s Manual


64
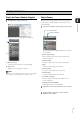
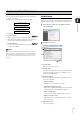
Configure the [Advanced Camera Settings]
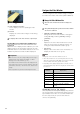
Adjust the Video Quality
Adjust the video quality using the [Image Adjustment] tab
in the [Advanced Camera Settings] dialog box.
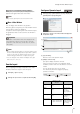
[Image Adjustment] tab
(1) [Exposure]
The settings change according to the selected
exposure setting.
•[Auto]
Automatically control the exposure.
• [Auto (Flickerless)]
Reduce flicker from light sources, such as
fluorescent lighting. The shutter speed is
automatically adjusted according to the lighting
conditions.
• [Auto (Shutter Priority)]
Specify the shutter speed.
The following exposure compensation setting is
displayed when [Auto], [Auto (Flickerless)], or [Auto
(Shutter Priority)] is selected.
[Compensation]: Specify exposure compensation.
Select negative values to darken the video and
positive values to lighten the video.
[Metering Mode]: Specify the metering mode setting:
[Center-weighted], [Average], or [Spot].
1
Click [Window] > [Camera Control].
2
Click the video window of the camera you want to
configure and click [Control] on the [Camera Control]
dialog box to get control of the camera.
3
Click [Advanced] on the [Camera Control] dialog box to
display the [Advanced Camera Settings] dialog box.
4
Click the tab that you want to configure.
5
After configuring the settings, click [Close].
Important
• If camera control is lost while the [Advanced Camera
Settings] dialog box is open, you cannot continue configuring
the settings. Click [Control] on the [Camera Control] dialog
box again to get control and continue configuring the
settings. For details on camera control privileges, see “Get
Control of a Camera” (p. 101).
• [Advanced Camera Settings] is only available while
recording a video when you have camera control privileges.
If camera control is lost, settings will return to the recording
schedule settings.
Important
The settings may be different for different camera models. For
details, see the camera manual.
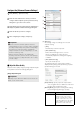
Metering mode Description
[Center-weighted] Meters the entire scene, with an
emphasis on the center. Correct
exposure is obtained for a subject
near the center of the scene, even
though the periphery may be slightly
darker or lighter. Use for subjects
that are in the center of the scene.
(1)
(2)
(3)
(4)