
Network Video Recording Software RM Series Administrator’s Manual


Record at Specific Times (Special Day Schedule Settings)
91
Setting a Recording Schedule
5
Specify the Day for the Special Day Schedule
Note
• Special day schedules can only be set for a one-day time
period (00:00 to 24:00). For example, for a three-day long
weekend (Saturday, Sunday and Monday) you will need to set
a separate schedule for each of the three days.
• You cannot apply different special day schedules to the same
day.
Select a Camera
For details, see “Select a Camera” (p. 75).
Specify the Recording Settings
The setting items are the same as those for the [Edit
Schedule Item] dialog box. For details, see “Set a
Weekly Schedule” (p. 76).
Specify Advanced Settings
Advanced settings can be configured when the
[Advanced] button is available in the recording settings
area. For details, see “Configure the Advanced Recording
Settings” (p. 84).
Save the Recording Schedule
The schedule is displayed in the schedule area. The
schedule becomes active as soon as it is displayed in
the schedule area.
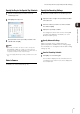
1
Click the schedule name you want to use in the
schedule type area.
2
Click [Add] in the days area.
3
Specify the date for the special day schedule on the
calendar and click [OK].
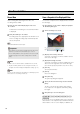
1
Select the schedule name in the schedule type area.
2
Specify the day to assign to the special day schedule
in the days area.
3
Select the camera you want to use in the schedule
area and click [Add].
4
Specify the special day schedule.
1
Click [OK] to close the dialog box.