
Network Video Recording Software RM Series Administrator’s Manual


75
Setting a Recording Schedule
5
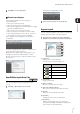
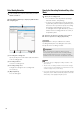
Display the [Recording Schedules] window
The [Repeating Weekly Schedules] tab is selected
whenever the [Recording Schedules] window is
displayed.
(1) [Add Schedule Item], [Edit], [Delete]
Add, edit or delete a schedule item.
(2) [Zoom] slider
Zoom in and zoom out the time line of the schedule
area.
(3) [Search for] box
Find the camera that will be assigned the recording
schedule.
(4) Schedule area
Displays the currently registered cameras and their
corresponding weekly schedules, arranged by day of
the week.
(5) [Close]
Closes this window.
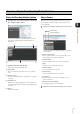
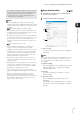
Select a Camera
When you have a large number of cameras registered,
search for the camera using the camera name or any
associated tags.
The following items are displayed when you click the
search button.
•[Name, Tag or Status]
Enter the camera name, any associated tags, or the
camera status in the search criteria box.
• [Camera Name]
Enter the camera name in the search criteria box.
•[Tag]
Select the camera tag to be searched.
•[Camera Status]
Select the status to be searched.
•[Camera Type]
Select the model name to be searched.
• [Host Name]
Enter the camera host name or IP address in the
search criteria box.
•[Storage Server Group Name]
Searching by this item is not available.
Record on a Regular Basis (Repeating Weekly Schedules)
1
Click [Window] > [Recording Schedules] to display the
[Recording Schedules] window.
(1) (2)
(3) (4) (5)
1
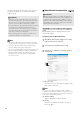
Click the search button and specify the search criteria.
2
Specify the search criteria and search for the camera.
Search button
Search criteria box