
Vixia HD Dual Flash Camcorder Instruction Manual


138 Additional Information
[LCD Screen Dimmer]: When set to [ On], the LCD screen is dimmed.
Doing so is ideal when using the camcorder in locations where the LCD’s
illumination could become a nuisance to others. Hold pressed
down for about 2 seconds to restore the LCD’s normal brightness.
• Dimming the LCD screen does not affect the brightness of your record-
ings or the brightness of the playback image on a TV.
• When the screen dimmer is set to [ Off], the LCD screen will return
to the brightness level that was in use before the screen was dimmed.
[TV Type]: When you connect the camcorder to a TV using the supplied
STV-250N Stereo Video Cable, select the setting according to the type of
TV in order to display the picture in full and in the correct aspect ratio.
[ Normal TV]: TV sets with 4:3 aspect ratio.
[ Wide TV]: TV sets with 16:9 aspect ratio.
• When the TV type is set to [ Normal TV], during the playback of
video originally recorded with an aspect ratio of 16:9, the picture will not
be displayed fullscreen.
[Speaker Volume]: Adjust ( ) the volume of the playback. You can also
adjust the volume using the joystick guide ( 45).
[Demo Mode]: The demonstration mode displays the camcorder’s main
features. It starts automatically when the camcorder is powered with the
compact power adapter if you leave it turned on without a memory card
for more than 5 minutes.
• To cancel the demo mode once it has started, press any button or turn
off the camcorder.
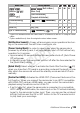
System Setup 2
Menu item Setting options
[Notification Sounds] [ High Volume],
[ Low Volume], [ Off]
zzz –
[Power Saving Mode] [ On], [ Off] zzz –
[Quick Start] [ Off], [10min],
[ 20min], [ 30min]
z –––
[Control for HDMI]
1
[ On], [ Off] zzz –
DISP.
COPY