CEL-SX2RA2F0 HD kamera Használati útmutató
SZERZŐI JOGI FIGYELMEZTETÉS: A szerzői jog védelme alá eső anyagok jogosulatlan rögzítése sértheti a szerzői jog tulajdonosainak jogait és ellentétes lehet a szerzői joggal. 2 Védjegyek • Az SD, SDXC és az SDHC emblémák az SD-3C, LLC védjegyei. • A Microsoft és a Windows a Microsoft Corporation védjegyei vagy bejegyzett védjegyei az Egyesült Államokban és/vagy más országokban. • A macOS az Apple Inc. bejegyzett védjegye az Egyesült Államokban és más országokban.
A kamera főbb jellemzői A Canon XA15 / XA11 nagy teljesítménye és kis mérete ideálissá teszi ezt a HD kamerát a legkülönfélébb körülmények közötti használatra is. A következőkben bemutatunk néhányat a kamera funkciói közül. HD felvételkészítés Kezelés HD CMOS PRO érzékelő és DIGIC DV 4 képprocesszor Hangsúlyozott rugalmasság A kamera 1/2.84-típusú CMOS képfelvevő elemmel működik, mely 2,91 millió hatásos képponttal állítja élő a képet (2136x1362).
AVCHD/MP4 felvétel és kettős felvételkészítés Felvétel készítése során választhat az AVCHD és a MP4 formátumok között (A 33). Használhatja a kettős felvételkészítést (A 41), hogy ugyanazt a jelenetet felvegye mindkét memóriakártyára, emellett különböző formátumban is rögzíthet a két memóriakártyára. A kettős felvételkészítés kényelmes, például, hogy biztonsági mentést készítsen a felvételről.
Tartalomjegyzék 1 Bevezetés 8 A használati útmutatóról 8 A használati útmutatóban alkalmazott jelölések 8 A mellékelt tartozékok 10 A kamera részei és kezelőszervei 11 2 Előkészületek 16 A ferritgyűrű felszerelése 16 Az akkumulátor töltése 16 A kamera előkészítése 19 A mikrofontartó feltétele 19 A fogantyú feltétele 19 A napellenző és az objektív védősapka használata 20 A kereső használata 20 Az LCD képernyő beállítása 21 Kézpánt és szíjak 22 A kamera alapvető használata 24 A kamera be- és kikapcsolása 24
A mikrofon érzékenységének beállítása (INPUT csatlakozók) 74 A mikrofon csillapításának bekapcsolása (INPUT csatlakozók) 74 A beépített mikrofon vagy a MIC csatlakozóhoz kapcsolt külső mikrofon használata 75 Bemenet kapcsolása (MIC csatlakozó) 75 Hangjelenetek 75 Hangfelvételi szint (MIC csatlakozó/ beépített mikrofon) 76 Mikrofon irányhatás (Beépített mikrofon) 77 Hang kiegyenlítő (Beépített mikrofon) 78 Szélvédő (Beépített mikrofon) 78 Mikrofon csillapító (Beépített mikrofon) 79 Mélyelnyomó szűrő (MIC
Felvételek másolása memóriakártyák között 111 Jelenetek másolása a videó index képernyőről 111 A fényképek másolása egyenként 111 Fényképek másolása az index képernyőről 112 Filmek konvertálása MP4 formátumra 113 Felvétel másolása külső videó felvevő eszközre 114 Nagy felbontással 114 Standard felbontás 114 9 További információk 116 Melléklet: A menüpontok listája 116 FUNC.
A használati útmutatóról 1 Bevezetés Bevezetés A használati útmutatóról 8 Köszönjük, hogy a Canon XA15 / XA11 készülékét választotta. Kérjük, a kamera használata előtt alaposan olvassa át ezt az útmutatót, és őrizze meg, hogy később is bármikor fellapozhassa. Ha a kamera valamilyen okból nem működne, olvassa el a Hibakeresés (A 130) című részt. A használati útmutatóban alkalmazott jelölések • FONTOS: A kamera használatával kapcsolatos előírások.
A használati útmutatóról A három ikonkészlet az üzemmódot jelöli, és azt elérhető-e a funkció abban az üzemmódban. : Azt jelzi, hogy a kamera felvételi (CAMERA), vagy lejátszási (MEDIA) üzemmódban van. Ebben a példában a funkció csak a üzemmódban érhető el A részletekért lásd A kamera be- és kikapcsolása (A 24) című részt. : A filmformátumot jelzi. A részletekért lásd A filmformátum kiválasztása (AVCHD/MP4) (A 34) című részt. : A kameramódot jelzi.
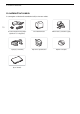
A mellékelt tartozékok A mellékelt tartozékok A csomagban a következő tartozékokat találja a kamera mellett: 10 CA-570 kompakt hálózati adapter (tápkábellel és ferritgyűrűvel) BP-820 akkumulátor Mikrofontartó (csavarokkal együtt) Fogantyú (csavarokkal) Napellenző objektívfedéllel Objektív védősapka Gyors útmutató
A kamera részei és kezelőszervei A kamera részei és kezelőszervei Bal oldali nézet 11 2 3 1 4 5 1 2 3 4 5 6 7 6 7 8 Objektívfedél kapcsolója (A 35) Memóriakártya-foglalat 2 (A 32) Memóriakártya-foglalat 3 (A 32) u (rögzítés felülvizsgálata) gomb (A 39)/5.
A kamera részei és kezelőszervei 12 1 2 3 4 Beépített hangszóró (A 94) MIC (mikrofon) csatlakozó (A 71) HDMI OUT-csatlakozó (A 101, 102) REMOTE (távvezérlő) csatlakozó A kereskedelemben beszerezhető távvezérlők csatlakoztatásához.
A kamera részei és kezelőszervei Felülnézet Alulnézet 3 14 9 4 5 1 6 2 7 10 11 12 8 1 2 3 4 5 6 7 Főkapcsoló (A 24) POWER/CHG (akkumulátortöltés) lámpa (A 16) Beépített sztereó mikrofon (A 71) Tartozékcsatlakozó Módválasztó kapcsoló (A 25) Kamera zoom billenőgombja (A 52) ACCESS (memóriakártya-hozzáférés) jelzőfény (A 35) 8 Hordozófogantyú rögzítése (A 19) 9 Napellenző rögzítési helyének jelölése 10 Állványmenet A kamerát 6,5 mm-es vagy rövidebb rögzítőcsavarral történő állványhoz rögzítéséhez.
A kamera részei és kezelőszervei Fogantyú 2 3 4 5 6 7 8 9 10 15 1 11 1 2 3 4 5 6 7 8 12 13 14 Mikrofontartó (A 71) Mikrofonrögzítő csavar (A 71) Tartozékcsatlakozó Kiegészítők csatlakoztatására.
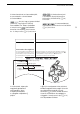
A ferritgyűrű felszerelése 2 Előkészületek Előkészületek A ferritgyűrű felszerelése Szerelje fel a mellékelt ferritgyűrűt mielőtt csatlakoztatja a kompakt hálózati adaptert a kamerához. 16 Szerelje fel a ferritgyűrűt a kompakt hálózati adapter kábelére kb. 6 cm-re a DC-csatlakozótól (a DC IN bemenethez csatlakozó csatlakozódugó). Fűzze át a kábelt a gyűrű közepén és tekerje a gyűrű köré (ahogyan az ábrán látható), majd zárja azt be, amíg nem kattan.
Az akkumulátor töltése 5 Az akkumulátor töltése megkezdődik a kamera kikapcsolásakor. POWER/CHG (akkumulátortöltés) jelzőlámpa • Ha a kamera be volt kapcsolva, a zöld POWER/CHG jelzőlámpa a kamera kikapcsolásakor kialszik. Kis idő múlva a POWER/CHG jelzőlámpa vörös színnel jelzi az akkumulátor töltését. A vörös POWER/CHG jelzőlámpa az akkumulátor teljes feltöltődése után kialszik. • Ha a töltésjelző gyorsan villog, lapozzon a Hibakeresés (A 132) részhez.
Az akkumulátor töltése FONTOS 18 • A kompakt hálózati adapter kábelének csatlakoztatása, illetve a csatlakozás bontása előtt mindig kapcsolja ki a kamerát. Miután kikapcsolja a kamerát fontos adatok kerülnek a memóriakártyára. Várja meg, amíg a zöld POWER/CHG jelzőlámpa kialszik. • A kompakt hálózati adapter használata esetén ne rögzítse véglegesen egy helyre, mert ez működési zavart okozhat.
A kamera előkészítése A kamera előkészítése Ez a rész a kamera előkészítését írja le; a fogantyú és a napellenző feltételét, valamint a kereső és az LCD képernyő beállítását. A napellenző, a kézpánt és a szíjak felszerelésekor legyen óvatos, és helyezze a kamerát egy asztalra vagy más stabil felületre, hogy ne ejtse el. A mikrofontartó feltétele A mellékelt csavarokkal szerelje fel a mikrofontartót a fogantyúra.
A kamera előkészítése A napellenző és az objektív védősapka használata Felvételkészítés közben az objektívfedéllel a mellékelt napellenző hatásos a szórt fény csökkentésére, amely fényvisszaverődést és szellemképeket okozhat. Továbbá az objektívfedél bezárása segít megelőzni az újlenyomatok és szennyeződésnek lerakódását az objektíven. 20 1 Vegye le az objektív védősapkát.
A kamera előkészítése • Akik szemüveget viselnek, a kereső használatakor a szemkagyló külső szélét a kamera felé visszanyomhatják, ha úgy kényelmesebb. 21 MEGJEGYZÉSEK • Az LCD képernyő és a kereső nem használható egyszerre. A kereső használatához csukja be az LCD panelt. • Tartsa a szemkagylót feltéve, ha használja a kamerát. • A kereső megóvásáról további információkat az Elővigyázatossági rendszabályok (A 140), és a Tisztítás (A 143) című fejezetekben talál.
A kamera előkészítése • Az LCD és a kereső képernyőről: Ezek a képernyők rendkívül nagy pontosságú gyártási technológiával készülnek, amely során a képpontok 99,99%-a megfelel a specifikációnak. Nagyon ritkán előfordulhat, hogy a képpontok hibásan világítanak, vagy állandó fehér pontként jelennek meg. Ennek nincs hatása a rögzített felvételre, és nem jelent működési hibát. Kézpánt és szíjak 22 Rögzítse a kézpántot.
A kamera előkészítése Kiegészítő vállpánt felszerelése Fűzze át a vállpántot a kézpánt rögzítési helyén, majd állítsa be a pánt hosszát.
A kamera alapvető használata A kamera alapvető használata A kamera be- és kikapcsolása Bekapcsolhatja a kamerát CAMERA ( ) módban a felvételek elkészítésére és MEDIA ( módban a felvételek lejátszására. A főkapcsolóval választhatja ki az üzemmódot. 24 A kamera bekapcsolása A főkapcsolót állítsa CAMERA helyzetbe a módhoz (A 35) vagy MEDIA helyzetbe a módhoz (A 93). mód A kamera kikapcsolásához A főkapcsolót állítsa OFF helyzetbe.
A kamera alapvető használata A Kamera mód beállítása Felvételek készítésekor, a felvételi stílusához igazíthatja a kameramódot. 25 Automatikus mód Állítsa a módválasztó kapcsolót N állásba. Ebben a módban a kamera végzi el az összes beállítást, csak a felvételre kell koncentrálni (A 35). Ez az üzemmód megfelel azoknak, akik éppen nem akarnak fáradni a kamera beállításával. Kézi mód Állítsa a módválasztó kapcsolót n állásba. Ebben a módban kihasználható az összes menü, beállítás és funkció (A 37).
A kamera alapvető használata Érintés Nyomjon meg egy elemet az érintőképernyőn. Jelenet lejátszása indexképernyőn, beállítás kiválasztása menüben stb. 26 Húzás Húzza az ujját le és fel, illetve balra és jobbra a képernyőn. Menük görgetésére, indexképernyők közötti lapozgatásra, és csúszkák állítására használható, ilyen pl. a hangerőállítás. Egyes képernyőkön ugyanez a hatás a háromszög alakú, lépernyőn megjelenő gombokkal is elérhető. FONTOS • A videokamera érintőképernyővel van felszerelve.
Beállítások az első bekapcsoláskor Beállítások az első bekapcsoláskor A dátum és az idő beállítása A használat előtt be kell állítani a dátumot és az időt. A [Date/Time/Datum/Idő] képernyő (a dátum és idő beállítására szolgáló képernyő) automatikusan megjelenik, ha a kamera órája nincs beállítva. Üzemmódok: 1 Használja a főkapcsolót a kamera bekapcsolásához. • Megjelenik a [Date/Time/Datum/Idő] képernyő. 2 Érintse meg megváltoztatandó mezőt (év, hónap, nap, óra, perc).
Beállítások az első bekapcsoláskor A nyelv beállítása A kamera nyelve alapbeállításban az angol. 27 nyelv közül választhat egyet. A Beállítási menü (A 30) részből tájékozódhat az egyes menüpontok kiválasztásával kapcsolatban ehhez az eljáráshoz. 28 Üzemmódok: 1 Nyissa meg a [Language/Nyelv ] képernyőt. [FUNC.] > [MENU] > q > [Nyelv ] • A [FUNC.] megérintése csak akkor szükséges, ha módban hajtja végre az eljárást. 2 Érintse meg a kívánt nyelvet, majd az [OK] lehetőséget.
Beállítások az első bekapcsoláskor A menük használata A kamera sok funkciója érhető el a FUNC. menüben és a beállítási menükben. A menükkel és beállításokkal kapcsolatos részleteket olvassa el a mellékletet A menüpontok listái (A 116) című fejezetében. FUNC. menü A 29 módban: Üzemmódok: A FUNC. menü megnyitásához érintse meg a [FUNC.] gombot a képernyőn, vagy nyomja meg a botkormányt (Ý/Þ) a [FUNC.] lehetőség kiválasztásához, majd nyomja meg a SET gombot. Amikor a FUNC.
Beállítások az első bekapcsoláskor Beállítás menü Az útmutatóban a beállítási menükben a navigálás az érintőképernyő vezérlőinek segítségével van elmagyarázva, de elérhetőek a botkormánnyal vagy a más gombokkal is. Az alábbi folyamat mindkét módszer használatát bemutatja. Szükség esetén tekintse át újra ezt a részt a botkormány használatáról. Üzemmódok: 30 Az érintőpanel vezérlőelemeinek használata 1 módban kizárólag: Érintse meg a [FUNC.] gombot. 2 Érintse meg a [MENU] lehetőséget.
Memóriakártya használata Memóriakártya használata A kamerával használható memóriakártyák Ebben a kamerában a következő típusú, kereskedelemben kapható Secure Digital (SD) kártyák használhatók. CLASS 4, 6 vagy 10* osztályú memóriakártyák használatát javasoljuk. A filmrögzítési funkciót 2017. júniusáig a következő gyártók SD-/SDHC-/SDXC-kártyáin teszteltük: Panasonic, Toshiba és SanDisk. A kamerával tesztelt felvételi adathordozókról szóló a legújabb információkért látogasson el a helyi Canon honlapra.
Memóriakártya használata A memóriakártya behelyezése és kivétele Mindenképp inicializálja (A 32) az összes memóriakártyát, mielőtt használná őket ezzel a kamerával. 1 Kapcsolja ki a kamerát. • Győződjön meg róla, hogy a POWER/CHG jelzőlámpa kialudt. 32 2 Nyissa ki a kettős memóriakártya-foglalat fedelét. 3 Tolja be a memóriakártyát az egyik foglalatba, a címkével a kamera eleje felé. • Két memóriakártyát használhat, mindkét foglalatba egyetegyet. 4 Csukja be a kettős memóriakártya foglalat fedelét.
Memóriakártya használata 3 Érintse meg az [Igen]-t. • Ha a [Teljes Inicializálás] lehetőséget választotta a [Mégse] megérintése megállítja a folyamatot. Az összes kép törlődik memóriakártyáról, és az használható lesz. 4 Érintse meg az [OK], majd az [X] ikont. FONTOS • A memóriakártya formázása véglegesen töröl minden felvételt. Az elveszett eredeti felvételeket nem lehet helyreállítani! Fontos felvételeit előzetesen mentse el külső eszköz használatával (A 109).
A filmformátum kiválasztása (AVCHD/MP4) A filmformátum kiválasztása (AVCHD/MP4) Megválaszthatja, hogy a filmeket AVCHD vagy MP4 formátumban rögzítse. Az AVCHD formátum fantasztikus képminőséget biztosít. Az MP4 filmek sokoldalúan használhatók, és könnyen lejátszhatók okostelefonokon és táblagépeken vagy feltölthetők az internetre. Üzemmódok: 34 1 Nyissa meg a [Filmformátum] képernyőt. [FUNC.] > [MENU] > > [Filmformátum] 2 Válassza ki a kívánt filmformátumot. 3 Érintse meg az [X] ikont.
3 Filmek és fotók rögzítése Felvétel Felvétel Filmek és fotók rögzítése Kiválaszthatja a filmek és a fotók rögzítésére használni kívánt memóriakártyát (A 33). A hang felvételével kapcsolatban lásd a Hangfelvétel (A 71) című fejezetet. Ha a kamera valamilyen okból nem működne megfelelően, olvassa el a Hibakeresés (A 130) című részt. ELLENŐRIZNI • A felvétel megkezdése előtt készítsen egy tesztfelvételt, hogy ellenőrizhesse, megfelelően működik-e a kamera.
Filmek és fotók rögzítése Ha befejezte a felvételt 1 Az objektívfedél becsukásához állítsa a kapcsolót CLOSED állásba. 2 Ellenőrizze, hogy az ACCESS hozzáférésjelző már kialudt-e. 3 A főkapcsolót állítsa OFF helyzetbe. 4 Csukja be az LCD panelt és állítsa vissza a keresőt alapállásba. 36 Smart AUTO módban a kamera a téma bizonyos jellemzőit érzékeli; a hátteret, megvilágítást stb.
Filmek és fotók rögzítése Intelligens IS Az Intelligens képstabilizálás funkció lehetővé teszi, hogy a kamera kiválassza a legjobb képstabilizációs módot a felvételi módtól függően. Az Intelligens IS ikon a következők egyikére változik. A és módokban a képstabilizálás manuálisan beállítható (A 55).
Filmek és fotók rögzítése MEGJEGYZÉSEK 38 • A fogantyún lévő START/STOP gombon zárókar van a véletlen működés megakadályozására. Állítsa a zárókart C helyzetbe, ha el akarja kerülni a felvétel véletlen leállítását, illetve ha nem akarja használni a START/STOP gombot. Ha újból engedélyezni akarja a START/STOP gomb használatát, állítsa vissza a kart előző helyzetébe. • Amikor a [FUNC.] > [MENU] > q > [Felv.
Filmek és fotók rögzítése Az utoljára rögzített jelenet ellenőrzése Az utoljára rögzített jelenet utolsó 4 másodpercét ellenőrizheti a kamera módba kapcsolása nélkül is. Az utolsó jelenet képének lejátszásakor hang nem szól. Alapértelmezésben az 5. kijelölhető funkciójú gomb beállítása [ Felv. megtekintése], de a funkcióhoz rendelhet más gombot is (A 90). Üzemmódok: 39 1 Rögzítsen egy jelenetet. 2 Egy jelent rögzítését követően nyomja meg a u gombot.
A Felvétel-mód (videó képminőség) kiválasztása A Felvétel-mód (videó képminőség) kiválasztása A kamera többféle felvételi módot ismer, attól függően, hogy a formátum AVCHD vagy MP4. Amikor egy AVCHD-jelenet felvételi módjában a beállítás 28 Mbps LPCM (50.00P) vagy 24 Mbps LPCM, kétcsatornás lineáris PCM hangot rögzíthet 48 kHz-es mintavételi frekvenciával. Részletek az alábbi táblázatban. Üzemmódok: 40 1 Nyissa meg a [Felvétel-mód] képernyőt. [FUNC.
Kettős felvételkészítés és rögzítés memóriaváltással Kettős felvételkészítés és rögzítés memóriaváltással Felvételkor a kettős felvételkészítéssel egyszerre rögzíthet mindkét memóriakártyára. Illetve használhatja a memóriaváltást is, így ha az egyik memóriakártya megtelik, a felvétel megszakítás nélkül folytatható a másik memóriakártyára. Kettős felvételkészítés aktiválása A tartalék felvételt a kamera a „B” memóriakártyára rögzíti.
A képfrekvencia kiválasztása A képfrekvencia kiválasztása A filmek megjelenésének módosításához módosíthatja az AVCHD-filmek képfrekvenciáját (a másodpercenként rögzített képkockák számát). Ha a felvételi mód 28 Mbps LPCM (50.00P) vagy 28 Mbps (50.00P) AVCHD videók esetén, illetve 35 Mbps (50.00P) vagy 8 Mbps (50.00P) MP4 filmek esetén, a képfrekvencia automatikusan 50.00P lesz, így ez nem lesz módosítható. Ezenkívül a más felvételi módban rögzített MP4 filmek képfrekvenciája 25.00P lesz.
Lassított és gyorsított felvétel Lassított és gyorsított felvétel Ha a videoformátum az MP4, olyan jeleneteket rögzíthet, amelyek lassított vagy gyorsított felvétel effektust tartalmaznak a lejátszás során. Egyszerűen kiválaszthatja a lassított/gyorsított felvétel kívánt sebességét (a normál sebesség 0,5–1200-szorosa), majd megkezdheti a felvételt. Hangfelvétel nincs ezeknél a jeleneteknél. Üzemmódok: 43 1 Nyissa meg a [Lassított és gyorsított] képernyőt. [FUNC.] > [MENU] > > [Lass.
CINEMA mód és mozifilm hatású szűrők CINEMA mód és mozifilm hatású szűrők A módban használhat professzionális mozifilm hatású szűrőket, hogy videóinak egyéni jelleget adjon. Filmek MP4 formátumra konvertálásakor használhatók mozifilmhatású szűrők (A 113). Üzemmódok: 44 1 A módválasztó kapcsolót állítsa E helyzetbe. 2 Érintse meg a [FILTER 1] pontot a mozifilm hatású szűrők kiválasztó képernyőjének megnyitásához.
CINEMA mód és mozifilm hatású szűrők Beállítások ( Alapértelmezett érték) A kamerán a következő mozifilm hatású szűrő közül választhat. Válassza ki a szűrőt a hatást a képernyőn figyelve. [1. Mozi standard] [2. Élénk] [3. Álom] [4. Hűvös] [5. Szépia] [6. Régi filmek] [7. Emlékek] 45 !Szűrő száma (a képernyőn megjelenő gombon látható) és neve "Előzetes a képernyőn #Hatás mértékének kiválasztása $Rövid leírás (útmutató a képernyőn) MEGJEGYZÉSEK • - módban a következő funkciók nem használhatók.
Élességállítás Élességállítás A kamera lehetőséget kínál a kézi és az automatikus sebességállításra is. Kézi élességállításnál a Fókusz programozás és a Körvonalazás funkciók használhatók segítségként. Automatikus élességállításnál az Arcérzékelés és -követés funkció segítségével biztosítható, hogy a téma éles maradjon. 46 ELLENŐRIZNI • A következő lépések előtt állítsa be a zoom-ot. Kézi élességállítás Állítson élességet kézzel, az élességállító/zoom gyűrűvel.
Élességállítás Fókusz programozás Kézi élességállításnál előre kijelölhet egy helyzetet, melyhez később hamar visszatérhet. 1 Jelenítse meg a fókusz/zoom vezérlőket. [FUNC.] > [< Fókusz] 2 Érintse meg az [MF] ikont. 3 Az Érintő AF funkcióval, vagy az élességállító/zoom gyűrűvel elérheti a kívánt fókuszpozíciót. 4 A [SET] gomb megérintésével jelölje ki a pontot. 5 Az élesség beállítása után a [ON] megérintésével a megjegyzett élességi helyzetbe állíthatja a kamerát.
Élességállítás Automatikus élességállítás Ha az automatikus élességállítás aktív, a képernyő közepén lévő tárgy élességét állandóan megtartja. Az élességállítási tartomány 1 cm (nagy látószögű végállásban az objektívtubus elejétől mérve) és G, illetve 60 cm (a teljes zoomtartományban az objektívtubus elejétől mérve) és G között van. Az automatikus élességállítás sebességét a következő eljárással lehet beállítani. Üzemmódok: 48 1 Csak és módban: Nyomja meg az AF/MF gombot.
Élességállítás • Ha a felvételi program beállítása [P Tűzijáték], a fókusz G lesz, és nem módosítható. • Az automatikus élességállítás a következő esetekben hibázhat. Ebben az esetben állítsa be kézzel az élességet. - Tükröző felületek - Piszkos vagy vizes ablakon - Kevéssé kontrasztos vagy függőleges keresztül fotózott témák vonalak nélküli témák - Éjszakai felvételek - Gyorsan mozgó témák - Amikor a [FUNC.] > [Képeffektusok] > [Megjelenések] beállítása [Széles DR].
Élességállítás Automatikus élességállítás csak arcokra Korlátozhatja az automatikus élességállítást arra az esetre, ha a kamera észleli az alany arcát a képen, egyébként az élességállítás kézi lesz. A kamera beállítja a világosságot is, amikor arcra fókuszál. 50 Az egyik kijelölhető funkciójú gombot állítsa [~ AF csak arcra] funkcióra (A 90), és nyomja meg a gombot. • A ~ jelenik meg a képernyőn. MEGJEGYZÉSEK • A kamera nem emberi arcokat is észlelhet tévesen.
A zoom használata A zoom használata Üzemmódok: A zoom alkalmazásához használhatja az élességállító/zoom gyűrűt, a kamera és a fogantyú zoom billenőgombjait, illetve az érintőképernyőn lévő zoom vezérlőket. A 20x optikai zoom mellett bekapcsolhatja a digitális zoomot* (400x) a [FUNC.] > [MENU] > p > [Digitális zoom] beállítással. A kamerában digitális telekonverter is működik, mellyel a képet digitálisan megnövelheti. * A digitális zoom elérhető módban, vagy amikor a [FUNC.
A zoom használata A zoom billenőgombok használata Mozgassa a zoom billenőgombot a kamerán vagy a fogantyún a T (nagy látószög) felé a távolításhoz. Közelítéshez tolja a kart a S (telefotó) irányba. 52 • Alapértelmezésben a kamera zoom billenőgombja (a kézpánthoz közeli) változó sebességgel működik – lassabb zoomhoz nyomja gyengédebben; gyorsabb zoomhoz erősebben. Az alábbi lépésekkel beállíthatja a zoom sebességét és kiválaszthat egy állandó sebességet.
A zoom használata A gyors zoom használata Ha a [Zoomkar zoomsebesség] beállítása [Y] használhatja a gyors zoom funkciót. Ha felvételi készenléti üzemmódban használja a gyors zoom lehetőséget, akkor a [Zoom sebesség] beállítása [Z Gyors]. Felvétel közben a zoom sebességet a [Zoom sebesség] határozza meg. 1 Nyissa meg a [Gyors zoom] képernyőt. [FUNC.] > [MENU] > p > [Gyors zoom] 53 2 Érintse meg a [i Be] lehetőséget, majd az [X] ikont.
A zoom használata 2 A zoom vezérlőket megérintve működtetheti a zoomot. • A V területen történő megérintéssel távolítás, az U területen történő megérintéssel közelítés érhető el. A középponthoz közelebb történő megérintéssel a zoomolás lassabb; a V/U ikonokhoz közelebbi érintéssel pedig gyorsabb. 54 3 A zoom vezérlők elrejtéséhez érintse meg az [X] gombot. A zoom lágy kezelése A zoom finom vezérlése gondoskodik a zoom fokozatos elindításáról és megállításáról.
Összetett képstabilizálási módok Összetett képstabilizálási módok A képstabilizátor csökkenti a kamera elmozdulása miatti elmosódást a képen, így képei szebbek lesznek. Válassza ki a felvételi körülményekhez legjobban illő képstabilizálási módot. Üzemmódok: 1 Jelenítse meg a [Képstabilizátor] képernyőt. [FUNC.] > [Képstabilizátor] 2 Érintse meg a kívánt IS módot, majd az [X] gombot.
Automatikus erősítésszabályozás (AGC) határolás Automatikus erősítésszabályozás (AGC) határolás Ha gyenge fényben szeretne felvétel készíteni, a kamera, hogy a kép világosságát megtartsa, automatikusan fokozza az erősítést. A nagyobb erősítés azonban nagyobb videozajt okoz a képen. Beállíthatja az AGC működési határát, így a legnagyobb erősítéssel a zaj mértéke is határolva lesz. Minél kisebb az AGC határolás, annál sötétebb a kép, de annál kevesebb képzajt is tartalmaz.
Felvételi programok az automatikus expozíció-beállítással Felvételi programok az automatikus expozíció-beállítással Az automatikus expozíció-beállítással (AE) működő felvételi programokban, a kamera beállít néhány kamerával kapcsolatos beállítást az optimális expozíció érdekében. Az AE felvételi programokban megváltoztathatja az olyan funkciókat mint a fehéregyensúly és képeffektusok. Üzemmódok: 1 Nyissa meg a kívánt felvételi program képernyőjét. 57 [FUNC.] > [M.felv.] > [‚ Idő-előv.
Felvételi programok az automatikus expozíció-beállítással • Az expozíció rögzítésekor a rekesz értéke és a záridő nem módosítható. Állítsa be a rekesz értékével vagy a záridővel előzetesen kézzel az expozíciót. • Ha a [FUNC.] > [MENU] > q > [CUSTOM tárcsa és gomb] beállításnál a [” Tv / Av] (A 89) lehetőséget választja, beállíthatja a záridőt vagy a rekeszértéket a CUSTOM tárcsával és gombbal.
Expozíció beállítása Expozíció beállítása Bizonyos esetekben a hátulról megvilágított témák sötétnek tűnhetnek (alulexponáltak), illetve az erős fénnyel megvilágított témák túl fényesnek tűnhetnek (túlexponáltak). Ilyen esetekben az expozíció beállítása segít. Ez a kamera rendelkezik [n Kézi expozíció] funkcióval. Az expozíciót más felvételi programoknál is kompenzálhatja.
Expozíció beállítása A zebra minta használata A zebra minta megjelöli az esetleg túlexponálódó részeket, lehetőséget adva ezzel az expozíció helyes megválasztására. A kamera kétféle zebra mintát kínál: A csak 100%-os megjelöli a részleteket elvesztő csúcsfényeket, míg a 70%-os megjelöli azokat a helyeket is, melyek veszélyesen közel vannak a túlexponálódáshoz. 1 Az expozícióbeállítási képernyőn (A 59) a [w] megérintésével válassza ki a zebraszintet. 60 2 Érintse meg: [70%] vagy [100%], majd [K].
Expozíció beállítása MEGJEGYZÉSEK • Az expozíció kompenzáció beállítása infravörös módban nem lehetséges. • A kamera visszatér az automatikus expozícióhoz, ha kikapcsolják, a főkapcsolót működtetik, illetve ha megváltozik a felvételi program vagy a kameramód megváltozik. • Ha a [FUNC.] > [MENU] > q > [CUSTOM tárcsa és gomb] beállításnál az [y Expozíció] (A 89) lehetőséget választja, beállíthatja az expozíciókompenzáció értékét a CUSTOM tárcsával és gombbal.
Fehéregyensúly Fehéregyensúly A fehéregyensúly funkció a színek különböző világítási feltételek melletti helyes reprodukálására szolgál. Üzemmódok: ELLENŐRIZNI 62 • Válasszon a különleges téma felvételi programokon kívül egy felvételi programot. 1 Jelenítse meg a fehéregyensúly képernyőjét. [FUNC.] > [Ä Fehéregyensúly (WB)] 2 Érintse meg a kívánt lehetőséget, majd érintse meg az [X] ikont. • Ha a [Â Színhőmérséklet], [Æ 1. beáll.] vagy [Ç 2. beáll.
Fehéregyensúly MEGJEGYZÉSEK • Amikor egyedi fehéregyensúly beállítást választott: - Állítsa be a [FUNC.] > [MENU] > p > [Digitális zoom] beállításnál a [j Ki] lehetőséget. - Állítsa be ismét a fehéregyensúlyt, amikor helyet változtat vagy a világítási feltételek megváltoznak. - A fényforrástól függően a Å tovább villoghat. Az eredmény ezzel együtt jobb lesz, mint az [Ã Automatikus] használata esetén.
Különleges téma felvételi programok Különleges téma felvételi programok A különleges téma felvételi programok használatával könnyedén készíthet felvételeket napfényes sípályán, naplementében vagy tűzijátékról. Üzemmódok: 1 Nyissa meg a felvételi programok képernyőjét. 64 [FUNC.] > [M.felv.] > [ú Portré] 2 Érintse meg a kívánt felvételi programot, majd az [X] gombot. Beállítások ( Alapértelmezett érték) [úPortré] A kamera nagy nyílást használ, ezáltal a háttér elmosódott, a téma pedig éles.
Különleges téma felvételi programok [œSzpotfény] Pontszerű fényforrással megvilágított jeleneteket rögzíthet. [PTűzijáték] Tűzijáték megörökítésére. 65 MEGJEGYZÉSEK • [ú Portré]/[û Sport]/[ý Hó]/[L Tengerpart]: Lejátszáskor előfordulhat, hogy a kép nem jelenik meg teljesen tisztán. • [ú Portré]: Minél nagyobb mértékű nagyítást alkalmaz a zoommal (S), annál homályosabb lesz a háttér. • [ý Hó]/[L Tengerpart]: Felhős időben vagy árnyékban a téma túlexponált lehet.
Megjelenések és más képeffektusok Megjelenések és más képeffektusok Felvételeihez „megjelenést” adhat. A megjelenés olyan különböző képbeállítások kombinációja, amelyek javíthatnak a kép vizuális minőségén. Emellett beállíthatja a kép különböző jellemzőit is, így például a színmélységet és az élességet. Üzemmódok: 66 ELLENŐRIZNI • Válasszon a különleges téma felvételi programokon kívül egy felvételi programot.
Megjelenések és más képeffektusok 5 Mentsen az [X] megérintésével, alkalmazva az egyedi képbeállításokat. • A b ikon jelenik meg a képernyőn. A [Csúcsf.elsőbbség] kiválasztása esetén a – is megjelenik a képernyőn. MEGJEGYZÉSEK • Az infravörös módban képeffektusok nem használhatók. • Amikor a [FUNC.] > [y Expozíció] beállítása [n], akkor a [Fényerő] paraméter nem áll rendelkezésre. • Amikor a [FUNC.] > [Képeffektusok] > [Megjelenések] beállítása [Széles DR] vagy [Csúcsf.
Az időkód beállítása Az időkód beállítása A kamera képes időkód előállítására és annak beágyazására a felvételbe. Ezenkívül az időkód megjelenik a videokimeneten a HD/SD-SDI csatlakozón (csak o) és a HDMI OUT csatlakozón. Megválasztható, hogy az időkód megjelenjen-e a HDMI OUT csatlakozón (A 124). Üzemmódok: 68 A futási mód kiválasztása Kiválasztható az időkód futásának módja. 1 Nyissa meg az [Időkódos mód] képernyőt. [FUNC.] > [MENU] > > [Időkódos mód] 2 Érintse meg a kívánt lehetőséget.
Az időkód beállítása MEGJEGYZÉSEK • A [Free Run] automatikusan bekapcsolódik és nem kapcsolható ki előfelvételi módban. • A beépített lítium akkumulátor feltöltött állapotában a szabadon futó időkód [Free Run] módban akkor is folytatja a számlálást, ha megszakítja a kamera egyéb táplálását. Ez azonban pontatlanabb, mint amikor a kamera be van kapcsolva.
A felhasználói bit beállítása A felhasználói bit beállítása A felhasználói bit a felvétel dátumából vagy időpontjából választható ki, vagy egy 8 karakterből álló hexadecimális azonosítóként is megadható. 16 féle karakter használható: számok 0-tól 9-ig és betűk A-tól F-ig. Jelenet felvételekor a kamera a felhasználói bitet is rögzíti vele együtt. A felhasználói bit megjelenik a HD/SD-SDI csatlakozón (csak (o) vagy a HDMI OUT csatlakozón is.
Hangfelvétel Hangfelvétel A rögzített hangforrás lehet a beépített sztereó mikrofon, a kiegészítő külső mikrofon (INPUT 1/INPUT 2 csatlakozók*, MIC csatlakozó) vagy vonali szintű bemeneti jel (INPUT 1/INPUT 2 csatlakozók*). Az INPUT 1/INPUT 2 csatlakozóhoz kapcsolt hangforrás esetén a hangbemenetet függetlenül választhatja az 1. (CH1) és 2. (CH2) csatornához. * Csak akkor elérhető, ha a hordozófogantyú fel van szerelve a kamerára. AVCHD film rögzítésekor, illetve ha a felvételi módot 28 Mbps LPCM (50.
Hangfelvétel Külső mikrofon vagy külső audio bemeneti jelforrás csatlakoztatása a kamerához A mikrofontartó és az INPUT 1/INPUT 2 csatlakozó használatához a fogantyút fel kell szerelni a kamerára. 72 1 Lazítsa meg a mikrofonrögzítő csavart (햲), nyissa ki a mikrofontartót, és helyezze bele a mikrofont (햳). 2 Húzza meg a rögzítőcsavart, és nyomja a kábelt a mikrofontartó alján lévő kábeltartóba (햴).
Hangfelvétel MEGJEGYZÉSEK 74 • Amikor a hangszint a kijelzőn eléri a piros pontot (0 dB), a hang torzított lehet. • Ha a hangszint kijelzése normál, de a hang torzított, aktiválja a mikrofon csillapítását (A 74). • Javasoljuk a fejhallgató használatát a hangszint beállítás ellenőrzéséhez vagy a mikrofon csillapítás bekapcsolásakor. • Ha automatikus beállítást használ, és az INPUT 1 és INPUT 2 bemenetek ugyanarra a hangbemenetre vannak kapcsolva (külső mikrofon vagy külső vonalbemenet), akkor a [FUNC.
Hangfelvétel A beépített mikrofon vagy a MIC csatlakozóhoz kapcsolt külső mikrofon használata A beépített mikrofon vagy a MIC csatlakozóhoz kapcsolt külső mikrofon használatához kövesse az alábbi lépéseket. Használjon saját tápellátással rendelkező, normál kondenzátormikrofonokat és egy, ∅ 3,5 mm-es mini sztereó csatlakozót. Állítsa az INPUT csatlakozó ON/OFF kapcsolóját OFF állásba.
Hangfelvétel Beállítások ( Alapértelmezett érték) [‘ Standard] Felvétel általános helyzetekben. A kamera általános beállításokkal rögzít. [’ Zene] Zenei előadások és énekműsorok beltéri felvétele. [‚ Beszéd] Emberi hang és párbeszéd rögzítéséhez a legjobb. [“ Madárhangos erdő] Madarak és erdei jelenetek hangjának rögzítéséhez. A kamera tisztán rögzíti a térben terjedő hangot. 76 [” Zajelnyomás] Jelenetek rögzítése a szél, elhaladó járművek és hasonló környezeti zajok elnyomásával.
Hangfelvétel 2 Nyissa meg a hang felvételi szint kézi beállításának képernyőjét. [FUNC.] > [ä Mikrofon szint] > [n] (kézi) • Megjelenik a képernyőn a hangszintet mutató műszer. • Érintse meg az [m] (automatikus) lehetőséget, hogy visszaállítsa a kamerát a hangfelvétel szintjének automatikus beállítására. Hangszint Mutató Hang aktuális felvételi szintje Kézi hangszintbeállítás Hangszint-beállítási sáv 3 Tartsa megérintve a [Ï] vagy a [Ð] gombot a hangfelvételi szint beállításához.
Hangfelvétel Hang kiegyenlítő (Beépített mikrofon) A hang kiegyenlítővel beállíthatja a hangszinteket frekvenciatartományonként külön. 3 szint közül választhat. Üzemmódok: 78 1 Állítsa a [— Hangjelenet] beállítást [„ Egyéni beállítás] értékre (A 75). 2 Nyissa meg a [Beép. mikr. frekv. átvitele] képernyőt. [FUNC.] > [MENU] > p > [Beép. mikr. frekv. átvitele] 3 Érintse meg a kívánt lehetőséget, majd érintse meg az [X] ikont.
Hangfelvétel Mikrofon csillapító (Beépített mikrofon) Ha a hangszint túl magas és az audió torzítottnak tűnik a beépített mikrofonnal történő felvétel közben, aktiválja a mikrofon csillapítót (20 dB). Üzemmódok: 1 Állítsa a [— Hangjelenet] beállítást [„ Egyéni beállítás] értékre (A 75). 2 Nyissa meg a [Beépített mikr. csill.] képernyőt. [FUNC.] > [MENU] > p > [Beépített mikr. csill.] 3 Érintse meg a kívánt lehetőséget, majd érintse meg az [X] ikont.
Hangfelvétel Mikrofon csillapító (MIC csatlakozó) A mikrofon csillapító (20 dB) aktiválható a MIC aljzatba csatlakoztatott mikrofon esetén, ha meg szeretné akadályozni, hogy a hang torzuljon túl nagy hangerő esetén. Üzemmódok: 1 Nyissa meg a [MIC csill.] képernyőt. 80 [FUNC.] > [MENU] > p > [MIC csill.] 2 Érintse meg a kívánt lehetőséget, majd érintse meg az [X] ikont.
Fejhallgató használata Fejhallgató használata A fejhallgatóval felvétel közben ellenőrizheti a hangot és használhatja lejátszáskor is. Az alábbi eljárással beállíthatja a hangerőt. Üzemmódok: 81 1 Csatlakoztassa a fejhallgatót a × (fejhallgató) csatlakozóhoz. 2 Nyissa meg a [Fejhallgató Hangerő] almenüt. [FUNC.] > [MENU] > q > [Fejhallgató Hangerő] • A [FUNC.] megérintése csak akkor szükséges, ha módban hajtja végre az eljárást.
Színsávok és hang referenciajel Színsávok és hang referenciajel A kamera kiadhat és rögzíthet színsávokat és egy 1 KHz-es mérőhangot, és megjelenítheti ezeket a HDMI OUT csatlakozón, AV OUT csatlakozón, HD/SD-SDI csatlakozón (csak o) és × (fejhallgató) csatlakozón (csak mérőhang). Üzemmódok: 82 Színsáv rögzítése Az EBU színsávok és az SMPTE standard definíciós színsávok közül választhat. 1 Nyissa meg a [Színsáv] menüt. [FUNC.
Videó pillanatfelvétel Videó pillanatfelvétel Rögzítse rövid jelenetek sorozatát. Video pillanatfelvétel rögzítéséhez rendeljen hozzá előzetesen egy kijelölhető gombot a [¦ Videó pill.felv.] funkcióhoz. Üzemmódok: 1 Rendelje egy kijelölhető funkciójú gombhoz a [¦ Videó pill.felv.] funkciót (A 90). 2 Nyomja meg a kijelölhető gombot a videó pillanatfelvétel mód aktiválásához. • A képernyőn megjelenik a D (a videós pillanatfelvétel alapértelmezett hossza).
Előzetes felvétel Előzetes felvétel A kamera 3 másodperccel a START/STOP gomb megnyomása előtt elkezdi a felvételt, hogy ne maradjon le egyetlen fontos jelenetről sem. Ez akkor hasznos, amikor nehéz előre kiszámítani a felvenni kívánt esemény kezdetét. Alapbeállításban a 2. kijelölhető funkciójú gombhoz az Előfelvétel funkció van hozzárendelve. Üzemmódok: 84 1 Nyomja meg a PRE REC gombot. • A z ikon jelenik meg a képernyőn. • A PRE REC gomb újbóli megnyomására kikapcsolódik az előfelvétel.
Kijelzések a képernyőn és adatkód Kijelzések a képernyőn és adatkód A legtöbb képernyőadat megjelenítését ki és be lehet kapcsolni. Üzemmódok: A DISP. gomb többszöri megnyomásával a kijelzési módot váltogathatja az alábbiak szerint: mód: • Minden kijelzés bekapcsolva • Jelek a képernyőn1 • Kijelzések kikapcsolva mód2: • Csak adatkód látható • Minden kijelzés bekapcsolva 1 2 A kijelzőjelölők csak akkor jelennek meg, ha a [FUNC.] > [MENU] > p > [Kijelző Jelölők] beállítása nem [j Ki].
Infravörös felvétel Infravörös felvétel Infravörös felvételi módban a kamera érzékenyebb lesz az infravörös fényre, így sötét környezetben is használható. A fogantyú infravörös lámpájával szinte teljes sötétségben is filmezhet. Emellett kiválaszthatja, hogy a kép világosabb részei zöld vagy fehér színben jelenjenek meg. Üzemmódok: 86 Az infravörös mód aktiválása Az alábbi eljárást követve állítsa be az infravörös (IR) módot és a csúcsfények színét a képen. Az INFRARED kapcsoló állítsa ON állásba.
A GP-E2 GPS vevő használata A GP-E2 GPS vevő használata Ha csatlakoztatja az opcionális GP-E2 GPS-vevőt a kamerához, beolvashat GPS információkat (hosszúsági fok, szélességi fok és tengerszint feletti magasság), és hozzáadhatja őket filmekhez és fotókhoz. A GPS-vevő csatlakoztatása Kapcsolja ki a kamerát és a vevőt. Csatlakoztassa a vevőt a kamera USB aljzatához USB-kábellel*. A felvétel idejére helyezze vissza a vevőt a hordtáskába*, és kapcsolja azt a kamera kézpántjára, vagy helyezze el ruházatában.
A GP-E2 GPS vevő használata MEGJEGYZÉSEK 88 • Az akkumulátor cseréje után, vagy hosszabb időre használaton kívül hagyott kamera bekapcsolásakor hosszabb időbe kerülhet, mire a vevő GPS-jelet talál. • A kamera nem kompatibilis a GPS-vevő digitális iránytű és pozícionálási intervallum funkcióival. Ezenkívül a [Beáll. most] lehetőség nem áll rendelkezésre a [FUNC.] > [MENU] > q > [GPS Autom. időbeáll.] funkcióhoz. • GPS információk nem adhatók a következő felvételtípusokhoz. - Filmből kivágott képek.
4 Beállítások CUSTOM tárcsa és gomb Beállítások igény szerint CUSTOM tárcsa és gomb A CUSTOM gombhoz és a CUSTOM tárcsához hozzárendelheti a számos gyakran használt funkció egyikét. A CUSTOM gomb és a CUSTOM tárcsa használható a funkciók kezelésére a menük igénybe vétele nélkül. Üzemmódok: 1 Tartsa lenyomva a CUSTOM gombot nagyjából 1 másodpercig. • Megjelenik a rendelkezésre álló funkciók gyorsmenüje. 2 A CUSTOM tárcsa elfordításával válassza ki a kívánt lehetőséget, majd nyomja meg a CUSTOM gombot.
Kijelölhető funkciójú gombok Kijelölhető funkciójú gombok A kamerán van 5 gomb, melyekhez funkciókat lehet rendelni a kényelmes kezelés érdekében. Gyakran használt funkcióknak a gombokhoz rendelése egy gombnyomásra egyszerűsíti a funkciók elérését. Üzemmódok: 90 A hozzárendelt funkció megváltoztatása 1 Nyissa meg a kívánt kijelölhető funkciójú gomb választási képernyőjét. [FUNC.] > [MENU] > q > Válasszon az [1. gomb hozzárendelés] és az [5.
Kijelölhető funkciójú gombok [ AGC Határ]* Ugyanaz, mint az [x AGC Határ] (A 56) kiválasztása a FUNC. menüben. [ Fókusz]* Ugyanaz, mint a [< Fókusz] (A 46) kiválasztása a FUNC. menüben. [ Expozíció]* Ugyanaz, mint az [y Expozíció] (A 59) kiválasztása a FUNC. menüben. [ Hangjelenet] Ugyanaz, mint a [— Hangjelenet] (A 75) kiválasztása a FUNC. menüben. [ Mikrofon szint]* Ugyanaz, mint a [ä Mikrofon szint] (A 76) kiválasztása a FUNC. menüben. [ Zoom] Ugyanaz, mint a [R Zoom] (A 51) kiválasztása a FUNC.
A kamera menü beállításainak mentése és betöltése A kamera menü beállításainak mentése és betöltése A mozifilmhatású szűrők beállítást, illetve a FUNC. és a beállítási menükben elvégzett egyéb beállításokat követően ezek a beállítások elmenthetők a „B” memóriakártyára. Később vagy egy másik XA15 vagy XA11 kamerán betöltheti őket, hogy a megszokott módon használhassa a kamerát. Üzemmódok: 92 A menü beállításainak mentése memóriakártyára A menübeállításokat a „B” memóriakártyára kell menteni.
5 Lejátszás Filmfelvételek lejátszása Lejátszás Filmfelvételek lejátszása Ez a fejezet a jelenetek lejátszásáról szól. A lejátszott jelenetek megjelenítéséről külső monitoron: Külső monitor csatlakoztatása (A 101). Üzemmódok: 1 A főkapcsolót állítsa MEDIA helyzetbe. • Megjelenik az AVCHD vagy MP4 videó index képernyő. 2 Ha szükséges, megváltoztathatja az index képernyőt.
Filmfelvételek lejátszása Olyan jelenetek lejátszása, melyeket a [Csúcsf.elsőbbség] megjelenés használatával rögzítettek A [FUNC.] > [Képeffektusok] > [Megjelenések] > [Csúcsf.elsőbbség] megjelenéssel rögzített jelenetek lejátszásakor a [FUNC.] > [MENU] > q > [ Nézet ellenőrzés] beállítás segítségével pontosabb színekkel jelenítheti meg a kamera képernyőjén. Ha egy ilyen jelenetet külső monitoron tekint meg, javasoljuk a monitor fényerejének növelését.
Filmfelvételek lejátszása Lejátszási szünetben: 95 ! Folytassa a lejátszást. " Lassú lejátszás* hátra/előre. # A megjelenített képkockából fényképet készít (A 96). * Érintse meg többször a lejátszási sebesség növeléséhez 1/8 → 1/4 -szeresre a normál lejátszáshoz képest. Jelenetinformációk megjelenítése 1 Az AVCHD vagy az MP4 videó index képernyőn érintse meg a [I] ikont. 2 Érintse meg a kívánt jelenetet. • Megjelenik a jelenet információs képernyő.
Filmfelvételek lejátszása Fényképek kivágása videolejátszás közben Kivághat fényképeket az éppen lejátszott videóból. 96 1 2 3 4 Játssza le a jelenetet, amelyből a fényképet ki szeretné vágni. Állítsa le a lejátszást ott, ahol a képek ki szeretné vágni. Érintse meg a [PHOTO] gombot. Érintse meg a [Ñ] gombot a lejátszás leállításához. • • • • A kivett fénykép mérete képpontokban 1920x1080 lesz. Az elkészülő fénykép dátuma az eredeti felvétel dátumát és idejét fogja tartalmazni.
Jelenetek törlése Jelenetek törlése A szükségtelenné vált jelenetek törölhetők. A jelenet törlése egyúttal helyet szabadít föl a memóriakártyán. Üzemmódok: A jelenetek törlése egyenként 1 Játssza le a törölni kívánt jelenetet (A 93). 2 A képernyőt megérintve jelenítse meg a lejátszási kezelőszerveket. 3 Nyissa meg a [Törlés] képernyőt. [Ý] > [FUNC.] > [Törlés] 4 Érintse meg az [Igen]-t. • Ezzel törölte a jelenetet. 5 Érintse meg az [OK] gombot.
Jelenetek törlése Beállítások [dátum/mappanév] Adott napon rögzített összes jelenet törlése. AVCHD-filmek esetén a dátum látható lesz a képernyőn megjelenő gombon. MP4 filmek esetén a mappanév (A 94) jelenik meg, amelyben az utolsó négy számjegy a hónapot és a napot jelenti. [Választ] Egyes jeleneteket választ ki törlésre. [Összes Jelenet] Minden jelenetet töröl. 98 FONTOS • A felvételek törlésénél körültekintően járjon el. A törlést követően a jelenetek nem állíthatók vissza.
Jelenetek megosztása Jelenetek megosztása Az AVCHD jelenetek feloszthatók, a kívánt részek meghagyhatók, a nem kívánt részek pedig törölhetők. Üzemmódok: 1 A kívánt jelenet lejátszása (A 93). 2 Ahol a jelenetet ketté kívánja osztani, szüneteltesse a lejátszást. 3 Nyissa meg a képernyőt a jelenetek felosztásához. [FUNC.] > [Megosztás] 4 Állítsa a jelenetet a kívánt ponthoz, ha szükséges. • A felosztási pontot a jelölő jelzi. • A lejátszási kezelőszervek megjelennek a képernyőn (A 95).
Jelenetek vágása Jelenetek vágása MP4 jelenetek vágásakor eltávolíthatja a felvétel egy részét egy adott pontig, vagy egy adott pont után. Üzemmódok: 100 1 A kívánt jelenet lejátszása (A 93). 2 Szünetelteti a lejátszást. 3 Nyissa meg a képernyőt a jelenetek vágásához. [FUNC.] > [Részleges törlés] 4 Állítsa a jelenetet a kívánt ponthoz, ha szükséges. • A vágási pontot a jelölő jelzi. • A lejátszási kezelőszervek megjelennek a képernyőn (A 95). A különleges lejátszási módokkal keresse meg a kívánt pontot.
6 Külső monitor csatlakoztatása Külső eszközök csatlakoztatása Külső eszközök csatlakoztatása Külső monitor csatlakoztatása Amikor a kamerához külső monitort csatlakoztat lejátszás céljából, használja a monitoron használni kívántnak megfelelő csatlakozót. Utána válassza ki a megfelelő videojel konfigurációt. p A kamera automatikusan vált az AV OUT és HDMI OUT csatlakozók között a külső csatlakozásnak megfelelően.
Külső monitor csatlakoztatása o A kimeneti csatlakozó kiválasztása Ha a felvételeit külső monitorra szeretné kiadni, először ki kell választania a használni kívánt csatlakozót. 1 Nyissa meg a [Kimeneti csatlakozó] képernyőt. [FUNC.] > [MENU] > q > [Kimeneti csatlakozó] • A [FUNC.] megérintése csak akkor szükséges, ha 102 módban hajtja végre az eljárást. 2 Érintse meg a kívánt lehetőséget, majd érintse meg az [X] ikont.
Külső monitor csatlakoztatása MEGJEGYZÉSEK • o Amikor a [FUNC.] > [MENU] > q > [Kimeneti csatlakozó] beállítása [ HD/SD-SDI & HDMI], a HDMI OUT csatlakozón megjelenő jelet a [FUNC.] > [MENU] > q > [HD/SD-SDI kimenet] beállítás határozza meg. • módban használhatja a [FUNC.] > [MENU] > q > [HDMI időkód] beállítást, hogy a HDMI OUT csatlakozóra küldött kimeneti jel tartalmazza az időkódot. • A kamera HDMI OUT-csatlakozója csak kimenetként szolgál.
Audio kimenet Audio kimenet A kamera képes hangot kiadni a HD/SD-SDI csatlakozón (csak o), a HDMI OUT csatlakozón, az AV OUT vagy a × (fejhallgató) csatlakozókon. Amikor az AV OUT vagy × (fejhallgató) csatlakozón jelenik meg hang, a következő beállítások konfigurálhatók. 104 A videó és az ellenőrzött hang szinkronizálása Amikor a hang az AV OUT vagy a × (fejhallgató) csatlakozóról érkezik, választhat, hogy a hang a videojellel legyen szinkronban vagy a kamera valós időben adja azt.
Audio kimenet MEGJEGYZÉSEK • Ha hozzárendel gombot a [Hang kimenőcsat.] funkcióhoz (A 90), megnyomhatja a gombot a hangcsatorna közvetlen módosításához.
Fényképek megtekintése 7 Fényképek Fotók Fényképek megtekintése Üzemmódok: 106 1 A főkapcsolót állítsa MEDIA helyzetbe. • Megjelenik az AVCHD vagy MP4 videó index képernyő. 2 Jelenítse meg a fotó index képernyőt. [6 ·] > A kívánt memóriakártya lapja (6 vagy 7) > [} Képek] 3 Keresse meg a lejátszani kívánt fényképet. ! Indexképernyő gomb. Az aktuálisan kiválasztott memóriakártyát jelzi. Megnyomásával megváltoztathatja az index képernyőt.
Fényképek megtekintése Ugrás a fényképek között Amikor sok fényképe van, a görgetősáv segít a fotók megkeresésében. 1 A képernyőt megérintve jelenítse meg a lejátszási kezelőszerveket. 2 Érintse meg a [h] gombot. 3 A görgetősáv mentén húzza ujját jobbra és balra, majd érintse meg a [K] gombot. FONTOS • A következő képfájlok megjelenítése esetleg hibás lehet. - Nem ezzel a kamerával rögzített fényképek. - Számítógépen szerkesztett képek. - Olyan képek, amelyeknek a fájlnevét megváltoztatták.
Fényképek törlése Fényképek törlése A szükségtelenné vált fényképek törölhetők. Üzemmódok: A fényképek törlése egyenként 108 1 Egyképes nézetben válassza ki a törölni kívánt fényképet. 2 A képernyőt megérintve jelenítse meg a lejátszási kezelőszerveket. 3 Nyissa meg a [Törlés] képernyőt. [FUNC.] > [Törlés] 4 Érintse meg a [ Folytassa], majd az [Igen] lehetőséget. • Ezzel törölte a fényképet. 5 Az ujját jobbra és balra húzva válasszon másik törölni kívánt fényképet, vagy érintse meg az [X] gombot.
8 A felvételek tárolása számítógépen A felvételek mentése és megosztása másokkal Felvételek mentése/megosztása A felvételek tárolása számítógépen A Data Import Utility szoftverrel számítógépre mentheti az AVCHD- és MP4-jeleneteket. A szoftver segítségével a következőket tudja végrehajtani. - Jelenetek mentése a számítógépre (összes jelenet/csak új jelenetek). - Külön memóriakártyára rögzített relé jelenetek (AVCHD vagy MP4 formátumban) összefűzése (A 41) és mentése egyetlen jelenetként.
A felvételek tárolása számítógépen Filmek áttöltése a számítógépre A Data Import Utility szoftverrel a filmeket a számítógépre mentheti. 110 IFC-400PCU USB kábel (opcionális) 1 2 3 4 5 6 7 Kamera: Használja a kompakt hálózati adaptert a kamera üzemeltetésére. Kamera: A főkapcsolót állítsa MEDIA helyzetbe. Kamera: Nyissa meg a kívánt filmindexképernyőt (A 93). Csatlakoztassa a kamerát a számítógéphez az opcionális IFC-400PCU USB kábellel. Kamera: Érintse meg a [Mind (csak PC-hez)] pontot.
Felvételek másolása memóriakártyák között Felvételek másolása memóriakártyák között Egyik memóriakártyáról a másikra másolhat felvételeket. Jelenetek másolása a videó index képernyőről Üzemmódok: 1 Nyissa meg a kívánt filmindexképernyőt (A 93). • Egy meghatározott napon rögzített jelenetek másolásához válasszon ki egy jelenetet az ujja balra/jobbra húzásával. 2 Nyissa meg a képernyőt a jelenetek másolásához. [FUNC.
Felvételek másolása memóriakártyák között Fényképek másolása az index képernyőről Üzemmódok: 1 Nyissa meg a kívánt fotó index képernyőt (A 106). 2 Nyissa meg a képernyőt a fényképek másolásához. [FUNC.] > [Másolás (6'7)] vagy [Másolás (7'6)] 112 3 Érintse meg a kívánt lehetőséget, majd az [Igen]-t. • Ha a [Választ] lehetőséget választotta, végezze el a következő eljárást, mely során kiválasztja az egyes fényképeket másolásra az [Igen] megérintése előtt.
Filmek konvertálása MP4 formátumra Filmek konvertálása MP4 formátumra AVCHD-filmeket MP4 formátumra konvertálhat, illetve az MP4-filmek kisebb méretű MP4 formátumra konvertálhatók (átméretezhetők). Ez akkor hasznos, ha például fel szeretné tölteni az MP4-filmeket az internetre. Amikor az egyik memóriakártyán lévő fájlokat konvertálja, azok a másik memóriakártyára kerülnek. Filmek konvertálásánál a kamera hozzáadhat egy mozifilmszűrő effektust a konvertált filmekhez.
Felvétel másolása külső videó felvevő eszközre Felvétel másolása külső videó felvevő eszközre Üzemmódok: Nagy felbontással 114 Csatlakoztassa a kamerát Blu-ray lemezes rögzítőhöz vagy más AVCHD-kompatibilis digitális rögzítőhöz az opcionális mellékelt IFC-400PCU USB kábellel nagy felbontású filmjeinek másolásához. Ha a digitális videó felvevő eszköznek van SD memóriakártya foglalata*, átmásolhatja felvételeit a kártyáról, a kamera csatlakoztatása nélkül is.
Felvétel másolása külső videó felvevő eszközre 5 Kamera: Folytassa a lejátszást. • Alapbeállítás szerint az adatkód megjelenik a kimeneti videojelben. Ez módosítható a [MENU] > s > [Adatkód] beállítással. 6 Külső rögzítő: Indítsa el a felvételt, ha az átmásolni kívánt jelenet megkezdődött; állítsa le a felvételt, ha befejeződött. 7 Kamera: Állítsa meg a lejátszást.
Melléklet: A menüpontok listája 9 További információk További információk Melléklet: A menüpontok listája 116 A nem elérhető menüpontok halványan jelennek meg. Az egyes menüpontok kiválasztásáról lásd A menük használata (A 29) című részt. Az egyes funkciók részletes leírását a megadott oldalon találja. Az oldalhivatkozás nélküli pontok magyarázata a táblázat után található. Az aláhúzott menüpontok az alapértelmezett beállítást jelölik. FUNC. menü FUNC.
Melléklet: A menüpontok listája Képernyőn megjelenő gomb [Képeffektusok] 1 2 Beállítási lehetőségek/Funkció [ON], [OFF] Az [ON] választása esetén – [Megjelenések]: [Standard], [Csúcsf.elsőbbség], [Széles DR] [Színmélység], [Élesség], [Kontraszt], [Fényerő]: –2 és +2 között (±0), n CINEMA A – – 66 117 Csak film felvételéhez elérhető. A beállítás megmarad, ha a kamerát átváltja vagy (Kivéve [„ Egyéni beállítás] a [— Hangjelenet] alatt.) FUNC. Menü – AUTO módból módba.
Melléklet: A menüpontok listája Menüpont 118 A Beállítások [Nagy sebességű zoom vezérlés] [i Be], [j Ki] 53 [AF-Mód] [= Instant AF], [? Közepes AF], [@ Normál AF] 48 [Fókusz segéd] [i Be], [j Ki] – [Arcérzékelés és -követés] [i Be}], [j Ki] 49 [Aut. ellenfény-helyesbítés] [i Be], [j Ki] – [Automatikus Lassúzár] [i Be], [j Ki] – [Vibráláscsökk.
Melléklet: A menüpontok listája [Fókusz segéd]: Amikor a fókusz segéd funkció aktív, a kép közepe nagyítva látszik a kézi élességállítás segítésére (A 46). • A fókusz segéd nagyítása nem jelenik meg a felvételen. 4 másodperc múlva automatikusan kikapcsolódik, vagy a felvétel megkezdésekor. • A fókuszsegéd csak filmekhez elérhető. [Aut. ellenfény-helyesbítés]: Ha [i Be] értékre van állítva, a kamera automatikusan érzékeli és kompenzálja a ellenfénnyel ellátott témák expozícióját.
Melléklet: A menüpontok listája s/ Lejátszási beállítások Menüpont Beállítások y } A [Adatkód] AVCHD- és MP4-filmek és képek esetén. [j Ki], [% Dátum], [és Idő], [' Dátum és Idő], [( Kamera adatok] MP4-filmek esetén: [j Ki], [% Dátum] – [TV-Típus] [+ 4:3 TV], [, Széles TV] – 120 [Adatkód]: Megjeleníti a jelenet vagy fénykép készítésének dátumát és/vagy idejét. [( Kamera adatok]: Megjeleníti a rekesz és a záridő értékét, mellyel a jelenet vagy fénykép készült.
Melléklet: A menüpontok listája Menüpont Beállítások } – – 68 – – 68 [Időkódos mód] [ Preset], [ [Időkód-futtató mód] [ Rec Run], [ [Kezd.
Melléklet: A menüpontok listája q Rendszerbeállítások Menüpont Beállítások y } A [ ], [Dansk], [Deutsch], [ ], [English], [Español], [Français], [Italiano], [Magyar], [Melayu], [Nederlands], [Norsk], [Polski], [Português], [ ], [Suomi], [Svenska], [Türkçe], [ ], [ ], [ ], [ ], [ ], [ ], [ ], [ ], [ ] 28 [Időzóna/DST] ["] (hazai időzóna) vagy [#] (időzóna utazáskor): [Párizs], a Föld időzónáinak listája [$] (DST beállítás): Váltógomb be vagy ki 28 [Dátum/Idő] [Dátum/Idő]: – [Dát
Melléklet: A menüpontok listája Menüpont Beállítások y } A [WB elsőbbség beáll.] [Ã Automatikus], [¼ Napfény], [½ Árnyék], [¾ Felhős], [¿ Fluoreszcens], [À Fluoreszcens H], [É Műfény], [ Színhőmérséklet], [Æ 1. beáll.], [Ç 2. beáll.] – – – [Fókuszgyűrű irány] [h Normál], [X Hátra] – – – [Fókuszgyűrű reagálás] [Z Gyors], [[ Normál], [] Lassú] – – – [Fókusz elővál.
Melléklet: A menüpontok listája [LCD Fényerő]: Beállítja az LCD képernyő fényerejét. • Az LCD képernyő fényerejének módosítása nem befolyásolja a felvétel és a TV-n lejátszott felvétel fényerejét. [LCD Háttérvilágítás]/[Kereső háttérvilágítás]: A három szint (LCD képernyő) vagy kettő szint (kereső) 124 egyikére állítja be a fényerőt. • A képernyő fényerejének módosítása nem befolyásolja a felvétel és a TV-n lejátszott felvétel fényerejét.
Melléklet: A menüpontok listája [Távols. mért.egység]: Megadja a kézi élességállításkor a távolság kijelzésére használt mértékegységet. Ez a beállítás a GPS-információk egységeit is befolyásolja a külön megvásárolható GP-E2 GPS-vevő használata esetén. [GPS Autom. időbeáll.]: Ha az opcionális GP-E2 GPS vevő csatlakoztatva van, a kamera automatikusan beállíthatja a [Dátum/Idő] beállítást a GPS-től kapott információk alapján.
Melléklet: A képernyőn megjelenő jelzések és ikonok Melléklet: A képernyőn megjelenő jelzések és ikonok Felvétel Kijelző Jelölők (A118) mód 126 Arcérzékelési keret (A49) Nyomkövetés (A49) A képernyő bal oldala Ikon/kijelzés Leírás ó Smart AUTO (A 36) ’, ‚, “, n, H, I, J, K, L, M, N, O, P Felvételi program (A 57, 59, 64) ; =, Infravörös mód (A 86) Infravörös fény F00,0 Rekeszérték (A 57) ND1/0 Semleges szűrő (A 119) y Expozíciókompenzáció (A 60) 1/0000 Záridő (A 57) 00dB AGC Határ (A 5
Melléklet: A képernyőn megjelenő jelzések és ikonok A képernyő felső része Ikon/kijelzés Leírás [FUNC.] Megnyitja a FUNC. menüt (A 29). [PHOTO] Fényképet készít (A 35). 0:00:00:00 Időkód (A 68) Ñ, Ü Rögzítési művelet (A 35) Ñ Felvételi készenlét, Ü Felvétel C, D, F Videó pillanatfelvét.
Melléklet: A képernyőn megjelenő jelzések és ikonok Lejátszás Filmek Fotók 128 A képernyő felső része Ikon/kijelzés Leírás [MENU] A beállítási menü megnyitása (A 117). [FUNC.] Megnyitja a FUNC. menüt (A 29). Ð, Ý Lejátszási művelet Ð: Lejátszás, Ý: Lejátszás szünet LPCM Lineáris PCM audió (A 40) 6 /7 Memóriakártya használatban. 0:00:00:00 Időkód (A 68) 000/000 Az aktuális fotó/Az összes fotó száma / x0000.00 Lassított és gyorsított felvételi mód (A 43) – [Csúcsf.
Melléklet: A képernyőn megjelenő jelzések és ikonok MEGJEGYZÉSEK • A DISP. gomb megnyomásával elrejtheti a legtöbb információt. Akkumulátor hátralevő töltöttségi idő • Az ikon mutatja a maradék töltöttséget az akkumulátor teljes töltésének százalékában. Az akkumulátor hátralévő felvételi/lejátszási ideje percekben az ikon mellett megjelenik. • Ha az akkumulátor merülőben van, a sárga színben jelenik meg. Ha az akkumulátor lemerült, a piros színben jelenik meg. Cserélje ki, vagy töltse fel az akkumulátort.
Hibakeresés Hibakeresés Ha bármilyen problémája támad a kamerával, először ezt az ellenőrzőlistát nézze végig. Néha, amikor azt gondolja, hogy a kamera elromlott, az alábbi, „LEGELŐSZÖR EZT ELLENŐRIZZE” című részben megtalálja az egyszerű megoldást. Ha a problémát nem sikerült megoldania, vegye fel a kapcsolatot márkakereskedőjével, vagy a Canon szervizközponttal.
Hibakeresés Felvétel A START/STOP gomb megnyomására a felvétel nem indul el. - A kamerával nem lehet felvételt készíteni miközben az előző felvételt írja a memóriakártyára (ACCESS hozzáférésjelző jelez). Várja meg, amíg a kamera befejezi a műveletet. - A memóriakártya megtelt vagy a lehető legtöbb, 3999 jelenet van már rajta (AVCHD filmek esetén a jelenetek maximális száma). Töröljön néhány felvételt (A 97, 108) vagy formázza meg a memóriakártyát (A 32) tárhely felszabadítása érdekében.
Hibakeresés Nem lehet jeleneteket, fényképeket másolni. - Más eszközzel rögzített vagy szerkesztett és a számítógéphez csatlakoztatott memóriakártyára átvitt jeleneteket/fényképeket esetleg nem lehet másolni. Az indexképernyőn nem lehet megjelölni az egyes jeleneteket/fényképeket pipával ! - Legfeljebb 100 jelenetet/fényképet lehet egyesével megjelölni. Válassza a [Összes Jelenet] vagy [Minden Kép] lehetőséget a [Választ] helyett. 132 A képernyőn megjelenő jelzések pirosan kigyullad.
Hibakeresés A képernyőn a videó képe zajos. - Tartson távolságot a kamera és az erős elektromágneses teret keltő eszközök (plazma TV, mobiltelefon stb.) között. Vízszintes csíkok jelennek meg a képernyőn. - Ez a jelenség a CMOS képérzékelőkre jellemző; bizonyos fényviszonyok mellett. Ez nem hibajelenség. Csökkentheti a tüneteket, ha a [FUNC.] > [MENU] > p > [Vibráláscsökk.] funkciónál az [Automatikus] beállítást választja.
Hibakeresés Csatlakozás más eszközökhöz A TV képén zavar jelenik meg. - Ha olyan helyiségben használja a kamerát, amelyben TV- készülék található, akkor a kompakt hálózati adapter és a TV antennakábelei között hagyjon némi távolságot. 134 A lejátszás jónak tűnik a kamerán, de a TV-n nincs kép. - A TV nem arra a videó bemeneti csatornára van állítva, ahová a kamerát csatlakoztatta. Válassza ki a megfelelő csatornát.
Hibakeresés Ellenőrizze a memóriakártyát - Nem lehet a memóriakártyát használni. Ellenőrizze, hogy a memóriakártya megfelelően vane betéve. - Kártyahiba történt. A kamera nem tud képeket rögzíteni és megjeleníteni. Próbálja a memóriakártyát újra betenni, vagy használjon másik memóriakártyát. - MultiMediaCard (MMC) van a kamerába téve. Használjon egy ajánlott memóriakártyát (A 31).
Hibakeresés 136 Leállt a felvétel a memóriakártya lassú írási sebessége miatt - A memóriakártya írási sebessége túl kicsi volt, így a felvétel leállt. 4, 6, vagy 10. SD sebességi osztályú memóriakártyák használatát javasoljuk. - Ha a felvételi mód 28 Mbps LPCM, 28 Mbps vagy 35 Mbps, akkor 6-os vagy 10-es sebességi osztályú kártyát kell használnia. - Lassított vagy gyorsított rögzítési módhoz javasoljuk a 10-es sebességi kategóriájú SD memóriakártyák használatát.
Hibakeresés Nem konvertálhatók a 50.00P jelenetek - A 28 Mbps LPCM (50.00P), 28 Mbps (50.00P) vagy 35 Mbps (50.00P) módban rögzített jelenetek nem konvertálhatók. Nem lehet lejátszani Csak a videokamerával inicializáljon - A kamerában lévő memóriakártya számítógéppel lett inicializálva. Inicializálja a memóriakártyát ezzel a kamerával (A 32). Nem törölhető a jelenet - A rögzítéshez használt memóriakártyánál nagyobb klaszterméretű memóriakártyára másolt MP4 filmek nem vághatók.
Hibakeresés Nincsenek jelenetek - A kiválasztott memóriakártyán nincsenek jelenetek. Rendszeres biztonsági mentés - Ez a figyelmeztetés biztonsági mentésre megjelenhet a kamera bekapcsolásakor. Hiba esetén felvételei elveszhetnek, ha nincs biztonsági másolata róluk. 138 Töltse fel az akkumulátort - Az akkumulátor lemerült. Töltse fel az akkumulátort. Túl sok kép. Csatlakoztassa le az USB kábelt. - Húzza ki az USB-kábelt.
Biztonsági utasítások és elővigyázatossági rendszabályok Biztonsági utasítások és elővigyázatossági rendszabályok Mindenképpen olvassa el ezeket az utasításokat, hogy biztonságosan tudja a készüléket működtetni. FIGYELEM Súlyos sérülések vagy halál kockázata áll fenn. • Minden szokatlan körülmény esetén- például füst vagy furcsa szagok észlelésekor - hagyja abba a készülék használatát. • Ne nyúljon a készülék szabadon lévő belső részeihez. • Óvja a készüléket a nedvességtől.
Biztonsági utasítások és elővigyázatossági rendszabályok ÓVINTÉZKEDÉSEK 140 Sérülések kockázata áll fenn. • Ne hagyja a készüléket nagyon magas vagy alacsony hőmérsékletű helyen. A készülék felforrósodhat/lehűlhet, és érintéskor égési vagy egyéb sérüléseket okozhat. • Csak megfelelően erős állványra rögzítse a készüléket. • Ne nézzen hosszú ideig a képernyőre vagy a keresőbe. Ez hányingerhez hasonló tüneteket válthat ki.
Biztonsági utasítások és elővigyázatossági rendszabályok Akkumulátor VESZÉLY! Az akkumulátort mindig óvatosan kezelje. • Tartsa távol a tűztől, mert robbanást okozhat. • Ne tegye ki az akkumulátort 60 ºC-nál magasabb hőmérsékletnek, és ne hagyja fűtőtest mellett vagy meleg idő esetén zárt autóban. • Ne próbálja meg szétszerelni vagy átalakítani. • Ne ejtse le, és ne üsse neki semminek. • Óvja a nedvességtől. • A szennyezett érintkezők a kamera és az akkumulátor között érintkezési hibát okozhatnak.
Biztonsági utasítások és elővigyázatossági rendszabályok • A Secure Digital (SD) memóriakártyákon kapcsoló van a tartalom véletlen törlésének megakadályozására. A memóriakártya védelmére kapcsolja a kapcsolót a LOCK helyzetbe. A beépített lítium akkumulátor 142 LOCK kapcsoló A kamera a dátum és az idő, valamint más beállítások tárolását egy beépített lítium akkumulátorral biztosítja. A beépített akkumulátort a kamera használat közben tölti, azonban, ha kb.
Karbantartás, egyebek Karbantartás, egyebek Tisztítás A kamera váza • A kamera vázának tisztításához puha, száraz ruhát használjon. Soha ne használjon vegyi anyagokkal kezelt ruhát, vagy illékony oldószert, pl. festékhígítót. Az objektív, a kereső és az azonnali AF érzékelő • Ha az objektív vagy az azonnali AF érzékelő szennyezett, az Autofókusz nem minden esetben működik helyesen. • Távolítson el minden port és szennyeződést egy nem-aeroszolos, pumpás kefével.
Karbantartás, egyebek A kamera használata külföldön Áramellátás 144 A kompakt hálózati adaptert minden olyan országban használhatja a kamera üzemeltetésére, és az akkumulátorok töltésére, ahol a hálózati feszültség 100-240 V, 50/60 Hz között van. A tengerentúli használathoz szükséges átalakítókkal kapcsolatban a Canon szervizközponttól kaphat további információkat. Lejátszás a TV képernyőjén A felvételek csak PAL rendszerű TV-készülékeken játszhatók le.
Külön megvásárolható kiegészítők Külön megvásárolható kiegészítők (Területenként különböző termékek érhetők el.) A következő megvásárolható tartozékok kompatibilisek a kamerával. A tartozékok részletesebb leírása a következő oldalakon található.
Külön megvásárolható kiegészítők Akkumulátorok Ha további akkumulátorokra van szüksége, válasszon a következő modellek közül: BP-820 vagy BP-828. 146 Az Intelligent System jelzést viselő akkumulátorokkal a kamera kommunikál, és a hátralévő használati idő egyperces pontossággal megjelenik a kijelzőn. Ezeket csak az Intelligent System jellemzőinek megfelelő kamerával vagy töltővel töltheti. CG-800E akkumulátortöltő Az akkumulátorok töltéséhez használja az akkumulátortöltőt.
Külön megvásárolható kiegészítők SC-2000 puha hordtáska Praktikus kamera hordtáska bélelt zsebekkel, és sok hellyel a tartozékok számára. 147 Ez a jel az eredeti Canon videó tartozékokat jelöli. Ha Canon videoberendezéseket használ, javasoljuk a Canon gyártmányú tartozékok, vagy más, az adott jellel ellátott termék használatát.
Műszaki adatok Műszaki adatok XA15 / XA11 148 – Az értékek hozzávetőlegesek. Rendszer • Rögzítés Filmek: AVCHD1 Video: MPEG-4 AVC/H.264; Audio: Lineáris PCM, 16 bits, 48 kHz, 2ch2 Dolby Digital, 2 ch MP4 Video: MPEG-4 AVC/H.264 Audió: MPEG-2 AAC-LC (2ch) Fényképek:DCF (Design rule for Camera File system), kompatibilis az Exif Ver.3-mal 2.3 Képtípus: JPEG 1 2 3 Kompatibilis az AVCHD ver. 2.0 szabvánnyal. A lineáris PCM csak akkor elérhető, ha a felvételi mód a 28 Mbps LPCM vagy 24 Mbps LPCM.
Műszaki adatok • Minimális megvilágítás 0,1 lux ([Kevés fény] felvételi program, záridő 1/2 mp.) 1,0 lux ([Program AE] felvételi program, Automatikus lassúzár [Be], Záridő 1/25) • Javasolt megvilágítás: 100 lux fölött • Képstabilizálás: Optikai eltolással működő képstabilizátor • A videofelvételek mérete AVCHD filmek: 28 Mbps LPCM (50.00P), 28 Mbps (50.00P), 24 Mbps LPCM, 24 Mbps, 17 Mbps: 1920 x 1080 képpont; 5 Mbps: 1440 x 1080 képpont MP4-filmek: 35 Mbps (50.
Műszaki adatok • REMOTE csatlakozó: ∅ 2,5 mm-es sztereó jack; csak bemenet Áramellátás, egyebek • Tápfeszültség (névleges) 7,4 V DC (akkumulátor), 8,4 V DC (kompakt hálózati adapter) 150 • Teljesítményfelvételt: o 4,6 W p 4,5 W (17 Mbps, AF bekapcsolva, LCD normál fényerőn) • Működési hőmérséklet: 0–40 °C • Méretek [szé. x ma. x mé.
Referenciatáblázatok Referenciatáblázatok Hozzávetőleges felvételi idők A kamera a videó adatokat változó adatsebességgel („variable bit rate”, VBR) kódolja, ezért az aktuális felvételi idő a témától függ. 151 AVCHD-filmek esetén: Felvétel-mód → 28 Mbps LPCM (50.00P) és 28 Mbps (50.
Referenciatáblázatok Töltési, felvételi és lejátszási idők A következő táblázatban megadott töltési idők körülbelüliek, és függenek a töltés körülményeitől, valamint az akkumulátor kezdeti töltésétől. Akkumulátor → BP-820 Töltési feltételek ↓ 152 BP-828 A kamerával 275 perc 405 perc A CG-800E akkumulátortöltővel 190 perc 260 perc A következő táblázatokban megadott felvételi és lejátszási idők körülbelüliek, és függenek a felvételmódtól és a töltési, felvételi és lejátszási körülményektől.
Referenciatáblázatok p AVCHD-filmek felvétele Akkumulátor BP-820 BP-828 Felvétel-mód Felvétel (maximum) Felvétel (tipikus)* Lejátszás 28 Mbps LPCM (50.00P) / 28 Mbps (50.00P) 150 perc 95 perc 245 perc 17 Mbps 160 perc 100 perc 255 perc 5 Mbps 165 perc 100 perc 265 perc 28 Mbps LPCM (50.00P) / 28 Mbps (50.
Tárgymutató 154 A E A kamera be- és kikapcsolása . . . . . . . . . . . . 24 A memóriakártya kiválasztása felvételhez . . . . . . . . . . . . . . 33 A memóriakártya inicializálása . . . . . . . . . . . . 32 Adatkód . . . . . . . . . . . . . . . . . . . . . . . . . . 85, 120 Adásjelző lámpa . . . . . . . . . . . . . . . . . . . . . . 124 AE világos részekre . . . . . . . . . . . . . . . . . . . . . 61 AGC (automatikus erősítésszabályozás) határolás . . . . . . . . . . . . . . . . . . . . . . . . . . . .
Hangmonitor késleltetés . . . . . . . . . . . . . . . .104 Hangszóró . . . . . . . . . . . . . . . . . . . . . . . . . . . . .94 HD/SD-SDI csatlakozó* . . . . . . . . . . . . . . . . .102 HDMI OUT csatlakozó . . . . . . . . . . . . . .101, 102 Hibakeresés . . . . . . . . . . . . . . . . . . . . . . . . . . .130 Hibaüzenetek . . . . . . . . . . . . . . . . . . . . . . . . .134 Hó (felvételi program) . . . . . . . . . . . . . . . . . . . .64 M Időkód . . . . . . . . . . . . . . . . . . . . . . . . . . . . .
T 156 Telefotó . . . . . . . . . . . . . . . . . . . . . . . . . . . . . . .51 Tengerpart (felvételi program) . . . . . . . . . . . . .64 Töltési idő . . . . . . . . . . . . . . . . . . . . . . . . . . . .152 Törlés Fényképek . . . . . . . . . . . . . . . . . . . . . . . .108 Filmek . . . . . . . . . . . . . . . . . . . . . . . . . . . . .97 Tűzijáték (felvételi program) . . . . . . . . . . . . . . .65 Tv (felvételi program) . . . . . . . . . . . . . . . . . . . .57 U USB csatlakozó . . . . . . . . . . .
Canon Europa N.V. Bovenkerkerweg 59, 1185 XB Amstelveen, The Netherlands http://www.canon-europe.com A helyi Canon-iroda elérhetőségét lásd a garancialevélen vagy a www.canon-europe.com/Support címen A terméket és a kapcsolódó garanciát az európai országokban a Canon Europa N.V. biztosítja. Az útmutató 2017 júliusáig ismert adatokat tartalmaz. A változtatás joga fenntartva. A legfrissebb változatot a helyi Canon honlapról töltheti le. © CANON INC.