
Manual

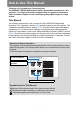

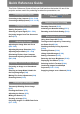

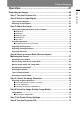

Table Of Contents
- To Start Menu
- How to Use This Manual
- Projector Highlights
- Quick Reference Guide
- Table of Contents
- Safety Instructions
- For Safe Use
- Before Use
- Projecting an Image
- Useful Functions Available During a Presentation
- Setting Functions from Menus
- Using Menus
- Setting Display Status (Input Settings)
- Selecting the Aspect
- Setup Using Auto PC
- Selecting an Input Signal
- Adjusting the Input Signal (Total dots)
- Adjusting the Input Signal (Tracking)
- Adjusting the Input Signal (Horizontal position)
- Adjusting the Input Signal (Vertical Position)
- Adjusting the Input Signal (Horizontal pixels)
- Adjusting the Input Signal (Vertical pixels)
- Adjusting HDMI Input Level
- Setting the HDMI Color Format
- Specifying HDMI Overscan
- Specifying Progressive Processing
- Specifying the Slideshow Interval
- Specifying Split- Screen Display
- Adjusting Image Quality (Image Adjustment)
- Specifying Image Priority in Split-Screen Mode
- Specifying the Image Mode
- Creating/Saving a User Profile
- Adjusting Brightness
- Adjusting Contrast
- Adjusting Sharpness
- Correcting Gamma
- Adjusting Colors
- Adjusting to the Ambient Light (Ambient Light)
- Reducing Image Noise (Noise reduction)
- Dynamic Gamma Adjustment
- Correcting Memory Color
- Fine-Tuning Colors (6-axis Color Adjustment)
- Fine-Tuning Gamma
- Controlling Contrast (Iris)
- Specifying the Lamp Mode
- Resetting Image Adjustment Settings
- Customizing System Operation (System Settings)
- Registering User Logos
- Positioning User Logos
- No Signal Screen
- Screen When Blank
- Selecting a Logo at Startup
- Specifying Auto Power-Off
- Specifying Direct Power-On
- Specifying Silence or Operating Tones
- Specifying Key Repeat Operation
- Locking Projector or Remote Buttons
- Assigning a Channel for Remote Control
- Reducing Motion Blur
- Specifying HDMI Input
- Selecting a Display Language
- Requiring a Password for Operation
- Setting a Password
- Restoring Original Gamma Settings
- Resetting the Lamp Counter
- Resetting the Air Filter Counter
- Updating the Firmware
- Resetting to the Default Setting
- Checking Projector Information
- Installation
- Before Installation
- Installation Procedure
- Connection Procedure
- Starting Projection
- Installation-Related Menu Settings
- Locking Installation Settings
- Flipping Image Display
- Specifying the Screen Aspect
- Specifying Keystone Correction
- Specifying Digital Image Shift
- Specifying Micro Digital Image Shift
- Adjusting Image Registration
- Specifying the Fan Mode
- Specifying Vertical Projection
- Selecting the Audio In Terminal
- Adjusting Colors to Suit the Screen Color
- Specifying a Menu Position
- Showing/Hiding the Guide Screen
- Showing/Hiding Input Status
- Showing/Hiding Overheat Warnings
- Specifying the Menu Display Time
- Showing/Hiding Lamp Replacement Warnings
- Showing/Hiding Filter Cleaning Warnings
- Showing/Hiding Split- Screen ID
- Showing/Hiding the Test Pattern
- Projecting from Multiple Projectors at Once (Edge Blending)
- Connecting to a Network
- Network Connection Overview
- Completing Projector Settings
- Locking/Unlocking Network Settings
- Enabling/Disabling the Network Password
- Registering a Network Password
- Enabling/Disabling Wired Network Functions
- Specifying Standby Power Consumption
- Viewing the IP Address
- Viewing the Gateway Address
- Viewing the MAC Address
- Enabling/Disabling DHCP
- Specifying TCP/IP Settings
- Initializing Network Settings
- Specifying PJLink Settings
- Specifying Use of AMX Device Discovery
- Specifying Use of Crestron RoomView
- Completing Computer Settings
- Maintenance
- Networked Multi- Projection Overview
- Operation in Each Mode
- Functions in All Modes
- Using the Session Selection Menu
- Using the Projector Selection Menu
- Using Layout Functions
- Switching Projectors Used for the Layout
- Controlling all Projectors at Once
- Projecting from Multiple Projectors (Multi-Projection)
- Switching the Primary/Secondary Monitor
- Temporarily Enlarge Images
- Projecting Session Information
- Fully Blanking Projection
- Blanking Projection from Your Computer
- Checking for Computers That Join or Leave Sessions
- Completing Application Projection Settings
- Reducing Windows to a Compact Size
- Tips for Better Networked Projection
- Restrictions
- Appendix
- Troubleshooting
- Relationship between Aspect and Screen Aspect
- When the image is projected on a 16:10 screen
- When the image is projected on a 16:9 screen
- When the image is projected on a 4:3 screen
- When projecting on a 16:10 screen in the aspect ratio of the connected device
- When projecting on a 16:9 screen in the aspect ratio of the connected device
- When projecting on a 4:3 screen in the aspect ratio of the connected device
- Displayed Test Patterns
- Supported Signal Types
- Product Specifications
- Index
- Option
- Menu Configuration

2
How to Use This Manual
Thank you for purchasing a Canon projector.
The WUX450 / WX520 Multimedia Projector (hereinafter referred to as “the
projector”) is a high-performance projector that is capable of projecting a
high-resolution computer screen and high-quality digital image on a large
screen.
This Manual
This manual combines the user’s manual for WUX450/WX520 Multimedia
Projectors. The “Operation” section (P47) describes how to use the projector. The
“Installation and Maintenance” section (P121) describes initial setup and regular
maintenance. For instructions on software for projection by multiple projectors
linked in a local network, refer to the “Networked Multi-Projection (NMPJ)” section
(P201). Read this manual thoroughly to make the most of your projector. Installation
of the projector should be performed by a qualified technician, if possible. Contact
the Canon Customer Support Center for further information.
Symbols Used in This Manual
Meanings of the symbols used in this manual are as follows.
A precaution about operation or restriction is given here.
Indicates supplemental information to note in use.
Selecting Screen Aspect
Select the correct aspect ratio for the screen which is used.
1 Press the MENU button to display the menu window.
2 Press the [ ] / [ ] buttons to select the [Install settings] tab.
Remote control Projector
Remote control Projector
Symbols of Button Operations
The projector can be operated using the buttons on the remote control or on the
side of the projector. The remote control allows you to operate all functions of the
projector.
In this document, the button’s operations are shown as below.
Operation of buttons
on side of projector
Remote control button
operation
Indicate the buttons to be pressed