
Installation Guide
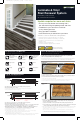

Specs for
Landings and Top Stair
**Be sure to only use Zamma coordinating Stairnose molding at the top stair.
There are 2 different options to use for the top stair or landing.
1. For landings, you can use a coordinating Stairnose molding. OR
2. Use Cap A Tread. Rip at the same width but no less than 4" as your flooring plank
from bullnose and join to flooring on landing with T-Molding or Multi-Purpose Reducer.
Some notching may be required depending upon your staircase.
If a bullnose exists on landing, ONLY Cap A Tread with adjoining threshold
should be used. Any existing bullnose should not be ripped off.
6. Use Heavy Duty Liquid Nail or any All Urethane Construction Adhesive. Apply about an
1/4" thick bead around the perimeter and then throughout the middle in a zig-zag shape on
the back of the tread as seen below and adhere the new Cap A Tread to the existing tread.
No need to use a trowel or full spread the adhesive.
IMPORTANT. TO KEEP TREADS IN PLACE WHILE INSTALLING FROM TOP TO BOTTOM,
YOU CAN ALSO SECURE WITH 3-4 BRAD NAILS ACROSS THE WIDTH OF THE TREAD,
BUT NOT MORE THAN 1/4" FROM THE CURRENT RISER. YOU WANT THE CAP A
TREAD RISER TO COVER UP ANY BRAD NAILS INSTALLED.
7. Measure for risers only after the tread has been installed.
a) Cut down the width of risers with a sliding compound miter saw.
b) Use a table saw (or circular saw with a guide) to make any alterations to the height of the riser that runs along the entire length of the product.
8. As in step #6, use Heavy Duty Liquid Nail or any construction urethane adhesive. Apply about an 1/4" thick bead around the perimeter and
then throughout the middle in a zig-zag shape on the back of the riser as previously shown and adhere the Cap A Tread to the existing tread.
7. Mida las contrahuellas una vez que se haya instalado el peldaño.
a) Recorte el ancho de las contrahuellas con una sierra ingleteadota compuesta deslizante.
b) Utilice una sierra de mesa (o sierra circular con una guía) para modificar la altura de la contrahuella que se extiende a lo largo de todo el producto.
8. Al igual que el paso Nº 6, utilice un pegamento pesado o cualquier adhesivo para construcción de uretano. Aplique una línea gruesa de
aproximadamente 1/4" alrededor del perímetro y luego en todo el centro en forma de zig-zag en la parte posterior de la contrahuella, como se muestra
más arriba, y adhiera el Cap a Tread al peldaño existente.
9. Caulk Cap A Tread around the perimeter
of the stair treads / risers and wipe clean
for a nice finished look with no gaps.
9. Calafetee un Cap A Tread alrededor del
perímetro de los peldaños/contrahuellas y limpie
para obtener un bonito acabado sin fisuras.
6. Utilice un pegamento pesado o cualquier adhesivo para construcción de uretano. Aplique una línea espesa de aproximadamente 1/4" alrededor del perímetro y
luego a través de todo el centro en forma de zig-zag en la parte posterior del peldaño, como se muestra a continuación, y adhiera el nuevo Cap A Tread al peldaño
existente. No es necesario utilizar una paleta ni esparcir el adhesivo por completo. IMPORTANTE: PARA MANTENER LOS PELDAÑOS EN SU LUGAR MIENTRAS
REALIZA LA INSTALACIÓN DESDE LA PARTE SUPERIOR HACIA LA INFERIOR, TAMBIÉN PUEDE FIJARLOS CON 3 Ó 4 CLAVOS DE TERMINACIÓN A LO LARGO
DEL ANCHO DEL PELDAÑO, PERO A NO MÁS DE 1/4" DE LA CONTRAHUELLA ACTUAL. ASEGÚRESE DE QUE LA CONTRAHUELLA DEL CAP A TREAD CUBRA
TODOS LOS CLAVOS DE TERMINACIÓN INSTALADOS.
Molding Overhang on Both Sides
• If overhang occurs on both sides of stringers, one side of overhang will need to be
ripped off with an appropriate saw.
• Keep any remaining overhang and re-install it with brad nails / glue. Caulk the seams
as best as possible. Re-painting may be required.
Cap-A-Tread Videos to Reference
Go to these YouTube links for further detailed installation
Standard Cap A Tread Installation
http://www.youtube.com/watch?v=Us8Ga7_MYUI
Type 2 Cap A Tread and specific details
http://www.youtube.com/watch?v=90tpUA3nttc
Do I Remove Existing Spindles / Install New Spindles
Pre-Attached to Treads?
• Staircases can both have / not have spindles and the
spindles may or may not be pre-attached to existing
stair treads.
• If spindles are pre-attached to existing stair treads,
these need to be removed prior to installation of
Cap A Tread and re-installed after the Cap A Tread
installation is complete.
** Be sure to consult a Professional Finished
Carpenter prior to installation or hire a Professional
Finished Carpenter to properly complete this task.
• DO NOT CUT AROUND EXISTING SPINDLES TO
INSTALL CAP A TREAD!
FAQ’s (Continued)
Landings that turn a corner
• For landings that turn a corner, use a piece
from the length of a tread already ripped
off and glue it underneath so no
gap is exposed.
Why does the return not come pre-mitered?
• Since most walls are not square, pre-mitering
the return could mean it may not properly fit
properly onto the side profile of the tread.
Use a T-Bevel or Angle Gauge to properly
determine the angle needed to cut the return.
How do I install the return?
• Secure with 3-4 brad nails and a small
amount of glue.
How do I finish off the return
on the side, or side of a riser?
• Miter a cut off piece of return
to fit into place and secure
with brad nails / glue.
Risers Over 8-1/4" Tall
• If your riser is over 8-1/4" tall, the standard Cap A Tread coordinating riseris likely not tall
enough to cover up the existing riser once the Cap A Tread on top is installed and you
will need to proceed one of two ways.
• Coordinating Risers: An extra Cap A Tread should be ordered. Once received, rip off the
nosing, cut down to size and use as a riser.
• White Risers: Purchase a piece of 12" x 48" white melamine to cut down and use as a riser.
If no existing nosing exists, can I still install Cap A Tread
• Yes, a gap can exist with waterfall stairs as when you walk
up a staircase, your feet do not apply diagonal pressure.
www.capatread.com
FINISHING /
ACABADO
RIP OFF AT MINIMUM 4"
FROM NOSING
Basic Installation Instructions
Instrucciones básicas de instalación
FAQ's
5. Check the cut of the Cap A Tread for
accuracy by dry-fitting it onto the stair
for which you measured.
5. Revise que el corte del Cap A Tread sea
preciso, colocándolo en seco en la escalera
de la que ha tomado la medida.
Installation Links
SET IN PLACE / INSTALAR
CHECK FIT
REVISAR EL AJUSTE
Adhesive Pattern /
Patrón de adhesivo
RISERS
CONTRAHUELLAS
Dog Ears
• Dog ears are necessary when the standard Cap A Tread with a return, has too much
of a pre-existing miter to use.
• Miter the tread to the necessary depth / angle yourself.
• Miter a piece already cut off the tread to finish off the installation.
Cap-A-Tread_Insert_Slip_11X17_Final_A_1_13_14.pdf 2 1/13/14 11:37 AM