
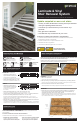
Installation Guide

CHECK FIT / REVISAR EL AJUSTE
5. Check the cut of the Cap A Tread for accuracy
by dry-tting it onto the stair for which you
measured.
Revise que el corte del Cap A Tread sea preciso,
colocándolo en seco en la escalera de la que ha
tomado la medida.
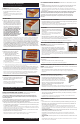
SET IN PLACE / INSTALAR
6. Use heavy duty all urethane construction
adhesive. Apply about a 1/4” thick bead
around the perimeter and then throughout
the middle in a zig-zag shape on the back
of the tread as seen below and adhere the
new Cap A Tread to the existing tread. No
need to use a trowel or fully spread the
adhesive. IMPORTANT. TO KEEP TREADS
IN PLACE WHILE THE GLUE DRIES, USE
3-4 BRAD/STAY NAILS IN THE BACK
3/8” OF THE TREAD TO PREVENT ANY
SLIPPAGE WHILE WORKING ON THE
SUBSEQUENT TREADS. MAKE SURE THE
NEXT RISER WILL COVER ANY OF THE
MECHANICAL FASTENERS USED.
Utilice todo el adhesivo resistente de construcción de uretano. Aplique una línea espesa
de aproximadamente 1/4” alrededor del perímetro y luego a través de todo el centro en
forma de zig-zag en la parte posterior del peldaño, como se muestra a continuación, y
adhiera el nuevo Cap A Tread al peldaño existente. No es necesario utilizar una paleta ni
esparcir el adhesivo por completo. IMPORTANTE: PARA MANTENER LOS PELDAÑOS EN
SU LUGAR MIENTRAS REALIZA LA INSTALACIÓN DESDE LA PARTE SUPERIOR HACIA
LA INFERIOR, TAMBIÉN PUEDE FIJARLOS CON 3 Ó 4 CLAVOS DE TERMINACIÓN A LO
LARGO DEL ANCHO DEL PELDAÑO, PERO A NO MÁS DE 1/4” DE LA CONTRAHUELLA
ACTUAL. ASEGÚRESE DE QUE LA CONTRAHUELLA DEL CAP A TREAD CUBRA TODOS
LOS CLAVOS DE TERMINACIÓN INSTALADOS.
RISERS / CONTRAHUELLAS
7. Measure and cut risers only after the
previous tread has been installed.
a.) Cut down the width of risers with a
sliding compound miter saw.
b.) Use a table saw (or circular saw with
a guide) to make any alterations to
the height of the riser that runs along
the entire length of the product.
Mida las contrahuellas una vez que se
haya instalado el peldaño.
a.) Recorte el ancho de las contrahuellas con una sierra ingleteadota compuesta deslizante.
b.) Utiliceunasierrademesa(osierracircularconunaguía)paramodicarlaalturadela
contrahuella que se extiende a lo largo de todo el producto.
8. As in step #6, use heavy duty all urethane construction adhesive. Apply about an 1/4”
thick bead around the perimeter and then throughout the middle in a zig-zag shape on
the back of the riser as previously shown and adhere the riser to the existing riser.
Al igual que el paso Nº 6, utilice todo el adhesivo resistente de construcción de uretano.
Aplique una línea gruesa de aproximadamente 1/4” alrededor del perímetro y luego en
todo el centro en forma de zig-zag en la parte posterior de la contrahuella, como se
muestra más arriba, y adhiera el peldaño al peldaño existente.
FINISHING / ACABADO
9. Caulk Cap A Tread around the perimeter of the
stair treads / risers and wipe clean for a nice
nished look with no gaps.
Calafetee un Cap A Tread alrededor del perímetro
de los peldaños/contrahuellas y limpie para obtener
un bonito acabado sin suras.
SPECS FOR LANDINGS AND TOP STAIR / ESPECIFICACIONES DEL
ATERRIZAJE Y LA PARTE DE SUPERIOR DE LA ESCALERA
**Therecanbemultipleoptionsfornishingthetopstepandlandingsshorterthan
47”. When using a stair nose at either of these locations, be sure to use only Zamma
coordinating products.
**Puede haber multiples opciones de terminar la parte superior e inferior mas corto
de 47”. Cunado este usando un voladiso en cualquier de estas locaciones, favor de
asegurarce usar solamente productor coordinados de Zamma
• The Cap A Tread can be used by cutting o the front portion as close to the same width
as the plank ooring but no less than 4” and transitioning to the rest of the ooring with
a T molding or multipurpose reducer.
La Cap A Tread puede ser utisado al cortar la porcion delantera lo mas cerca al la misma
medida que los pisos de tablon pero no menos que 4” y haciendo la transición al resto de
el piso con un molde T o algun reductor multiuso.
• For those situations that width of the nosing exceeds 47” or you do not have a natural
breakpoint the stair nose is the logical choice.
Para esas situaciones que la talla de el voladizo excede 47” o no tienes un punto de
interrupción natural entonces un voladizo seria la elección lógica.
DO I REMOVE EXISTING SPINDLES? / REMUEVO EL BARANDAL QUE YA
EXISTE?
• If spindles are present on the staircase, they must rst be removed to allow for proper
installation of the tread(s). Never cut around spindles or any other obstruction.
Si ya existe un barandal en las escaleras, esto deve de ser removido para permitir la
instalacion propia de los escalones. Nunca corte alrededor de al barandal o de cualquier
otra obstruccion.
**Consult with a professional contractor prior to installation of the Cap A Tread to
determine proper installation including removal and replacement of spindles.
**Consulta con un profecional antes de la instalacion de Cap A Tread para
determinar la instalacion apropiada e incluyendo remoción y reemplazo de
barandal.
LANDINGS THAT TURN A CORNER / DESCANSOS QUE DAN LA BUELTA
• For landings that turn a corner, use a piece from the length of a tread already ripped o
and glue it underneath so no gap is exposed.
Para descansos que dan la buelta, usar una pieza del largo de un escalon que ya arrancó
y pégalo debajo para que no quede ningún espacio expuesto.
DOG EARS / VOLADIZO
• Dog ears are necessary when the standard Cap A
Tread with a return, has too much of a pre-existing
miter to use.
Los voladizos son necesarias cuando la estandar
Cap A Tread con retorno tiene demasiada mitra
preexistente para usar.
• Miter the tread to the necessary depth / angle yourself.
Mitre la banda de rodadura a la profundidad / ángulo necesarios usted mismo.
• Miter a piece already cut o the tread to nish o the installation.
Mitre una pieza ya cortada la banda de rodadura para nalizar la instalación.
WHY DOES THE RETURN NOT COME PRE-
MITERED? / PORQUE ES QUE LAS ESQUINAS NO
VIENEN PRE-INGLETEADAS?
• Since most walls are not square, pre-mitering the return
could mean it may not t properly onto the side prole of
the tread. Use a T-Bevel or Angle Gauge to determine the
proper angle needed to cut the return.
Dado que la mayoría de las paredes no son cuadradas, pre-ingletear el retorno podría
signicar que puede no encajar correctamente en el perl lateral de la banda de rodadura.
Use un medidor de bisel en T o ángulo para determinar correctamente el ángulo necesario
para cortar el retorno.
HOW DO I INSTALL THE RETURN? / COMO PUEDO INSTALAR EL
RETORNO?
• Secure with 3-4 brad nails and a small amount of glue.
Asegura con 3-4 clavos y una pequeña cantidad de pegamento.
HOW DO I FINISH OFF THE RETURN ON THE SIDE, OR SIDE OF A
RISER / COMO TERMINO EL RETORNO DE LADO, O EN EL LADO EN DONDE
ESTA LA CONTRAHUELLA
• Miter a cut o piece of return to t into place and secure with brad nails / glue.
Mitre un trozo de uno orilla cortado para que encaje en su lugar y asegúrelo con clavos /
pegamento.
MOLDING OVERHANG ON BOTH SIDES /
MOLDEO EN EL VOLADIZO EN AMBOS LADOS
• If overhang occurs on both sides of stringers, one side of
overhang will need to be ripped o with an appropriate saw.
Si se produce voladizo en ambos lados de los largueros, un
lado del voladizo deberá arrancarse con una sierra adecuada.
• Keep any remaining overhang and re-install it with brad
nails / glue. Caulk the seams as best as possible. Re-
painting may be required.
Mantenga cualquier voladizo restante y vuelva a instalarlo con clavos / pegamento.
Calafatee las costuras lo mejor posible. Puede ser necesario volver a pintar.
IF NO EXISTING NOSING EXISTS, CAN I STILL INSTALL CAP A TREAD /
SI NO EXISTE UNA NARIZ EXISTENTE, ¿PUEDO INSTALAR CAP A TREAD?
• Yes, a gap can exist with waterfall stairs as when you walk up a staircase, your feet do
not apply diagonal pressure.
Sí, puede existir una brecha con las escaleras en cascada, ya que cuando sube una
escalera, sus pies no aplican presión diagonal.
RISERS OVER 8-1/4” TALL / CONTRAHUELLA MAS GRANED QUE 8-1/4” DE
ALTO.
• If your riser is over 8-1/4” tall, the standard Cap A Tread coordinating riser is likely not
tall enough to cover up the existing riser once the Cap A Tread on top is installed. You
will need to proceed one of two ways:
Si su contrahuella mide más de 8-1/4 “de altura, la contrahuella de coordinación Cap
A Tread estándar probablemente no sea lo sucientemente alto como para cubrir la
existente contrahuella una vez que se instala la Cap A Tread en la parte superior. Continue
una de dos maneras:
• COORDINATING RISERS: An extra Cap A Tread should be ordered. Once received, rip
o the nosing, cut down to size and use as a riser.
COORDINDO LAS CONTRAHUELLAS: se debe pedir una banda de rodadura Cap
A Tread. Una vez recibido, arrancar el voladizo, cortar a la medida y utilizar como un
contrahuella.
• WHITE RISERS: Purchase a piece of 12” x 48” white melamine to cut down and use as
a riser.
CONTRAHUELLAS BLANCAS: Compre una pieza de melamina blanca de 12 “x 48” para
cortar y usar como una contrahuella.
Basic Installation Instructions
Instrucciones básicas de instalación
Frequently Asked Questions
Preguntas Frecuentes
www.capatread.com