Standard ‘83 Deluxe Installation Guide Cape Cod Shower Kits www.CapeCodShowerKits.
INDEX STANDARD SHOWER 1 Standard Ingredients Standard Installation 2 3, 4 DELUXE SHOWER 5 Deluxe Ingredients Deluxe Installation 6 7, 8 ‘83 SHOWER 9 ‘83 Ingredients ‘83 Installation 10 11, 12 FINISHING TOUCHES + ACCESSORIES 13 KIT INSTALLATION GUIDE
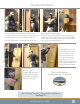
The STANDARD Installation Guide House Mount KIT INSTALLATION GUIDE 1
Ingredients Post Cap Cedar Braces Floor Cedar Door Brace Cedar Post Hardware Pack Small Wall Door Large Wall Shown with extra posts. 48” x 52” CUSTOM TIP: Doors can be rotated on any side you choose! Our kits are set up for altering doors + walls.
Standard Installation Above Ground & House Mount 8’ Posts are used DELIVERY IS OFFERED or Materials can fit in a Truck, SUV, or Van. Choose your cedar posts and pick the best end for the top. Use a block or item to be reference for height for all posts. For Above Ground: Important tip to remember is to decide how high off the ground you want the kit positioned. Kits are Pre-Drilled.
Standard Installation Take the small wall and attach a cedar post to it - again making sure the height from the ground matches the other 2 walls. Add the small wall. Drill the Timberloks™ at an angle for easier use. Applying the Corner Braces: Each Kit comes with corner braces. Use these at corners to act as added support for the 90 degree angle. Note: Screws are not in the hardware pack but any screw will do the trick.
The DELUXE Installation Guide House Mount KIT INSTALLATION GUIDE 5
Ingredients Post Cap Cedar Braces Floor Cedar Door Brace Large Wall Door Small Wall Hardware Pack Cedar Post CUSTOM TIP: Doors can be rotated on any side you choose! Our kits are set up for altering doors + walls.
Deluxe Installation Above Ground & House Mount 8’ Posts are used DELIVERY IS OFFERED or Materials can fit in a Truck, SUV, or Van Using Timberloks™ in Hardware Pack, attach a cedar post to large wall. Make sure the rainguard is on top (wider board). Add another cedar post to the other side of the large wall. Be sure both posts are aligned properFor Above Ground: Important tip to remember is to ly with each other. decide how high off the ground you want the kit Next: Do the same for positioned.
The ‘83 Installation Guide House Mount KIT INSTALLATION GUIDE 9
Ingredients Post Cap Cedar Braces Small Wall Floor Cedar Door Brace Cedar Post Hardware Pack Door Large Wall 48” x 83” 65” x 83” House Mount House Mount XL • 3 Large Walls • 1 Door • 3 - 8’ Cedar Posts Optional: buy 2 extra posts for against the house • 3 Cedar Post Caps • 2 Cedar Floors • Cedar Corner Braces • 1 Hardware Pack • 1 Cedar Door Brace • 3 Large Walls • 2 Small Wall • 1 Door • 5 - 8’ Cedar Posts Optional: buy 2 extra posts for against the house • 5 Cedar Post Caps • 2 Cedar Floors
The ‘83 Installation Above Ground & House Mount 8’ Posts are used Our walls are built with rain guards. These will be the wider boards of the structure built in to the top of the wall. This part of the wall will be the top. Attach the posts to the large panel walls. Note: You can adjust the height along the post and all must be that measurement. Use our timberloks provided in the boxes. It’s that easy. Continue along where the marks are screwing the Timberloks to the posts.
The ‘83 Installation Do the same for the door and small wall. Use the pre-drilled holes as a guide. When assembling the door, use hardware supplied and double check the distance on top/bottom to insure good spacing and symmetry. Attach the door to the 1st wall making sure to check that it is level. Adjust the door distance from post as needed on the swing space in between post and edge of door.
Finishing Touches + Accessories Door Handle with Lanyard Floors & Post Caps Add Floors and Post Caps to finish. Post Caps Style: Post Caps can be set tight against the top or they can rest higher. It depends how far the post comes off the top of the walls and how dig you deep the posts into the ground. We recommend 7-12” for the space under the bottom of walls to ground. NOTE: If you are in a windy area you may want to nail the post caps down and have an in-ground install with this kit.
Congrats! That’s it! Just add the finishing touches....and water! Cape Cod Shower Kits FOR MORE : TUTORIAL VIDEO IS ONLINE http://www.youtube.com/watch?v=4TkAj7VAHak or visit www.CapeCodShowerKits.com www.CapeCodShowerKits.