USE AND CARE MANUAL MAESTRO SERIES 30” OVEN SINGLE AND DOUBLE MODELS: MWO301ES, MWO302ES
A SPECIAL MESSAGE TO CUSTOMERS Dear Valued Customer, Congratulations on making a smart choice! You have joined an elite group of cooking enthusiasts who demand only the very best from their appliances. A Capital Cooking appliance promises years of enjoyment and maximum performance, allowing cooks everywhere to create culinary memories that last a lifetime. Because of the unique features found in our appliances, we urge you to read this manual thoroughly before installation and use.
TABLE OF CONTENTS A SPECIAL MESSAGE TO CUSTOMERS ............................................................................................................... 1 TABLE OF CONTENTS............................................................................................................................................. 2 WARNINGS AND GENERAL SAFETY ..................................................................................................................... 3 WARNINGS AND GENERAL SAFETY (continued).
WARNINGS AND GENERAL SAFETY WARNING Do not install or use this product near water or outdoors, for example, near a kitchen sink, in a wet basement or near a swimming pool. GENERAL SAFETY PRECAUTIONS: To reduce the risk of fire, electric shock, serious injury or death when using your appliance, follow basic safety precautions, including the following: 1. 2. 3. 4. 5. 6. 7. 8. 9. 10. 11. 12. 13. 14. 15. 16. 17. 18. 19. 20. Read the provided use and care manual before operating this appliance.
WARNINGS AND GENERAL SAFETY (continued) 21. 22. 23. 24. 25. 26. 27. 28. 29. 30. 31. 32. 33. 34. Do not touch outside surfaces of the oven during the self-clean cycle, which may become hot. Do not line the oven with aluminum foil or other materials while cooking or cleaning. Do not leave metal objects, such as aluminum foil, the meat probe, cookie sheets, etc., on the bottom of the oven. Objects left on the bottom of the oven could damage the oven.
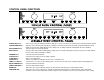
CONTROL PANEL FUNCTIONS CANCEL Button(s): CONVECTION Button: ROTISSERIE Button: MOIST Button: PROBE Button: CLOCK button: START Button: LIGHT Button: TIMER 1 / 2 Buttons: DELAY COOK Button: TIMED COOK Button: MODE Dial: TIME/TEMP Dial: Turns off any selected cooking mode with a single press. It is also used to lock and unlock the control panel when desired. Turns the Convection Fan On or Off when cooking for convection modes.
OVEN LEGEND 1 1. Mode Icons 2. Mode Dial / Button 3. Clock and Temperature / Function Display 4. Time / Temperature Adjustment Dial / Button 5. Door Latch 6. Control Panel Buttons 7. Cabinet Mounting Holes 8. Broil Element (Under Glass) 9. Meat Probe Socket 10. Meat Probe 11. Door Gasket (Upper) 12. Rotisserie Fork 13. Rotisserie Spit Rod 14. Halogen Light 15. Oven Roller Rack 16. Hinge Receptacle 17. Oven Heat Vent 18. Door Gasket (Lower) 19. Bake Elements (Under Glass) 20. Convection Baffle 21.
OVEN FEATURES DEFINED 1. Mode Icons: These icons illuminate to show which oven mode is being used. All icons will light up when Mode selection is started and a single mode will be highlighted when the Mode Selector Dial is rotated and Mode is selected. 2. Mode Dial / Button The Mode Dial / Button will start Mode selection when pressed once and is rotated to toggle between modes. 3. Clock and Temperature / Function Display Displays the Time of Day when the oven or Timers are not in use.
OVEN FEATURES DEFINED (continued) 14. Halogen Light Two high intensity low voltage halogen lights are provided for each oven and are located to give maximum illumination throughout the cooking area. 15. Oven Roller Rack Three oven racks are provided per oven. Each rack is hinged for easy insertion and removal from the oven and allows the full width of the oven to be used when cooking. Rollers on each rack provide smooth movement when cooking or checking food. 16.
USE OF YOUR OVEN INITIAL OVEN SETUP CLOCK • • • • • • • • When powered up and prior to pressing any buttons the clock will flash 12:00 and will increase each minute. To set the oven clock press the CLOCK button on the control panel once. The clock will blink indicating it is ready to be set and the AM or PM icon will be displayed. Set the correct time by rotating the TEMP/TIME knob on the right side of the control panel clockwise to increase the time and counter clockwise to decrease the time.
OVEN HEATING MODES DEFINED Your Oven features cooking modes which are used in most forms of in-house cooking. PRE-HEAT Most recipes call for an oven to be heated to a particular temperature prior to the start of cooking. This heating of the oven is the Pre-Heat mode and uses high intensity heat from the top, bottom, and rear of the oven to quickly and evenly heat the oven. The Convection Fan is also used during Pre-Heat to rapidly distribute the heat throughout the oven.
OVEN HEATING MODES DEFINED (continued) SELF CLEAN Self Clean is a special heating function that raises the oven temperature to levels that will burn most food byproducts to ash. It is a 3 hour heating cycle but due to the extreme heat generated, the oven door is automatically locked when the cycle is started.
POSITIONING OVEN RACKS • Your oven comes with Capital Roller Racks which effortlessly move in and out of the oven on bearing rollers. • To completely remove a rack from the oven, before the oven is hot, grasp the rack on both the right and left sides and lift the rack up while allowing the roller brackets to rotate downward. • This will release the rack from the retaining grooves in the oven side wall.
WHILE THE OVEN IS RUNNING • • • When a cooking mode is started the PRE icon will appear in the clock display. This indicates the oven is Pre-Heating. o BROIL mode does not use a Pre-Heat cycle. o The displayed temperature will increase until the set temperature is reached. o When the set temperature is reached the oven will sound a beep tone and the PRE icon will turn off. o Once the set temperature has been reached it will be displayed continuously.
SECURING THE OVEN CONTROL • The oven control can be locked into a Secure mode to prevent accidentally turning the oven by children or when cleaning. • The Secure mode will disable all buttons and switches except the CANCEL buttons. • To Secure the oven control, press and hold the CANCEL button (either button on a double oven) for 5 seconds. • The oven control will beep and the display will show OFF in the temperature readout areas of the display.
SETTING TIMERS • The Timers are timers only and do not affect oven functions. • Your oven has two independent countdown timers: TIMER 1 and TIMER 2. • The Timers may each be set from 5 seconds to 11 hours 50 minutes. • To set, press either TIMER 1 or TIMER 2 buttons (they each have the same functions). • Rotate the TIMER/TEMP dial clockwise to increase the timer setting. • Press the START button to begin the timer countdown.
SPECIAL FUNCTIONS SELF CLEAN • WARNING: Remove all racks, cooking vessels, utensils, meat probe and all other items from the oven prior to cleaning. • IMPORTANT: Clean excess spillage, grease and other cooking byproducts from the oven prior to Self Cleaning. • WARNING: Do not line the oven with aluminum foil or other materials. They may melt, burn or cause permanent damage to the oven. • WARNING: Do not touch the outer surfaces of the oven during the Self-Clean cycle as the oven may be hot.
CONVECTION (Upper and Lower Oven on Double) • The CONVECTION button turns the oven Convection Fan on during a cooking mode providing an additional four modes of cooking. • CONVECTION used in combination with BAKE, DELICATE, BAKE, BROIL, or ROAST uses the same heat sources as the standard set mode but evenly moves the heated air throughout the oven. • When cooking is complete and a mode is cancelled, the CONVECTION fan will automatically turn off.
• WARNING: • The ROTISSERIE button turns the Rotisserie motor ON and OFF when Rotisserie cooking. • The ROTISSERIE button illuminates when ON. • The ROTISSERIE button can be turned on and off at any time except when Self Clean is selected. • Periodically check the food on the Rotisserie to make sure it does not contact oven walls or the drip pan. Food may become loose during cooking and may require repositioning of the Rotisserie forks or securing the food with cooking string.
• Press the MOIST button to allow the oven to add water into the oven cavity. When activated, the MOIST button will be illuminated. o Only use the MOIST feature with oven settings above 250° F. If the oven temperature is too low the water will not evaporate and may drip onto the oven bottom. • The MOIST mode will automatically turn Off when the cooking mode is cancelled or can be manually turned Off at any time by pressing the MOIST button. When turned Off, the MOIST button light will turn Off.
PROBE (Upper and Lower Oven on Double) PROBE allows the oven to monitor the food temperature as it cooks and stops cooking when the food is done. The Meat Probe is inserted into the food to monitor the internal temperature. When the food is done, the cooking mode will change to HOLD mode for two hours. • The PROBE function is used in conjunction with a cooking mode set to the recipe cooking temperature.
DELAY COOK • Your oven can be set to start cooking at a desired time by presetting a cooking mode, temperature, and setting a start time in DELAY COOK. • WARNING: When using DELAY COOK, always maintain food safe habits and be extremely careful of access to the oven by children or adults who may be injured or cause damage by a live oven. • WARNING: Do not use DELAY COOK for foods subject to spoiling (dairy products, eggs, uncooked poultry, etc.
TIMED COOK • Your oven can be set to end cooking after a set time has passed by using the TIMED COOK function. • To set TIMED COOK a cooking mode must be active (or set with DELAY COOK). • Press the TIMED COOK button to enter the duration time screen. • Use the TIME/TEMP dial to set the duration in minutes, or hours and minutes. • Press START to activate the TIMED COOK function.
TIPS General • Always center your cookware within the oven from front to back and side to side to ensure even heating. • Darker containers will absorb more heat and will provide a darker or crisper crust while lighter pans and vessels will reflect more heat and provide a more uniform heat. • Use low sided or flat cooking vessels, such as cookie sheets, when cooking with convection and even heat is desired around the food.
CARE AND MAINTENANCE WARNING: Do not touch the interior surfaces of the oven during use. After use, make sure these surfaces have had sufficient time to cool before touching them. WARNING: Do not clean the oven door gaskets. The door gaskets are essential for a good seal of the oven. Care is to be taken during cleaning to prevent rubbing, damaging, or moving the gasket from its installed position.
CLEANING CHART: • Always start by selecting the mildest cleaner according to the kind of soil and the material soiled. To prevent marring the stainless steel finish, always apply the cleaners in the direction of the grain. Rinse and dry immediately to avoid water marks. • Use clean applicators, i.e. soft cloths, sponges, or paper towels for cleaning and scouring. • The use of brand names in the char is intended only to indicate a type of cleaner. This does not constitute an endorsement.
TROUBLESHOOTING Before calling for service, reference the following table for common problems that may enable self diagnosis or can resolve the problem: SYMPTOM Clock is off and controls do not function Oven is not heating Door will not open POSSIBLE CAUSE POSSIBLE SOLUTION Power is off Check breaker Wiring improperly connected Oven is improperly set Call electrician to properly connect wiring Check oven temperature and mode setting Verify that the desired oven has been set for cooking on a double b
SERVICE INFORMATION If none of the above has occurred, contact our customer service department at (866) 402-4600. Before you call for service, please have the following information available: • Model Number • Serial Number • Date of Installation • Copy of Receipt or Invoice • A brief description of the problem Your satisfaction is our top priority.
WARRANTY • One (1) year full parts and labor, covers the entire unit. WILL PAY FOR: All repair labor and parts found to be defective due to material or workmanship for on (1) full year (from date of purchase) “in home” WARRANTY. This does not apply if the unit was subjected to other than normal household use. An Authorized Factory Agency must provide Service during normal working hours.
THESE SPECIFICATIONS ARE FOR PLANNING PURPOSES ONLY. CONSULT WITH AN AUTHORIZED TECHNICIAN FOR YOUR SPECIFIC INSTALLATION DETAIL REQUIREMENTS. FOR THE MOST UP TO DATE INFORMATION, CONTACT CAPITAL COOKING EQUIPMENT, INC. INDICATING THE MODEL NUMBER. WE RESERVE THE RIGHT TO CHANGE THESE SPECIFICATIONS OR DESIGN WITHOUT NOTICE. THE POWER OF PERFORMANCE TM Capital Cooking Equipment, Inc. 13211 E. Florence Ave. Santa Fe Springs, CA 90670 USA 866.402.4600 Toll Free 562.903.1167 Fax MADE IN USA www.