Models: C 301 F/W C 301 F/B C 307 M/SS Double Ovens Instruction Manual
Thank you for buying your new CAPLE Built-Under Oven. To ensure that you get the best results from your new CAPLE oven, we strongly suggest that you read this instruction manual thoroughly before use. This manual contains installation advice, cleaning tips and a cooking guide, as well as other important facts about your CAPLE oven. If treated with care, your CAPLE oven should give you years of trouble-free cooking. Safety Reminders ...........................................................................
Safety Reminders Instruction Book This appliance should only be used for its intended purpose as described in these instructions. Ensure that you fully understand these instructions before operating this appliance. DO NOT line the oven, grids, trays etc. with aluminium foil as this could adversely affect the heating elements and it could also damage the interior surfaces. DO NOT place flammable materials in the oven.
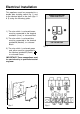
Electrical Requirements WARNING! ELECTRICITY CAN BE EXTREMELY DANGEROUS. THIS APPLIANCE MUST BE EARTHED. This Installation should be carried out by a competent electrician in accordance with current l.E.E. Regulations. This CAPLE product must be connected to an electricity supply at the voltage shown on the rating plate. Connection must be made via a double pole isolating switch with a contact separation of at least 3 mm. Use supply cable, having a minimum conductor cross-sectional area of 2.
Electrical Installation This appliance must be connected to a double pole isolating switch (fig. 1) and to the terminal block in the oven (figs. 2 & 3) using the following guide: DOUBLE POLE SWITCHED FUSED SPUR OUTLET 1) The wire which is coloured brown must be connected to the terminal marked L (Live), or coloured Red. FUSE 2) The wire which is coloured blue must be connected to the terminal marked N (Neutral), or coloured Black. ON USE A 25 AMP FUSE Fig.
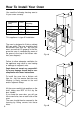
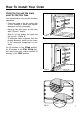
How To Install Your Oven 50 You need the following housing area to fit your oven correctly. Oven Housing Height 888 877 Width 594 560 Depth 560 555 min. 560 555 This appliance is type X installation. 888 877 Dimensions (mm) 5 n. mi The oven is designed to fit into a cabinet 600 mm width. The oven should be built into kitchen units (figs.
How To Install Your Oven Using the top and the main oven for the first time You are advised to carry out the following operations: – Clean the inside of the two ovens with a cloth soaked in water and neutral detergent and dry thoroughly. – Hang up the wire racks on the oven walls (Figure 7 and 8). – Slide in, on the guides, the shelf and the tray etc. (Figure 9). Fig.
Ovens - C 301 F/W, C 301 F/B How To Use Your Oven Cooking in a Conventional Top Oven The oven has two heating elements, one on the base and one on the roof of the cooker. Hot air rises, so the top of the oven is always the hottest. The temperature in the middle of the oven is maintained at the temperature set by the control knob, and is slightly hotter above and cooler below. In a conventional oven, dishes requiring different temperatures can be cooked in the oven at the same time - e.g.
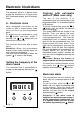
How To Use Your Oven - Control panel Models: C 301 F/W, C 301 F/B A U T O Fig. 10 A D C B Control panel A. Electronic clock/alarm B. Main oven selector C. Top oven function selector D.
Electronic Clock/Alarm The electronic alarm is a device which groups the functions of a 24 hours clock with illuminated display and 99 minutes alarm. A - Electronic clock Upon immediate connection of the cooker or after a mains failure, three zeros will flash on the programmer panel. To set the clock it is necessary to push the button and then, within 7 seconds, the or button until you have set the correct time. The clock will show zero after a mains failure.
How To Use Your Top Oven Fig. 12 Fig. 13 D - Function Selector Cook or grill by turning the knob until the indicator on it is in line with the function required. Remember to keep children away from the appliance when you use the grill or oven, since these parts become very hot. LIGHT The oven light is switched on. C - Temperature Selector OVEN Use in conjunction with the temperature selector C.
How To Use Your Main Oven Grease Filter Fig. 14 B - Function/Temperature Selector Cook by turning the knob until the indicator on it is in line with the function/function temperature required. 12 FAN The fan switches on. This function can be used for defrosting food. 50-225 These show the approximate temperature in °C. It is advisable to pre-heat the oven for at least 5 minutes. The set temperature has been reached when the indicator light above the function/temperature selector goes off.
Oven - C 307 M/SS How To Use Your Oven Top Oven general features Main Oven general features This is a conventional oven with 2 cooking positions, thermostatically controlled, obtained by 3 heating elements (top, bottom and grill). This is a MULTI-FUNCTION oven. As its name indicates, this is an oven that presents particular features from an operational point of view. In fact, it is possible to set 7 different programs to satisfy every cooking need.
How To Use Your Oven - Control panel Model: C 307 M/SS A U T O L L M Fig. 16 A B C Control panel A. Digital electronic programmer (Main oven only) B. Function selector (Top oven) C. Thermostat (Top oven) D. Function selector (Main oven) E. Thermostat (Main oven) L.
Electronic Programmer (Main oven only) Autotimer The electronic programmer is a device which groups together the following functions: – 24 hours clock with illuminated display – Timer (up to 23 hours and 59 minutes) – Program for automatic oven cooking M A – Program for semi-automatic oven cooking. U T O Description of the buttons: Timer Cooking time End of cooking time Fig.
Electronic Programmer (Main oven only) Normal Cooking without the use of the Programmer To manually use the oven, that is, without the aid of the programmer, it is necessary to cancel the flashing AUTO by pushing the button (AUTO will be switched off and the symbol will go on). Attention: If the AUTO is steady lighted (which means a cooking program has already been inserted), by pushing the button you will cancel the program and revert to manual operation.
Electronic Programmer (Main oven only) that is that the cooking cycle has been superimposed on the clock. In this case, modify the end of cooking time or the cooking time itself by following again the above mentioned instructions. 3. Set the temperature and the cooking program by using the switch and thermostat knobs of the oven (see specific chapters).
How To Use Your Top Oven Fig. 18 Function selector knob Thermostat knob Rotate the knob clockwise to set the oven for one of the following functions. This only sets the cooking temperature and does not switch the oven on. Rotate clockwise until the required temperature is reached (from 50 to 250°C) Light By setting the knob to this position, only the oven light comes on (15 W). It remains on in all the cooking modes. Oven The upper and lower heating elements come on.
How To Use Your Top Oven Grill The infrared electrical resistance comes on. The heat is dispersed by radiation. Use with the thermostat knob set to 225°C for 15 minutes, then to 175°C and the oven door closed. For cooking hints, see the below chapter “GRILLING and AU GRATIN”. – IMPORTANT: Drip trays, baking trays etc. must not be left on the base of the oven as this could damage the appliance. Recommended for: Intense grilling, browning, cooking au gratin and toasting etc.
How To Use Your Main Oven Fig. 19 Function selector knob Thermostat knob Rotate the knob clockwise to set the oven for one of the following functions. This only sets the cooking temperature and does not switch the oven on. Rotate clockwise until the required temperature is reached (from 50 to 250°C) Light By setting the knob to this position, only the oven light comes on (15 W). It remains on in all the cooking modes. Oven The upper and lower heating elements come on.
How To Use Your Main Oven Grill Grill & Fan The infrared electrical resistance comes on. The heat is dispersed by radiation. Use with the thermostat knob set to 225°C for 15 minutes, then to 175°C and the oven door closed. For cooking hints, see the chapter “Use of the grill”. The infrared grill and the fan come on. The heat is dispersed mainly by radiation and the fan then distributes it all over the oven. Use with the door closed.
How To Use Your Main Oven Regeneration Conventional & Fan The upper and lower heating elements come on and the fan. The heat coming from above and below is dispersed by convection with ventilation. The temperature can be set to between 50° and 250°C via the thermostat knob. Set the switch to position Conventional & Fan and the thermostat knob to position 150° C. Bread becomes fragrant again if wet with a few drops of water and put into the oven for about 10 minutes at the highest temperature.
How To Use Your Main Oven Grilling and “au gratin” Grease Filter Grilling may be done without the roasting jack on position Grill & Fan of the switch, because the hot air completely envelops the food that is to be cooked. Set the thermostat to position 175 °C and after having preheated the oven, simply place the food on the rack. Close the door and let the oven operate with the thermostat on position 175 °C, until grilling is done.
Cleaning and Maintenance Before cleaning the double oven switch it off and wait for it to cool down. Important: Before any operation of cleaning and maintenance disconnect the appliance from the electrical network. General Installation, and any demonstration, information or adjustments are not included in the warranty. We recommend that the installation is carried out by qualified personnel.
Cleaning and Maintenance Removal of the inner glass door panel The inner glass door panel can easily be removed for cleaning by unscrewing the two screws (figure 21). During re-assembly, ensure that the inner glass is correctly aligned and do not over tighten the screws. ATTENTION The appliance gets very hot, mainly around the cooking areas. It is very important that children are not left alone in the kitchen when you are cooking. Fig.
Helpful Advice Trouble shooting Problem Food too brown but not cooked. 2. When the oven is cool, reach back and upwards inside the oven, the bulb is in the top left corner. Remedy Turn down the oven temperature slightly and cook a little longer 3. Unscrew the light glass cover, replace the bulb with a new one of the same specification and screw the cover back until it is hand tight. Problem Food cooked but not brown enough. NOTE: Oven bulb replacement is not covered by your guarantee.
Recommended cooking temperature Food °C °F Gas Mark Shelf Position* Cooking Time (approx) CAKES Victoria sandwich Small cakes/buns Maidera cake Fruit cake Rich fruit cake Scones 190 190 180 170 150 225 375 375 350 325 300 425 5 5 4 3 2 8-9 2 or 3 1 and 2 2 or 3 3 3 or 4 2 20-25 mins 15-20 mins 20 mins 13/4 hours 21/2 hours 8-10 mins PASTRY Puff Short crust Plate tarts Quiches and flans 225 200 200-210 200-210 425 400 400-410 400-410 8-9 6 6 6 2 2 1 or 2 1 or 2 10-20 20-30 30-35 40-45 225 2
CAPLE “Built-in” Service Should you require service at any time, please contact the Caple Helpline on 0870 241 1142. ß4 Caple have a nationwide service network of engineers who will respond quickly to your call. Always replace spare parts with genuine Caple spares. These are available from authorised Caple Service Centres or by mail order from our National Service Stores, simply telephone 0870 241 1142. When ordering parts always quote the model number and serial number of your appliance.