Ceramic Cooker with Double Oven Model: C 5220 Instruction Manual
Thank you for buying your new CAPLE Cooker. To ensure that you get the best results from your new CAPLE Cooker, we strongly suggest that you read this instruction manual thoroughly before use. This manual contains installation advice, cleaning tips and a cooking guide, as well as other important facts about your CAPLE cooker. If treated with care, your CAPLE appliance should give you years of trouble-free cooking.
Safety Reminders Instruction Book The Grill and Top oven element This appliance should only be used for it’s intended purpose as described in these instructions. Ensure that you fully understand these instructions before operating this appliance. are exposed, so take great care when placing food in the oven or removing it. Use the grill pan handles or gloves. DO NOT line the oven, grids, trays etc.
Electrical Requirements IMPORTANT: The appliance must be installed in accordance with the manufacturer’s instructions. Incorrect installation, for which the manufacturer accepts no responsibility, may cause damage to persons, animals and things. N.B. For connection to the mains, do not use adapters, reducers or branching devices as they can cause overheating and burning. If the installation requires alterations to the domestic electrical system call an expert.
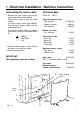
1 - Electrical Installation - Wall box connection Connecting the mains cable Technical data – Remove the two screws securing the cover plate A behind the cooker. – Remove the screw C from the cable clamp. – Insert the mains cable (type H05RRF) of minimum 6 mm2 section into the cable protector P. – Connect the phase and earth cables to the mains terminal connection block B.
FOR THE INSTALLER 2 - Location The cooker must be installed by a qualified technician and in compliance with local safety standards. The appliance afford type “X” protection against overheating of surrounding surfaces. The appliance must be kept no less than 300 mm away from any side wall which exceed the height of the cooktop (fig. 2.1). 450 mm 650 mm The furniture walls adjacent to the cooker must be made of material resistant to heat.
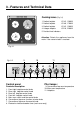
3 - Features and Technical Data Cooking zones (Fig. 3.1) 3 4 1. Radiant hotplate 2. Radiant hotplate 3. Radiant hotplate 4. Halogen hotplate 5. Residual heat indicators 1200 W 1700 W 1200 W 2200 W Attention: Detach the appliance from the mains if the ceramic hobs is cracked. 5 1 2 Ø 145, Ø 180, Ø 145, Ø 210, Fig. 3.1 9 Fig. 3.2 8 7 11 10 6 5 3 4 2 1 Control panel Pilot lamps: Controls description 9. Conventional top oven temperature 10. Main oven temperature 11. Hotplates 1. 2. 3.
How To Use the Hotplates The ceramic surface of the hob allows a fast transmission of heat in the vertical direction, from the heating elements underneath the ceramic glass to the pans set upon it. The heat does not spread in the horizontal direction, so that the glass stays “cool” at only a few centimeters from the cooking plate. The 4 cooking plates are shown by dark disks on the ceramic surface. Type of hotplates Halogen hotplate (fig. 3.3). Incorporating 1 halogen lamp and 2 heating elements (fig. 3.
Radiant hotplate control knob Halogen hotplate control knob The radiant hotplates are controlled by a 6-position control switch (fig. 3.4). The halogen hotplate is controlled by a energy regulator switch (fig. 3.5). The heat power of the halogen hotplate can be adjusted within steps from “0” to its max “12”. Fig. 3.4 Fig. 3.
Cooking plate controlled by a 6 position switch Cooking plate controlled by a 12 position switch Quick-light star hotplates Halogen hotplate 1 1 Cooking hints Position of switch TYPE OF COOKING 0 0 Switched OFF 1 2 1 2 For melting operations (butter, chocolate). 2 2 3 4 To maintain food hot and to heat small quantities of liquid (sauces, eggs). 3 4 5 6 To heat bigger quantities; to whip creams and sauces. (vegetables, fruits, soups). 3 4 6 7 Slow boiling, i.e.
Residual heat indicator The hob also features 5 warning lamps which are wired to the corresponding plate. When the temperature of a cooking plate is over 60°C, the relevant warning lamp is also lit-up to warn of heat on the surface of the hob. This lamp also stay on after the cooking plate has been switched off to shown that the hob surface is still hot. This residual heat lasts for a rather long time after the cooking plate has been switched off.
Safety hints: Cleaning – Before you switch the hob on, make sure you know which knob controls the required cooking plate. We advise you to set the pan over the cooking plate before switching it on. Remove the pan after you have switched the cooking plate off. – Do not use pots and pans with rough bases (pay attention to cookware made of cast-iron). Rough bases can damage (scratch) the glass surface of the hob. Make sure that the pan bottom of the pan is dry and clean.
4 - Electronic clock / end cooking timer The electronic programmer is a device with the following functions: – 24 hours clock with illuminated display – Timing of oven cooking with automatic switch-off (max. 99 minutes). Electronic clock Upon immediate connection of the oven or after a mains failure, three zeros will flash on the programmer panel. To set the clock it is necessary to push the button and then, within 7 seconds, the or button until you have set the correct time.
5 - How To Use the Top Conventional oven Attention: the oven door becomes very hot during operation. Keep children away. WARNING: The door is hot, use the handle. General features As the name implies, this oven features a number of special characteristics from the functional point of view.
Thermostat knob (Fig. 5.1) This only sets the cooking temperature but does not switch the oven on. Rotate clockwise until the required temperature is reached (from 50 to 225 °C). The light above the knob will illuminate when the oven is swiched on and turns off when the oven reaches the correct temperature. The light will cycle on and off during cooking in line with the oven temperature. Function selector knob (fig. 5.2) Rotate the knob clockwise to set the oven for one of the functions described.
6 - How To Use the Bottom Main oven Attention: the oven door becomes very hot during operation. Keep children away. Switch and thermostat selector (Fig. 6.1) Turn the selector knob (fig. 6.1) to the required function. OFF as per fig. 6.1 The oven light is switched on. The fan operates without the heating element, this function can be used for defrosting. 50-225 The oven light is switched on. The oven temperature can be set between 50°C 225°C.
Cooking with air forced Fan cooking is more economical and quicker than cooking in a conventional oven. The moving hot air surrounds the food and penetrates it more quickly than in a conventional oven. The oven can be filled with different dishes all requiring the same cooking temperature. Subtract 10 minutes per hour for every dish requiring a cooking time of more than 1 hour and reduce the heat by 10-20°C; the hotter the oven, the more the temperature can be reduced.
Recommended cooking temperature Food °C °F Gas Mark Shelf Position* Cooking Time (approx) CAKES Victoria sandwich Small cakes/buns Maidera cake Fruit cake Rich fruit cake Scones 190 190 180 170 150 225 375 375 350 325 300 425 5 5 4 3 2 8-9 2 or 3 1 and 2 2 or 3 3 3 or 4 2 20-25 mins 15-20 mins 20 mins 13/4 hours 21/2 hours 8-10 mins PASTRY Puff Short crust Plate tarts Quiches and flans 225 200 200-210 200-210 425 400 400-410 400-410 8-9 6 6 6 2 2 1 or 2 1 or 2 10-20 mins 20-30 mins 30-35 mi
7 - Cleaning and Maintenance General advice – Important: Before any operation of cleaning and maintenance disconnect the appliance from the electrical network. – It is advisable to clean when the appliance is cold. – Do not use a steam cleaner because the moisture can get into the appliance thus make it unsafe. Cleaning All the enamelled parts must be cleaned with a sponge and soapy water or other non-abrasive products. Dry preferably with a soft cloth.
Using the top and the main oven for the first time You are advised to carry out the following operations: – Clean the inside of the two ovens with a cloth soaked in water and neutral detergent and dry thoroughly. – Hang up the wire racks on the oven walls (Figure 7.1 and 7.2). Fig. 7.1 – Slide in, on the guides, the shelf and the tray etc. (Figure 7.3). The shelf must be fitted so that the safety catch, which stops it sliding out, faces the inside of the oven.
Fig. 7.5A Type A Removing the oven door The oven door can easily be removed as follows: – Open the door to the full extent (fig. 7.5A). – Attach the retaining rings to the hooks on the left and right hinges (fig. 7.5B). Fig. 7.5B – Hold the door as shown in fig. 7.5. – Gently close the door and withdraw the lower hinge pins from their location (fig. 7.5C). – Withdraw the upper hinge pins from their location (fig. 7.5D). – Rest the door on a soft surface.
Type B Dismontling the door Please operate as follows: L – Open the door completely. – Push down the lever “L” and, keeping it in this position, slowly close the door in order to block the hinge. – Grip the door (as indicated in fig. 7.7) and, while closing it, release the two hinges as shown in fig. 7.8. Fig. 7.6 Door assenbly – Grip the door with your hands placed near the hinges and raise the levers “H” with your forefingers (fig. 7.8).
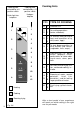
Helpful Advice Trouble shooting Problem Food too brown but not cooked. Remedy Turn down the oven temperature slightly and cook a little longer Problem Food cooked but not brown enough. Remedy Increase temperature. Problem Food baking unevenly. Remedy 1. The temperature may be slightly high turn it down 2. Position the food in the centre of the shelves rather than towards the sides of tho oven. 3. Rotate the food a half turn in the oven. 4. Try pre-heating the oven for 5-15 minutes prior to baking.
CAPLE “Built-in” Service Should you require service at any time, please contact the Caple Helpline on 0870 241 1142. Caple have a nationwide service network of engineers who will respond quickly to your call. Always replace spare parts with genuine Caple spares. These are available from authorised Caple Service Centres or by mail order from our National Service Stores, simply telephone 0870 241 1142. When ordering parts always quote the model number and serial number of your appliance.