Gas Hob Model: C 761 G GB Instruction Manual
Thank you for buying your new CAPLE Gas Hob. To ensure that you get the best results from your new CAPLE Gas Hob, we strongly suggest that you read this instruction manual thoroughly before use. This manual contains installation advice, usage instructions and a cleaning guide, as well as other important facts about your CAPLE Gas Hob. If treated with care, your CAPLE Gas Hob should give you years of trouble-free cooking. Contents Installation Requirements................ ...................................
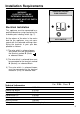
Installation Requirements DOUBLE POLE SWITCHED FUSED SPUR OUTLET WARNING! ELECTRICITY CAN BE EXTREMELY DANGEROUS. THIS APPLIANCE MUST BE EARTHED. Electrical Installation FUSE ON This appliance must be connected by a qualified electrician using fixed wiring via a double pole isolating switch (fig. 1). As the colours of the wires in the mains lead for the appliance, may not correspond with the coloured markings identifying the terminals in your spur box, proceed as follows: USE A 3 AMP FUSE Fig.
Gas Installation Gas installation This appliance should be fitted by a C.O.R.G.I. registered fitter. The installation must comply with Gas Safety (installation and use) Regulations 1994. It is illegal to provide any assistance in the installation of gas appliance except to C.O.R.G.I registered installers. GB Any C.O.R.G.I registered fitter requiring help must provide name, address and registration number. Information supplied will be validated before help is provided.
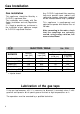
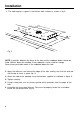
Installation The hob must be installed by a qualified technician and in compliance with local safety standard. Take care not to lose or mishandle any parts when unpacking the appliance. cabinet only (without cooker hood) Positioning the appliance 900 mm 450 mm 750 mm COOKER HOOD The hob must be installed a minimum of 50 mm from the back wall and 150 mm from any vertical surface either side of the hob. Adjacent units must be a minimum of 450 mm above the worksurface.
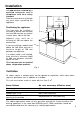
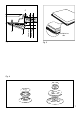
Installation 1. The hob requires a space in the kitchen work surface as shown in fig 3. Fig. 3 NOTE: A partition between the base of the hob and the cupboard below should be fitted 100 mm below the worktop if the cupboard is to be used for storage. Never place perishable foods in the cupboard below the hob. 2. Apply the adhesive seal around the edge of the hob, making sure that the ends do not overlap or leave a space (fig. 4). 3.
C ;;; A Fig. 4 40 mm max. B 20 mm min. ;;;;;;;;; ;;;;;;;;; Adhesive side Fig. 5 Fig.
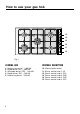
How to use your gas hob 4 3 15 5 14 13 12 11 10 1 2 Fig. 7 COOKING HOB CONTROLS DESCRIPTION 1. 2. 3. 4. 5. 10. Electric lighter button 8 Auxiliary burner (A) - 1,00 kW Rapid burner (R1) - 3,05 kW Semirapid burner (SR) - 1,60 kW Rapid burner (R2) - 2,40 kW Double-ring burner 3,20 kW 11. 12. 13. 14. 15.
Use of the burners The arrival of the gas at the burner is controlled by a knob (fig. 8) which operates the safety closing tap. When the mark on the knob coincides with the symbols on the panel at the side, we will have: - symbol ● tap off (burner off) - symbol: full flow (burner at maximum) - symbol: slow (burner at minimum). To open the tap which allows the gas to reach the burner push the knob and turn it to the left. To close it, turn the knob to the right until the safety device releases.
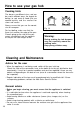
How to use your gas hob Cooking hints The burners are different sizes, and can be used in different ways; the largest for boiling, to seal meat or foods that are cooked quickly and the smallest for stews and sauces. Always ensure that you use the correct size of saucepan. For fast boiling, make sure that the flame just reaches the edge of the pan. Flames going up the side of the pan means wasted heat and the contents of the pan will take longer to boil. Fig.
Enamelled parts All the enamelled parts must only be cleaned with a sponge and soap or other nonabrasive products. Preferably clean with a cloth. Stainless steel Clean with a suitable product. Always dry carefully. Black burners (“oxi-black” coating) They can be removed and washed only with soapy water. Detergents can be used but must not be abrasive or corrosive. Do not use abrasive sponges or pads. Do not put in dishwasher.
CAPLE “Built-in” Service Should you require service at any time, please contact the Caple Helpline on 0870 241 1142. Caple have a nationwide service network of engineers who will respond quickly to your call. Always replace spare parts with genuine Caple spares. These are available from authorised Caple Service Centres or by mail order from our National Service Stores, simply telephone 0870 241 1142. When ordering parts always quote the model number and serial number of your appliance.