EN CM 107 EN Operating instructions Compact Oven 1
TABLE OF CONTENTS EN 1/NOTICES TO THE USER • Safety recommendations . . . . . . . . . . . . . . . . . . . . . . . . . . . . . . . . . . . . . . . . . . • Operating principle . . . . . . . . . . . . . . . . . . . . . . . . . . . . . . . . . . . . . . . . . . . . . . . • Protecting the environment . . . . . . . . . . . . . . . . . . . . . . . . . . . . . . . . . . . . . . . . 3 4 4 2/INSTALLING YOUR APPLIANCE • Before hook-up . . . . . . . . . . . . . . . . . . . . . . . . . . . . . . . . . . . . . . . .
EN 1/NOTICES TO THE USER Important: staples or fasteners for frozen foods is not recommended. Keep this user guide with your appliance. If the appliance is ever sold or transferred to another person, ensure that the new owner receives the user guide. Please become familiar with these recommendations before installing and using your appliance. They were written for your safety and the safety of others.
1/NOTICES TO THE USER •OPERATING PRINCIPLE EN •PROTECTING THE ENVIRONMENT This appliance’s packing materials are recyclable. Recycle them and play a role in protecting the environment by disposing of them in municipal containers provided for this purpose. The microwaves used for cooking are electromagnetic waves. They are commonly found in our environment in the form of radio-electric waves, light or infrared rays. Their frequency is in the 2450 MHz range.
EN 2/INSTALLING YOUR APPLIANCE •BEFORE HOOK-UP In the case of connections with an electric receptacle, it must remain accessible after installation of the appliance. The oven’s neutral conductor (blue wire) must be connected to the network’s neutral conductor. Warning: Ensure that your appliance has not suffered any damage during transport (deformed seal or door, etc...). If you see any kind of damage, before doing anything else, contact your retailer.
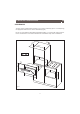
2/INSTALLING YOUR APPLIANCE EN •BUILDING IN The oven can be installed under a worktop or in a column of cabinetry (open* or closed) having the appropriate dimensions for built-in installation (Fig.02). Do not use your appliance immediately (wait approximately 1 to 2 hours) after having moved it from a cold location to a hot location because the condensation may cause a malfunction. 55 0 in t. 456 23 450 int. 600 e xt. 7 450 int. 54 592 Fig.
EN 3/DESCRIPTION OF YOUR APPLIANCE •THE APPLIANCE A B C D Fig.03 A Control panel B Cavity C Turntable D Door handle •Turntable: Enables even cooking of foods with no handling. It rotates indiscriminately in both directions. If it is not rotating, ensure that all the components are properly positioned. Do not attempt to rotate it manually; you risk damaging the drive system. It can be used as a cooking dish. To remove it, take hold of it using the access zones defined in the cavity.
3/DESCRIPTION OF YOUR APPLIANCE •ACCESSORIES •Grid (Fig.05): Allows you to toast, brown or grill. The grid should not under any circumstances be used with other metal cookware on the microwave, grill + microwave or fan heat + microwave settings. However, you can reheat food in an aluminium tray if you insulate it from the grid using a plate. Fig.05 •Side racks (Fig.06): 2 two shelf supports with hooks allow you to use the grid at three heights. Fig.
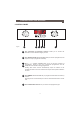
3/DESCRIPTION OF YOUR APPLIANCE •CONTROL PANEL A Fig.09 B D C E F A The automatic programme selector allows you to choose the B The START/STOP touch control allows you to start a programme, and C The “ - / + ” touch controls allow you to set the time, duration of programmes, weight of the food, memorised programmes and the temperature for fan heat cooking programmes. D automatic function and the category of food. suspend or stop a programme underway.
3/DESCRIPTION OF YOUR APPLIANCE •SELECTORS A B C G H I D J E F K B A G L Fig.10 C H D I E J Fig.
EN 3/DESCRIPTION OF YOUR APPLIANCE •DISPLAY A B C D E F G H I Fig.
EN 4/USING YOUR APPLIANCE •SETTING AND ADJUSTING THE TIME After hooking up your appliance or after an extended power outage, “1 2 : 0 0 ” will flash in the display. To set the time on the clock Display Press the +/- touch controls to set the time, e.g 6:30. Confirm by pressing the MEMO touch control. There is a beep to confirm that the time has been set. To change the time 12:00 06:30 Display Press and hold the MEMO touch control for five seconds. The time display flashes. Enter the new time (e.g.
4/USING YOUR APPLIANCE EN •PROGRAMMING Your appliance is now hooked up and the correct time is set. Open the door using the handle. Place the food in the appliance, then close the door. If the door is not closed properly, the appliance will not function. Opening the door during operation does not cancel the current programme; it merely suspends it. To restart the oven, close the door and press the START/STOP touch control.
EN 4/USING YOUR APPLIANCE •MICROWAVE FUNCTION 1000W Direct programming Display Turn the function selector to choose the maximum power microwave function. The microwave display lights up; 1000 W appears in the display. The clock’s digits start flashing in the display. 1000w Press the +/- touch controls to adjust the programme time, e.g. 10 minutes. 00:00 Confirm the selection by pressing START/STOP. The oven turns on and the programme begins.
4/USING YOUR APPLIANCE EN •REHEATING ON TWO LEVELS When using the 500W microwave power level function, you can reheat two dishes at the same time. Place one plate on the turntable and the other on the grid inserted level 3 Recommendations: Cover the plates with plastic food wrap for microwave use or with another inverted plate. The programme times indicated below are given for reheating refrigerated foods or preserved goods at room temperature.
EN 4/USING YOUR APPLIANCE •GUIDE TO AUTOMATIC FUNCTIONS Pork This function allows you to cook and brown roasts that weigh 500 g - 2000 g. Veal Cooking is carried out through a combination of the microwave + fan heating and microwave functions. Use a dish suitable for microwave ovens that is heat-resistant, preferably in terra cotta (less splattering than in a glass dish). When possible, cook roasts without fatty exterior layers to avoid smoke and grease splattering.
4/USING YOUR APPLIANCE EN •GUIDE TO AUTOMATIC FUNCTIONS Vegetables Fresh Frozen Ready-made dishes Fresh Frozen Pizza - Fresh Frozen Fresh Tarts Fresh Quiche This function allows you to cook vegetables that weight 100 g to 1000 g. Vegetables are cooked with the microwave function. Choose fresh vegetables and before cooking add: - up to 200 g: 2 tablespoons water - up to 500 g: 0.5 dl water - up to 1000 g: 1 dl water Use an appropriately-sized dish and cover (except when you are cooking mushrooms).
EN 4/USING YOUR APPLIANCE •DEFROSTING Using your microwave oven to defrost frozen vegetables enables you to save a lot of time. To defrost food, use the SPEED DEFROST function or the MICROWAVE function set to power level 200 W (defrost). Note: Small cuts of meat and fish can be cooked immediately after defrosting. Larger cuts such as meat roasts or whole fish will still be slightly frozen at the end of the defrost programme.
4/USING YOUR APPLIANCE EN •SPEED DEFROST FUNCTION Choose the type and quantity of food that you wish to defrost and the automatic function will programme the appropriate defrosting time. Speed defrost Display Turn the function selector to choose the “Speed Defrost” function. The corresponding display lights up. 50 g appears in the display. Press the +/- touch controls to adjust the weight, e.g. 50 9 400 g. Confirm the selection by pressing START/STOP.
4/USING YOUR APPLIANCE EN •DEFROSTING GUIDE Defrosting pastry Food Quantity Time Recommendations 400 g 1 - 3 min Place on kitchen paper and turn halfway through defrosting Quantity Time Recommendations Scallops 500 g 5 - 7 min Peeled prawns 100 g 1 - 2 min Whole pink prawns 200 g 2 - 4 min Langoustine /Gambas (10) 500 g 6 - 8 min Flaky or shortcrust pastry Defrosting shellfish Food Place on a plate, mix halfway through defrosting.
4/USING YOUR APPLIANCE EN •GRILL FUNCTION This function enables you to cook and brown foods such as au gratin dishes and meats. It can be used before or after cooking, depending on the recipe. Please note: The accessible areas of the oven can become hot when the grill is used. It is advisable to keep small children under supervision. If the appliance is being used in combined mode, it is recommended that children only use the oven under adult supervision because of the temperatures generated.
4/USING YOUR APPLIANCE EN •MICROWAVE + GRILL FUNCTION This function lets you simultaneously use the grill and the microwave, which enables quick cooking. You can use any of the grid levels with any microwave power level settings up to 700 W. Programming the GRILL + MICROWAVE FUNCTION Display Turn the selector to choose the LOW GRILL or HIGH GRILL + MICROWAVE setting, e.g. LOW GRILL + MICROWAVE . The corresponding display lights up and the maximum microwave power level, 700 W, flashes in the display.
4/USING YOUR APPLIANCE EN •FAN HEAT FUNCTION The fan heat function allows you to cook and brown foods like in a traditional oven. Programming the FAN HEAT function Display Turn the selector to choose the FAN HEAT function. The corresponding display lights up; the temperature (200°C) flashes in the display. Press the +/- touch controls to choose the programme temperature, e.g. 180° C. Confirm the temperature by pressing START/STOP. The clock’s digits start flashing in the display.
EN 4/USING YOUR APPLIANCE •FAN HEAT COOKING GUIDE * Preheat the oven to the temperature indicated.
4/USING YOUR APPLIANCE EN •FAN HEAT + MICROWAVE FUNCTION The fan heat + microwave cooking mode combines microwave cooking with fan heat cooking, which allows you to save considerable time. The following microwave power levels are available : 100-200-300-400-500 W. The cooking temperature can be adjusted in increments of 10°C, from 50°C to 250°C. The cooking time can be set between 0 and 60 minutes. Programming the FAN HEAT + MICROWAVE function Turn the selector to choose the FAN HEAT + MICROWAVE function.
4/USING YOUR APPLIANCE EN •MICROWAVE + FAN HEAT COOKING GUIDE Use a dish suitable for microwave ovens that is heat-resistant, preferably in terra cotta (less splattering than in a glass dish). When possible, cook roasts without fatty exterior layers to avoid smoke and grease splattering. After cooking, season the roast, wrap it in aluminium paper and let it sit for 10 minutes. The roast will be juicier.
4/USING YOUR APPLIANCE •CHILD SAFETY EN You can activate the “CHILD SAFETY” function to prevent the unauthorised use of your microwave oven. Programming Display Open the door and press the START/STOP touch control for five seconds, until the key symbol appears in the display. Two beeps are sounded to confirm that your microwave oven is temporarily locked. No programmes are available. To cancel: Follow the same procedure: Press the START/STOP touch control for five seconds with the door open.
6/TROUBLESHOOTING If you have doubts about the proper functioning of your appliance, this does not necessarily mean that there is a breakdown. In any event, check the following items: You observe that ... What should you do? The time counts down, but the appliance is not working (the turntable is not rotating and food is not heated). “Time/demo” flash alternately in the display. Your appliance is in DEMONSTRATION mode. Simultaneously press the START/ STOP, “+“ and “-” touch controls for five seconds.
EN 7/FUNCTIONAL APTITUDE TESTS Functional aptitude tests in accordance with CEI/EN/NF EN 60705 norms 60705. The International Electrotechnical Commission, SC.59K, has established a standard for comparative performance tests conducted on various microwave ovens. We recommend the following for this appliance: Test Load Approx. time (min) 1000 g 16 - 18 Set custard (12.3.1) Power level Cookware / Tips Pyrex 227 On the turntable 500 W Pyrex 220 On the turntable 750 g 13 - 15 Savoie cake (12.3.