CM460 Caple Built-In Coffee Machine Instruction Manual
Dear Customer, we would like to thank you and congratulate you on your choice. This new product has been carefully designed and built using top quality materials, and meticulously tested to ensure that it meets all your culinary requirements. Please read and observe these simple instructions, which will enable you to achieve excellent results from the very first time you use it. This state-of-the-art appliance comes to you with our very best wishes.
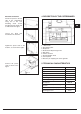
GB CONTENTS 10. Dispensing steam 1. For your safety • During use • For installation and maintenance 11. Programming the quantity of ground coffee 12. Programming the quantity of hot water • Restoring the factory settings 2. Recommendations for the protection of the environment • Packing • Obsolete equipment 13.Illumination of the dispensing compartment 14. Warnings and alarms • No water warning • Replace filter warning • Coffee grounds warning • Coffee probe broken warning • Generic alarm warning 3.
1. FOR YOUR SAFETY 2. RECOMMENDATIONS FOR THE PROTECTION OF THE ENVIRONMENT Although the machine is simple to use, it is important that you read the entire booklet before installing or using the machine for the first time. By doing so, you will achieve the best performance, avoid mistakes, use the machine in absolute safety and protect the environment. Packing All packing materials used are safe for the environment and recyclable.
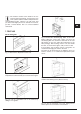
Components for the installation of the machine The machine must be installed in compartments that are 460 mm high and between 560 and 568 mm wide. The following installation components are supplied with the machine. GB 1. 2. 3. 4. 5. 6. Fixed support of the machine. N°13 self-threading screws 3.9X19 N°1 fixed power cord N°2 lateral guides N°2 lateral 1-mm plates N°2 lateral 2-mm plates Then mount the 2 guides using the remaining 8 self-threading screws.
4. DESCRIPTION OF THE COFFEEMAKER Electrical connection Fasten the power to the left side of the compartment using one of the selfthreading wood screws provided and the fixed cord as indicated in the figure. GB Loosen the fixed cord mounted on the machine. Tighten the power cord on the machine, as shown in the figure. 1. 2. 3. 4. 5. 6. 7. 8. 9. Connect the power cord as shown in the figure. 5.
6. DESCRIPTION OF THE CONTROL PANEL: TOUCH BUTTONS GB Control panel Description of the buttons and indicator lights on the control panel.
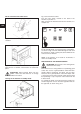
The exclusive feature of this model is the use of touch-control technology. Just touch the area of the symbol and the machine will perform the corresponding function. However, you will notice that you must exert slight pressure to activate the controls, just like a normal button; this is to avoid accidental commands. GB 7. FIRST USE Fill the water tank Fig.7.4 Insert the decalcifying filter in its seat.
Fill the container with coffee beans Fig. 7.9 Pull out the machine. Turn the main switch, located on the back of the machine, to position “1”. After you push the machine back into the furniture, it is ready to use. GB Fig. 7.7 Pour about 200 g of coffee beans in the coffee container. Fig. 7.10 To exit standby mode, you must press the on/off button, as shown in Fig. 8.10. The LED will begin to flash until the machine is “ready”. At this point, all the LEDs for the various services will be lit.
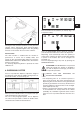
GB Press the button for the selection you want (in Fig. 7.1 it is espresso coffee). Turning the knob clockwise produces a finer grind and stronger coffee. Turning the knob counter-clockwise produces a coarser grind and lighter coffee. The grinding fineness can be read on the cover of the container. Press the START/STOP button within 10 seconds of your selection and wait for the coffee to be dispensed. Dispensing ends automatically when the quantity of coffee for the selection has been reached.
9. DISPENSING HOT WATER To dispense hot water, suitably position the water/steam nozzles, see Fig. 10.1 GB ATTENTION: if the start button is not pressed within 10 seconds, the function is disabled. If you wish to dispense a beverage, you will have to repeat the procedure. The steam will continue to flow until you release the START button. • Position a container below the water/steam nozzle. • Press the hot water button. • Press the START button with 10 seconds from making your selection.
two LEDs flash for its duration. GB FOR EXPERT USERS ONLY: PROGRAMMING THE GRINDING TIME The grinding time for strong coffee is programmable and medium and light coffee are calibrated accordingly. To enter programming mode, when the machine is in standby mode: • press the START/STOP button for 5 seconds; the LED s on the upper left line light up to indicate the grinding time; • to increase the time, press the coffee regulation button and to, decrease it, the START/STOP button.
. ILLUMINATION OF THE DISPENSING COMPARTMENT GB Coffee grounds warning The machine has LEDs for illuminating the dispensing compartment. To activate this function, just press the light button as shown in Fig. 14.1. After 15 coffees have been dispensed, the machine warns of the presence of grounds by turning on the indicator light and will not work until the tray is emptied. For emptying the tray of “used” coffee grounds see Chapter 17 “CLEANING AND MAINTENANCE”.
If the generic alarm light turns on: • Check that the grounds emptying door is closed. • Check that there is water in the tank. Turn the machine off and on. If the problem persists, contact service. Let cool in the refrigerator for ½ hour before serving. 16. CLEANING ATTENTION: do not immerse the machine in water for cleaning. 15. RECIPES External parts Viennese cappuccino The external parts of the machine must be cleaned with a soft cloth and without the use of aggressive detergents.
• The tank can be washed in the dishwasher. • If using the Brita decalcifying filter, we recommend replacing the filter every 2000 espresso coffees or at least every six months. Drip basin Remove the drip basin from the machine as shown in the following figures. GB 17. TROUBLESHOOTING The operator should make sure that the problem is not caused by: - No electricity - No water in the tank - No coffee in the machine - Incorrect closure of the access door to the coffee ground tray.