Instruction manual for fully integrated electronic condenser washer dryer Model code: WDi2202 Contact Caple on 0844 8003830 or for spare parts www.4caple.co.
washing machine contents WARNINGS 4 SPECIFICATIONS 5 INSTALLATION AND ASSEMBLY 6 USING THE APPLIANCE.
warnings A manual containing the operating, maintenance and installation instructions is supplied with this washing machine. Please read all the instructions before using the washing machine, as indicated in the symbol. Do not use an extension lead or adaptor plug to connect the washing machine to the mains. Do not climb onto the washing machine or lean on the loading door when it is open. The machine must only be used for the purpose for which it is designed.
washing machine specifications Power cord Drain hose Control panel SELECT Detergent dispenser Stainless steel drum Hatch Accessible filter Adjustable feet ACCESSORIES Water inlet hose.
washing machine installation and assembly AND 1 UNPACKING UNBLOCKING THE WASHING MACHINE UNPACKING SELECT a Remove the base, corner protectors and top cover. UNBLOCKING a Remove the screws holding the plastic covers to the back of the washing machine. b Loosen and remove the 3 blocking screws. Important c Cover the holes with the plastic covers you have just removed. a/c Do not throw the blocking screws away. You may need to move the washing machine at a later date.
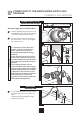
TO THE MAINS WATER SUPPLY AND 2 CONNECTION DRAINAGE installation and assembly CONNECTION TO THE MAINS WATER SUPPLY The water supply hose is inside the drum: a Connect the bent end of the hose to the threaded inlet of the electrovalve located at the rear of the washing machine. Important b Connect the other end of the hose to the water intake. Then securely tighten the connection nut.
THE WASHING MACHINE AND CONNECTING 3 LEVELLING IT TO THE MAINS ELECTRICITY SUPPLY installation and assembly Important LEVELLING Use the adjustable feet to level the washing machine. This will reduce the noise level and prevent it from moving during use. Do not bring the feet too far out, you will achieve better stability. You need to use a spanner for the models that have a nut.
4 PRE-CLEANING PRE-CLEANING a When your washing machine has been correctly installed, we recommend that you pre-clean the machine. This is to check that the installation, the connections and the drainage are all correct, and to thoroughly clean the inside of the washing machine before any wash programmes are run (see the operating instructions on the following pages). a Select the normal programme at 60ºC. b Press the Start/Stop button.
washing machine using the appliance and practical tips 1 PREPARING GARMENTS FOR WASHING Important PREPARATION Before placing the clothes in the drum, make sure all the pockets are empty. Any small objects may block the drain pump. Important SORTING THE CLOTHES Make sure beforehand that your woollens can be machinewashed. a Sort the clothes according to fabric and how they are made: We recommend using the delicate programmes for sensitive fabrics. There is a special wool programme for woollens.
2 USING DETERGENT AND ADDITIVES using the appliance and practical tips DETERGENT AND ADDITIVES a a Your washing machine’s detergent dispenser has three compartments. PREWASH WASH FABRIC SOFTENER b Put the detergent or additive into the detergent dispenser before starting the wash programme. c Liquid detergents may also be used in this washing machine. An optional detergent dispenser is to be used for this, which can be obtained from the Technical Service Network.
OF WASHING AND 3 SELECTION DRYING PROGRAMME using the appliance and practical tips start/ stop button drying time button screen SELECT detergent dispenser spin and anti-crease button programme selector command To select a wash programme, proceed as follows: a Starting from the off “0” position, the washing machine turns on when selecting the desired wash programme, (see programme table).
using the appliance and practical tips The procedure for selecting the drying time is as follows: a a Select drying time in minutes using the drying time button. Important The time will appear on the display, increasing each time the drying time button is pressed. If you select a wash + dry option, the load must not be over 4 kg. (1.5 kg. for delicate wash programmes).
Drying prog. Auxiliary prog. Wool P.
Anti-crease Max load of clothes (Kg) Wash product compartment Total consumption kWh/litres Programme description Approx.
4 SPIN SPEED SELECTION using the appliance and practical tips SPIN-DRYING a The wash options must always be selected after choosing the wash programme. Any programme change during selection cancels the previously selected options. a Spin speed selection and anti-crease button The selected programme has its own particular spin speed. Select b b You can change it by repeatedly pressing the spin button. The spin speed will gradually be reduced at 100 r.p.m. intervals to 400 r.p.m. for display models.
5 TIME DELAY SELECTION AND ADDITIONAL FUNCTIONS using the appliance TIME DELAY Time delay selection button A delay of up to 24 hours can be selected. The delay must be selected after choosing the wash programme. To select the hours of delay, press the clock button. Each time the button is pressed the start of washing is delayed by 1 more hour. Select Cancelling the delay To cancel the delay you have to press the clock button successively.
6 STARTING UP AND BLOCK FUNCTION SELECTION using the appliance and practical tips STARTING UP a Start/Stop button a To start up the washing machine you have to press the Start/Stop button. The minutes remaining until the end of washing and drying will appear on the display at all times. Select BLOCK FUNCTION a Block function selection The lock function ensures that the programme will not be affected if any buttons are pressed. It is used when children could press the buttons, etc.
7 WASH/DRY PROGRAM STATUS AND POWER CUTS using the appliance and practical tips PROGRAMME PHASES Important Once started, current programme status and time remaining till completion can be ascertained from the screen. The active phases will appear successively at the top of the display as the programme progresses. The time remaining until the end of the programme will also appear on the display. It updates at regular intervals, but not minute by minute.
washing machine maintenance and cleaning MAINTENANCE After each wash, leave the door open for a while to allow the air to circulate freely inside the machine. SELECT Important From time to time, depending on the hardness of your water, it is recommendable to run a full wash cycle using a decalcifying product. This will extend the life of your washing machine. The washing machine should be disconnected from the mains electricity supply before any cleaning or maintenance is carried out.
THE ACCESSIBLE FILTER 2 CLEANING AND THE OUTSIDE maintenance and cleaning CLEANING THE FILTER Clean the accessible filter if the drain pump is blocked by any foreign objects. a Use a coin to turn the filter cap. b Pull out the filter cap. c Place a container under the drain pump filter to collect any water that comes out of it. d Half- or quarter-turn the filter to the left. Water will start to come out.
washing machine safety and troubleshooting If you detect any problems with your washing machine, you will probably be able to rectify them yourself by consulting the following instructions. Important If this is not the case, unplug the appliance and contact the TECHNICAL ASSISTANCE SERVICE. Never open up the appliance. There is no fuse or similar component inside that can be replaced by the user.
safety and troubleshooting Why doesn’t the washing machine take in water? Indicator F01, no water coming in, this may be due to a cut in the water supply, a tap turned off or a blocked water inlet filter. The possible solutions are as follows: wait for the water supply to be reconnected, turn on the tap, or remove the water inlet hose and clean the filter. If this failure is detected, F01 will appear on the display.
safety and troubleshooting Why is there still some water in the dispenser? This may be because the dispenser needs cleaning. This simple operation is described in Maintaining and cleaning the appliance. 1- Cleaning the detergent dispenser. Why can’t I open the hatch immediately after the wash has finished? Washing machines today are provided with safety systems for users. One of them is that the washing machine cannot be opened until it is certain that the drum is quite still.
environmental warnings eco-note INFORMATION FOR THE CORRECT DISPOSAL OF WASTE ELECTRICAL AND ELECTRONIC APPLIANCES When your appliance is of no further use, it should not be disposed of together with general domestic waste. It can be taken, free of charge, to a specific waste collection centre, run by your local authority, or dealers who provide this service.
01/10 LJ6A035V7 / B026A4200