
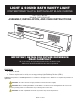
User's Manual


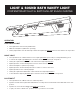

OPTION 1
ANCHORING TO AN ELECTRICAL OUTLET BOX
1. If replacing an existing xture remove.
2. Remove Mounting Plate (B) from Light Fixture (A) by removing pre-installed
Mounting Plate Screws (AA).
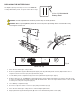
3. Wire Capstone Quick Connector (DD) to Electrical Box (G) using Wire Nuts (CC) (white wire to white
wire / black wire to black wire) and attach Wall Ground Wire to the Electrical Box (Fig 1).
4. Bring Capstone Quick Connector (DD) through center hole in Mounting Plate (B) (Fig 2).
5. Align and anchor Mounting Plate (B) to Electrical Box (G) using Electrical Box Mounting Screws (BB). Make
certain the Mounting Plate bottom is facing downward.
6. Connect Capstone Quick Connector (DD) pre-wired to Light Fixture (A) to Capstone Quick Connector (DD) wired
to Electrical Box (G) and attach Light Fixture Ground Wire to Ground Screw (E) (Fig 3).
7. Place Rocker Switch (F) in ON position to activate Night Light feature.
8. Align Light Fixture (A) in Mounting Plate (B) and secure with Mounting Plate Screws (AA).
OPTION 2 – ANCHOR TO A WALL
1. If replacing an existing xture remove.
2. Remove Mounting Plate (B) from Light Fixture (A) by removing pre-
installed Mounting Plate Screws (AA).
3. Align Mounting Plate (B) on wall centering over Electrical Box (G). Make
certain the Mounting Plate bottom is facing downward.
4. Mark location of Wall Mounting Screw Holes (D) with pencil/pen.
5. Remove Mounting Plate (B) from wall and drill holes using 7mm (9/32”) drill bit
6. Insert Plastic Wall Anchors (FF).
7. Wire Capstone Quick Connector (DD) to Electrical Box (G) using Wire Nuts (CC) (white wire to white wire and
black wire to black wire) (Fig 4).
8. Bring Capstone Quick Connector (DD) and Wall Ground Wire through center hole in Mounting Plate (B) (Fig 5).
9. Anchor Mounting Plate (B) to wall by securing Self-Tapping Wall Mounting Screws (EE) into Plastic Wall
Anchors (FF).
10. Connect Capstone Quick Connector (DD) pre-wired to Light Fixture (A) to Capstone Quick Connector (DD) wired
to Electrical Box (G) and attach Wall Ground Wire and Light Fixture Ground Wire to Ground Screw (E) (Fig 6).
11. Place Rocker Switch (F) in ON position to activate Night Light feature.
12. Align Light Fixture (A) in Mounting Plate (B) and secure with Mounting Plate Screws (AA).
Fig 3
Fixture
Ground
Wire
E
BB
Fig 4 Fig 5 Fig 6
Fixture
Ground
Wire
DD
E
EE
DD
Wall
Ground
Wire
G
DD
DD
B
B
B
B
A
A
Fig 2Fig 1
Wall Ground Wire
Wall
Ground
Wire
Wall
Ground
Wire
G