
User Manual


10
It is important that you have ordered a steering wheel interface with lead cable to be able to link it. If
this is not the case, you can possibly purchase it from us.
If you are going to connect steering wheel control to your radio, connect the steering wheel adapter
between the car plug and the radio plug. In addition, a lead cable is always included with a steering
adapter. This lead cable connects you between the adapter and the radio. If you have a Kenwood or
JVC radio, you have a single key wire (blue steering wheel remote input) that is paired with the radio.
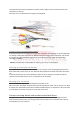
With an Android radio you have two key wires and a mass which need to be coupled. The key wires
are labeled with a white sticker or are listed on top of the radio in a diagram. If both are not the case
and your plug matches the one below. Then you can use blue and orange as a key wire. See
description below.
The blue wire is key1 and the orange wire is key2
How does learning work
In the radio menu, go to the menu to learn steering wheel control. This can be found among all
applications and is indicated by one of the following terms: SWC/ SWI/ Steering wheel, depending on
the model purchased.
Press start/ initialize or the indicated start term. Then press and hold a button on the steering wheel.
While holding this button, you can select a key on the radio with the correct term and/or symbol.
Then you go through all the buttons for the right result. Do not release your steering wheel while
touching the radio, as there must be simultaneous contact. At the end of the process, you can
save/save, or press confirm. It is also possible, depending on the multimedia ordered, that the make
and model ... your car must be selected. In that case, after confirming your car make or model, the
steering wheel control is automatically activated.
If you have taken the above steps and have not yet achieved a result for the steering wheel control,
take the following steps.
Make sure you've connected Wi-Fi first, then follow this way:
Settings-Factory reset-Password entry (1234, 12345, 8888, 88888)- can settings. This will set the
multimedia to factory settings. Then fills the brand and year of manufacture of car. At Cfg: All
Protocol: Raise
Mounting of a third brake light camera
• Grab the 3rd brake light camera with the 4-pin, red (+) and black (-) wire.
• Connect the red and black wire to the plus and minus of the reversing lights.
• Connect the camera's 4-pin cable to the short 4-pin adapter cable.
You then connect this again with the long 4-pin cable.
Now you connect the gradient to it with the 4-pin connection and the yellow, white, and black tulip.
On the black tulip of this gradient, connect the cable with the long red and black wire.
• You can now pull the entire cable forward towards the radio.
The yellow tulip now connects you to the yellow tulip of the radio (rapkv cvbs.in, cam. Cvbs; rear cam
in) by means of the gradient plug (man-man) that is included.
• The long red and black wires can be reconnected to the reversing lights (or fuses cabinet)
• All that is needed now is a separate plus wire that is brought forward from the reversing light to the
radio. You then connect this wire to the reverse/back detection cable of the radio. Now the camera
turns on automatically when you reverse. Connecting a reversing camera to a can bus car