m ol ut io ns . co Video Interface for Mercedes-Benz W204 C ar -S User Guide Release Date 2013.08.26 Model QPI-W204-Main-V1.2 Product Code 130814-N www.car-solutions.com support@car-solutions.
Warning / Caution ar -S ol ut io ns . co m When installing the main unit, do not remove or alter existing vehicle fasteners, including nuts, bolts, screw, clips, and fittings. Never detach, move or alter existing vehicle wiring, including electrical grounds and straps. Alteration of existing vehicle Warning components may make vehicle unsafe to operate. Should be no any electronic devices or magnetic pole around installation place. Air bags are vital part of a safety system.
Table of Contents C ar -S ol ut 3. Settings 3.1 DIP Switch 3.2 Remote Control 3.3 FACTORY MENU 3.3.1 IMAGE, PARK 3.3.2 UTIL1 3.3.3 UTIL2 3.3.4 INFO 3.4 Original Button Usage 3.5 OSD io ns . 2. Installation 2.1 Installation Diagram 2.2 Installation 2.3 Connecting Power cable 4. Trouble Shooting www.car-solutions.com co m 1. Specifications 1.1 Main Specifications 1.2 Features 1.3 System Diagram 1.4 Components 1.5 Exterior 1 2 3 4 5 6 7 9 10 11 13 15 18 19 20 22 support@car-solutions.
1. Specifications 1.1 Main Specifications m 1. Car Compatibility New A-Class, B-Class, C-Class, E-Class, GLK-Class, ML-Class, CLA-Class(Round connector Type) co 2. Components Interface* 1EA io ns . 3. MULTIMEDIA INTERFACE input specification 3 * A/V input (video external input) 1 * CVBS(Rear Camera) input 2 * Analog RGB input (Navigation system, HDMI) 1 * LCD input (Car system input) ol ut 4. MULTIMEDIA INTERFACE output specification 1 * LCD output ar -S 5.
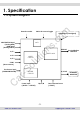
1. Specification m 1.3 System Diagram Switch for source toggle Remote control NAVIGATION Input (Analog RGB) HDMI Input (Analog RGB-2) A/V 1 io ns . MCU co OEM Button (Can Signal) DISPLAY Car Installation OEM LCD VIDEO MUX A/V 3 CVBS (Rear camera) C ar -S Car Screen Input (CAR MAIN BOARD) VIDEO CIRCUIT ol ut A/V 2 POWER CIRCUIT Power Input (+8VDC ~ +18VDC) A/V OUT Dip S/W HEADREST MONITOR Rear Camera Power (+9VDC) -3www.car-solutions.com support@car-solutions.
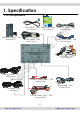
1. Specification 1.4 Components Sub-board* 1ea TOUCH cable * 1ea (HLCDCA0007) (QCPASS0433) (HTOUCH0007) Remote control * 1ea (REMOTE0001) LVDS cable * 1ea (HLVDSC0003) co m LCD cable * 1ea TOUCH OUT cable * 1ea ar -S ol ut io ns . (HTOUCH0004) A/V cable * 1EA (HAVCAB0002) Mode cable * 1EA C (HARETC0001) R-CAM POWER cable * 1EA (HARETC0002) RGB cable * 1ea (HRGBCA0013) IR cable * 1EA (HIRCAB0002) POWER cable (16P) * 1EA (HPOWER0040) -4www.car-solutions.com support@car-solutions.
1. Specifications m 1.5 Exterior ⑧ ⑨ Width 150.4mm Length 99.4mm Height 2.3.2mm io ns . ⑫ ⑪⑩ co Dimension ① MODE ③ C ① ② ar -S ol ut ② IR ④ ⑤ ③ POWER ④ REAR CAMERA ⑤ RGB-IN(HDMI) ⑥ RGB-IN(NAVI) ⑦ AV IN/OUT ⑧ TO NAVI T/S-OUT ⑥ ⑦ ⑨ LVDS OUT ⑩ TEST ⑪ LED ⑫ DIP S/W -5www.car-solutions.com support@car-solutions.
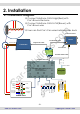
2. Installation 2.1 Installation Diagram ※ Connect Interface CAN1-High(Red) with Car’s Brown+Red wire ※ Connect Interface CAN1-LOW(Brown( with Car’s Brown wire m ※ User can find Car’s Can wires behind Audio deck CAN co Behind of monitor Monitor Provided LCD Cable CAN LOW CAN HIGH io ns .
2. Installation 2.2 Installation Original LCD cable Command io ns . co m Monitor Provided LCD cable ar -S ol ut Provided LVDS cable Touch Screen C Provided TOUCH cable ※ For using touch, have to buy touch screen -7www.car-solutions.com support@car-solutions.
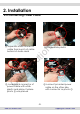
2. Installation ② Divide white plastic C ar -S ol ut ① Separate white connector cable from bunch of cable behind of Audio deck io ns . co m 2.2 Connecting Power cable ③ cover black connector of power cable with white plastic and place it where photo ① was placed ④ connect provided power cable on the other side with connector as photo ① -8www.car-solutions.com support@car-solutions.
3. Settings ※ Example DIP S/W usage - Use input mode : A/V2, A/V3 - Use original navigation - External rear camera ▷DIP S/W : 2,3 OFF (A/V1,2 display) ▷DIP S/W : 4 OFF (A/V3 display) ▷DIP S/W : 5 OFF (High Resolution Monitor) ▷DIP S/W : 6 OFF ▷DIP S/W : 7 ▷DIP S/W : 8 ON (display external rear cam) OFF io ns . ※ ON : DOWN / OFF : UP : 8 OFF ON (hide INPUT MODE) m ▷DIP S/W : 1 co 3.
3. Settings POWER Function Unavailable A/V 1~2 Mode : Remote control UI Display HDMI, A/V 3 Mode : Mode switching UI Display ar -S PIP ol ut Key io ns . co m 3.2 Remote Control MENU OK Activating OSD menu Making a selection, changing image display Moving upward ▼ Moving downward ◀ Moving leftward (If you press this button 2 seconds long, you can access the factory mode.) ▶ Moving rightward (If you press this button 2 seconds long, you can reset all the data about user environment.
3. Settings 3.3.1 FACTORY MODE-IMAGE, PARK m FACTORY mode – Press ◀ button 2 seconds long on the remote control. PARK io ns .
3. Settings 3.3.1 FACTORY MODE-IMAGE, PARK FACTORY mode – Press ◀ button 2 seconds long on the remote control. co m Go to Factory Menu, choose PAS SETUP, by using OK button change H-POS → V-POS io ns . H-POS In H-POSITION, use ◁, ▷ on remote control, to adjust parking guideline left and right. ol ut H-POS : 0000 In V-POSITION use △, ▽on remote control, to adjust parking guideline up and down. C V-POS : 0000 ar -S V-POS -12www.car-solutions.com support@car-solutions.
3. Settings 3.3.2 FACTORY MODE-UTIL1 FACTORY mode – Press ◀ button 2 seconds long on the remote control. Setup for car model Setup for navigation m HDMI SKIP HDMI SKIP HDMI SKIP co HDMI SKIP io ns . BENZ * Set pin#5 of DIP switch to the right size of the monitor after selecting model of the car. (Refer to page9.
3. Settings 3.3.2 FACTORY MODE-UTIL1 FACTORY mode – Press ◀ button 2 seconds long on the remote control. HDMI SKIP m HDMI SKIP co HDMI SKIP UTIL1 – AVOUT SELECT Selecting background sound After returning navigation or original mode io ns .
3. Settings 3.3.3 FACTORY MODE-UTIL2 LI-1DISC NEC-6DISC USER(when using IR MEMORY) ON / OFF A/V1 : Control DVD Remote control UI A/V2 : Control DTV Remote control UI C ar -S ol ut •Select DVD model: Setting on AV1 Mode •Select DTV model : Setting on A/V2 mode UTIL2 - I_DRV CONTROL Selecting whether to use I_DRV function or not io ns . UTIL2 - I_DRV REMOTE Choose DTV and DVD model to be control I_DRV function co m FACTORY mode – Press ◀ button 2 seconds long on the remote control.
3. Settings 3.3.3 FACTORY MODE-UTIL2 FACTORY mode – Press ◀ button 2 seconds long on the remote control. ② Picture above shows DVD remote control button value input, select menu you want to save. (To register DVD remote control button value, select IR MEMORY – DTV and follow below instructions. ol ut ① First of all, press ◀ button on remote controller 2 seconds long or press UP→DOWN→UP→MENU button in order to access Factory mode. Choose IR MEMORY on UTIL2. io ns . co m UTIL2 – IR MEMORY Example) a.
3. Settings 3.3.3 FACTORY MODE-UTIL2 FACTORY mode – Press ◀ button 2 seconds long on the remote control. io ns . ③ After register, select “SRC” button in OSD menu. Then you can see confirmation window as shown above. At the moment, (If data is saved, DVD TYPE and DTV TYPE will be changed to “USER” automatically.) ar -S ol ut Instruction> continued… c. The values that you registered will appear as green text in the marked area on pressing the button. And the values will be saved automatically. d.
3. Settings 3.3.3 FACTORY MODE-INFO co m FACTORY mode – Press ◀ button 2 seconds long on the remote control. io ns . INFO C ar -S ol ut Check main version and Trip version -18www.car-solutions.com support@car-solutions.
3. Settings 3.3.4 Original Button Usage co m ※ When press long the back button in handle, Can switching mode (RGB→HDMI→A/V1→A/V2→A/V3→Original mode) ar -S ol ut io ns . ※ SELECT C When press long the voice button in handle, Can reboot the program When press long the back button in handle, Can switching mode (RGB→HDMI→A/V1→A/V2→A/V3→Original mode) -19www.car-solutions.com support@car-solutions.
3. Settings co m 3.5 OSD (On Screen Display) / Analog RGB Mode OSD *LANGUAGE : Set OSD language (only support English and Chinese) * TRANS : Adjust OSD transparency *H-POSITION : Move OSD horizontally * V-POSITION : Move OSD vertically ar -S ol ut io ns . IMAGE * BRIGHTNESS * CONTRAST * SHARPNESS C UTIL * FACTORY RESET : Factory reset only for OSD function (unable reset video position) -20www.car-solutions.com support@car-solutions.
3. Settings co m 3.5 OSD (On Screen Display) / Video Mode OSD * LANGUAGE : Set OSD language (only support English and Chinese) * TRANS : Adjust OSD transparency * H_POSITION : Move OSD horizontally * V_POSITION : Move OSD vertically ar -S ol ut io ns . IMAGE * BRIGHTNESS * CONTRAST * SATURATION * HUE * SHARPNESS C UTIL * FACTORY RESET : Factory reset only for OSD function (unable reset video position) -21www.car-solutions.com support@car-solutions.
4. Trouble Shooting Q. I cannot change mode A. Check connection of Ground cable and IR Cable. Check LED lamp is on, if not check connection of POWER cable. co m Q. All I got on the screen is black. A. .Check second LED lamp of the interface is on, if not, check A/V sources connected are working well. (Second lamp indicates AV sources connected works well.) Check interface connection has been done well. io ns . Q. Displayed image color is not proper (too dark or unsuitable color) A.