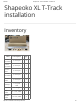
5/3/2018 Shapeoko XL T-Track installation - Carbide 3D Shapeoko XL T-Track installation Inventory Item Description Qty 1-1/4″ Hex Bolt (1/4-20 tpi) - 4 1-3/4″ Hex Bolt (1/4-20 tpi) - 4 2″ Hex Bolt (1/4-20 tpi) - 4 2-1/4″ Hex Bolt (1/4-20 tpi) - 4 Thumb Nuts (1/4-20 tpi) - 4 Clamps 1″×4″, Red Oak - 4 T-tracks 23″ length - 4 Side Filler 4″ × 23″, MDF - 2 Middle Filler 10 × 23″, MDF - 3 http://docs.carbide3d.
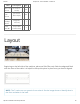
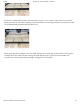
5/3/2018 Shapeoko XL T-Track installation - Carbide 3D Item Description Qty #8 × 1/2″ Screw (to secure Ttracks) - 50 #8 × 11/4″ Screw (to secure filler strips) - 30 #2 Phillips Driver (magnetic, 1/4″ hex) - 1 5/64″ Drill Bit (to pre-drill screw holes) - 1 Layout Beginning on the left side of the machine, place one Side Filler strip flush the edge and flush with the front of the table. It is helpful to clamp this piece in place once you have it aligned.
5/3/2018 Shapeoko XL T-Track installation - Carbide 3D Take one of the provided T-tracks, and align it with the front edge. Keep this T-track pressed against the side filler strip. There should be no gap. Continue with this same method by next laying down a middle filler strip, then another T-track, then another middle filler strip, then another T-track, then the last side filler. When you get to the end, both filler strips should be flush with both edges of the stock MDF board. Prep http://docs.carbide3d.
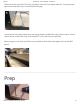
5/3/2018 Shapeoko XL T-Track installation - Carbide 3D You have two options here. Option — For the perfectionist: We included a / ″ drill bit with this kit. If you were so inclinded, you could transfer all of the holes, as they are laid out. Then remove all of the pieces, and pre-drill each one. PROTIP: Pre-drilling the holes will help limit the amount of ‘bubbling’ the MDF will do when the screw is driven in.
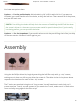
/3/2018 Shapeoko XL T-Track installation - Carbide 3D Each of the middle filler pieces are attached using × - / ″ screws. Start from one end and work your way to the other, keeping close attention to not letting the piece ride up the screws. Some downward pressure will help with this. Work your way all the way across the table, trying not to strip any of the screws. Setting your cordless drill to a lower torque setting can help prevent this.