
Installation Guide

Installing the Fan
After choosing the location where your solar attic fan will be
installed, find the closest rafter to that location and determine if
your roof has either 16" on center or 24" on center rafter spacing.
If your roof has 24" on center rafter spacing, find the center point
between two rafters and mark it as the center of the vent hole. For
roofs with 16" on center spacing, mark the rafter itself as the center
of the vent hole. Partially insert a screw into the center point mark.
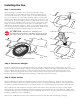
Using the screw as a reference point, trace out a 10" radius circle
(20" across) as shown in Figure 1. Next, use a reciprocating saw to
cut out the traced hole pattern from the roof decking. Remove the
cut out decking material from around the hole as needed.
Step 1 - Cut the Hole
Figure 1 - Cutting the Hole
10”
ATTENTION: DO NOT CUT THROUGH ANY
RAFTERS OR STRUCTURAL MEMBERS WHILE CUTTING
THE VENT HOLE. ONLY CUT OUT THE ROOF DECKING.
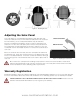
Insert the reciprocating saw sideways between the shingles and roof decking. Starting at the 3 o’clock
position of the vent hole, begin cutting in a sweeping motion under the shingles, sawing through any roofing
nails or staples. Continue cutting counter-clockwise around the vent hole until reaching the 9 o’clock
position. Using a roofing knife, cut a 4 inch horizontal slit in the shingles at the 9 o’clock and 3 o’clock
positions of the hole, allowing the fan’s flashing to slide underneath the shingles.
Step 2 - Release the Shingles
Figure 2 - Releasing the Shingles
3 o’clock
9 o’clock
12 o’clock
4"cut
Apply weatherproof caulking to the bottom side of the fan unit (see Figure 3). Align the fan unit with the
vent hole so that the sticker "solar panel pivot's this way" is facing the desired direction. If the solar panel is
to remain in the flat unraised position, the sticker will be on the topside (12 o'clock position) of the fan unit.
Next, slide the fan underneath the shingles until the fan reaches the top of the vent hole. Secure the fan
flashing to the roof with self-tapping screws through the pre-drilled holes in the base flashing. Apply caulk
around the fan unit where the shingles meet the flashing, across the 4" slit cuts, and over any exposed screw
heads to weatherproof your installation.
Remove the cardboard cover from the solar panel and your solar attic fan should begin working.
Step 3 - Mount the Fan