
Installation Guide
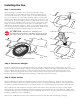
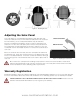

Figure 3 - Mounting the Fan
Adjusting the Solar Panel
The solar panel on your Cardinal Ventilation solar attic fan may
either be left down in the horizontal mounted position as received
from the factory, or the solar panel bracket may be raised to
pivot the solar panel toward the south in order to get better sun
exposure. To raise the solar panel, first remove the set bolts from
the solar panel mounting brackets as shown in Figure 4. You will
need 7/16" wrench and a pair of pliers to remove the set bolts and
lock nuts.
Once the set bolts are removed, raise the solar panel and fold out
the bracket legs. Align the mounting holes in the bracket legs with
those on the base brackets. Insert the set bolt and washer through
the mounting holes in the brackets and secure each in place with a
lock nut.
Do not raise the solar panel if installing this product in an area of either Florida or Texas that
has been designated as a high velocity wind zone area. The solar panel must remain in the flat
horizontal position due to building code requirements.
REMOVE SET BOLT
RAISE SOLAR PANEL
Figure 4 - Adjusting the Solar Panel
Warranty Registration
Cardinal Ventilation oers an industry leading 25-year standard parts warranty on your new solar attic fan.
For more information about the terms and conditions of our warranty, please see our website for details.
YOUR WARRANTY MUST BE REGISTERED WITHIN 90 DAYS OF INSTALLATION. Please visit our
website at www.cardinalventilation.com to register your warranty.
www.cardinalventilation.com