
Specifications


Installation & Maintenance Manual__________
24
8. Start-Up and Shut-Down
IMPORTANT WARNING:
1. Before starting, inspect the humidifier to make sure it is in good condition; that there are no
water leaks and the electrical components are dry.
2. Don't apply voltage to the unit if it is damaged or wet!
Complete the installation checklist before starting the gaSteam humidifier.
Should overheating occur, or the gas supply fails to shut off, shut off the manual gas valve to the
appliance before shutting off the electrical supply.
Note:
When the humidifier is first started, it may take up to 30 minutes for the steam generator to fill with water, heat
up, and attain nominal steam production.
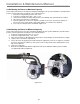
To reduce the filling time, the unit can be manually pre-filled using the drain/fill faucet located at the base of the
tank. The manual pre-filling can be performed together with the automatic fill, yet must stop before reaching the
minimum level sensor: from this point, ONLY proceed with the automatic fill to ensure that the Autotest is
performed correctly.
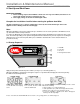
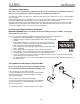
8.1 Startup Sequence
1- ON/OFF
2- Controller
3- Not used
4- interrupt/manual drain
Figure 8.1.1
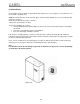
Apply electric power and turn the power switch (see Fig 8.1.1) to the ON (position '1')
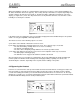
When the humidifier is started it goes through a sequence of operation that is displayed on the front panel by
the LEDs in the following manner:
1 - INITIAL START 2 - INITIALIZATION 3 - Operation
In this phase, which lasts 1
second, all LEDs on the display
are lit.
During this phase, which lasts
for 4 seconds, the three LEDs
shown are illuminated.
The humidifier begins to function normally and the control
indicates the following:
• autotest status (see section 8.2 Autotest)
• steam production (in %) with external proportional control;
• display of the control sensor in stand-alone mode;
• in case the humidifier is disabled, two dashes will appear
flashing in the two right digits
In case of an alarm, the alarm LED will turn on and the corresponding alarm code will be displayed.
1
0
1
2
3
4