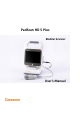
PadScan HD 5 Plus Bladder Scanner User’s Manual
TRADEMARKS , PadScan are trademarks, registered or otherwise, of CARESONOTechnology Co., Ltd. Other names may be trademarks of their respective owners. COPYRIGHT All rights reserved. No part of this publication may be reproduced in any form whatsoever without the prior written permission of CARESONO. © Copyright 2019-2020CARESONO EC-Representative:MEQUIPEX Bernhardt Kern Address:Feldstrasse 39, 4813 Altmuenster Austria Version Number: HD5.V1.1.1.Caresono Release Date: 2019.9.
ALL RIGHTS RESERVED. NO PART OF THIS PUBLICATION MAY BE REPRODUCED IN ANY FORM WHATSOEVER WITHOUT THE PRIOR WRITTEN PERMISSION OF CARESONO. ................................................................................................. II INTRODUCTION .................................................................................................................................................... 1 Intended Use ..............................................................................................
Cleaning the Probe ................................................................................................................................................. 35 Probe Maintenance ................................................................................................................................................ 35 Battery Use and Maintenance .................................................................................................................................
INTRODUCTION The PadScan HD 5 Plus developed and manufactured by Caresono Technology Co., Ltd. Provides noninvasive real-time measurement of urinary bladder volume. The device calculates the bladder volume by using patented ultrasound imaging and measuring technology. When the scan is complete, multiple 2D plane ultrasonic images are acquired in several seconds. It features: Expert and Easy operating modes. Correct, reliable, fast, and simple operation.
The PadScan HD 5 Plus Bladder Scanner has been tested and found to comply with the electromagnetic compatibility (EMC) limits for medical devices to IEC 60601-1-2:2014, IEC 60601-1-2-37: 2007 + A1: 2015. These limits are designed to provide reasonable protection against harmful interference in a typical medical installation.
CAUTIONS AND WARNINGS Read carefully before use Only trained technicians should operate this device. The operator must read the Owner’s manual entirely and refer to any additional training materials before using the device. Check and maintain the device regularly. Do not disassemble or attempt to repair the device and the probe. ONLY CARESONO-trained technicians may service the unit. Equipment Checks 1. Make sure all cables are properly connected. 2. Make sure the device is properly functioning. 3.
Chemical medicines or gas Sudden shaking of the device or drops Maintain Probe Safety Do not immerse the probe in water or any other liquids. Keep probe away from heat sources. To avoid damaging the cable or transducer connector, handle them with care. Do not bend or pull probe cable. It is recommended to use standard ultrasound gel only. Other substances may damage the probe and the probe cable. A dirty probe may decrease the accuracy of the system. Keep the probe clean.
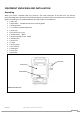
EQUIPMENT UNPACKING AND INSTALLATION Unpacking When you receive a PadScan HD5 plus, perform a full visual inspection of the device for any obvious physical damage that may have occurred during shipment, and then check the components and accessories against the packing list. A standard PadScan HD 5 Plus system is included with: 1 main unit 1 N2/2.
USB slot for flash disk probe connection port PadScan HD 5 Plus side connection ports printer paper dispenser PadScan HD 5 Plus back Installation 1. Battery Insertion and Removal: Slide the battery lock downward. Insert the battery into (or remove it from) the battery compartment, and then slide the lock back into the place.
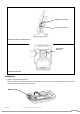
2. Probe Cup Installation and Removal Align the screw hole of probe cup with the one on main unit as shown in the figure, then tighten the two M3*6 screws using a screwdriver. probe cup M3*6 screws 3. Connect the main unit to the docking station As shown in the figure, gently slide the main unit along the entry on the docking station until the main unit clicks in place, taking the positioning column as reference.
4. Attach the probe to the main unit Align the red dot on the main unit with the black dot on the probe, and gently insert the probe into the main unit. red dot red dot 5. Plug the AC input plug of the adapter into a power outlet. when the indicator light on the DC output turns green, it indicates it is working properly. Battery Charging and Status 1. 2. 3. 4. Insert the battery into the main unit. Place the main unit securely onto the docking station.
POSITIONING THE PROBE AND OBTAINING OPTIMAL IMAGES Locating the position of the bladder is the first and the most important step in obtaining correct volume measurements. The bladder is located in the lower abdomen, below the navel while approximately 3 cm above the pubic bone. Place an ample quantity of ultrasound gel on the patient’s abdomen and the probe before each scan. Press the probe as below onto the lower abdomen through the gel.
In expert mode, center the bladder area (dark area within green outlines) relative to the vertical green line. It indicates that the bladder is centered if the center line is green or it is off centered if orange. Figure 1:correct position (expert mode) Figure 2:incorrect position (expert mode) In easy mode, center the bladder area relative to the vertical center line.
PADSCAN HD 5 PLUS SCANNER SCREENS AND BUTTONS Login Screen A C B A B C Operator: Tap to select user ID Password: Tap to type password Keyboard:use for typing Tap when ID and password are complete Home Screen Expert Mode Under this mode, the device is tended to use for locating the bladder through a real-time 2D ultrasound image scanned by a technician.
A: B: C: D: E: F: G: H: I: J: K: L: M: N: O: P: Q: Hospital/Clinic and Department Admin User Date and Time WiFi Battery status indicator Ultrasound Image displayed area Scan icon Tap to add new or review patient data (see page 14) Tap to enter Setup menu Tap to print current scan Tap to save current scan Patient information Current Volume Projection of probe aiming (Optional) Maximum Volume displayed (Optional) Caresono company logo Tap to enter instructional video Easy Mode It is designed to provide the
Patient Information Screen A E B C F D G CARESONO H I A: Tap Mode and then icon [male B: C: D: E: F: G: H: I: or child (under 120cm tall and weighing less than 25kg)] Tap to add Patient Age Tap to add Patient ID Tap to add Patient Name Keyboard for typing age Tap to clear content Tap to enter Patient data management Tap to confirm content entered Tap to cancel screen , female , female with hysterectomy , PadScan HD 5 Plus User’s Manual 13
Virtual keyboard to enter Patient ID A B C F E A: B: C: D: E: F: D Input patient ID Virtual keyboard Caps lock Confirm the content entered Switch between words and numbers Backspace Virtual keyboard to enter patient Name CARESONO PadScan HD 5 Plus User’s Manual 14
NOTE: The patient information must be entered correctly and completely, otherwise the following dialog box will appear if any of it is not entered: A. On the Patient Information screen, there are four options available in the Mode icon; It is required to tap one of them or the following dialog box will appear on the screen; Null: No Mode entered B.
C. On the Patient Information screen, ID can be entered at a maximum of 12-digit number; It is required to enter or the following dialog box will appear on the screen; Null: No ID entered D. On the Patient Information screen, Name can be entered at a maximum of 12-digit number; It is required to enter or the following dialog box will appear on the screen; Null: No name entered NOTE: If you want to go to the Home screen, tap the OK after you are finished entering all information requested.
Save and Review Patient Data Tap to save current patient scan to the Patient Data Management. NOTE: If you want to save the scan results to Patient Data Management, you must select the patient mode at least in the Patient Information screen before scan. Then you can review the saved exam in the Patient Data Management. Tap screen. Tap the line in the patient list then tap Tap on the Home screen and then tap or to enter Patient Data Management to review the data.
Load Patient Data If you want to review all scanned results and records for one patient, select the patient and tap Load to enter the Patient Data Management screen If you haven’t selected or select two or more patients, the following dialog will appear on the screen.
and connected well with the device. NOTE: Do not turn off the device while the export through WiFi is in process; The time that is needed to complete the process depends on the local network. Import Patient Data If you want to modify the patient information that has been stored, or to rescan the patient, select the patient record on the list and tap Import. NOTE: If you want to modify the patient information that has been stored, tap Modify.
ID and Name Search Tap ID or Name to enter the Search screen; The following Search as example is performed through ID. A D B C A: B: C: D: NOTE: Input the ID to be Searched Common virtual keyboard Arrow to turn pages Display area for the Search results On the Search screen, you may upload or delete patient scans on a batch basis If you enter the ID to be Searched, the display area on the left side will appear all patient data that satisfies your request.
Patient Data Management Connect to PC Install HD 5 Plus’s software in the PC. Connect HD 5 Plus with a computer through the USB cable, whose one end inserting the mini USB port of HD5 Plus. Tap in the Home screen and then tap screen. Run software in the PC. Do not remove the USB cable while the export is in process.
Setup Screen Tap on the Home screen to configure the system. A: General Tap to add basic information and to start probe calibration if necessary (see page 33 for calibration information). A B C D E A: B: C: D: E: CARESONO Tap to add the clinic/hospital name. A maximum of 12 letters can be added. Tap to add the department name. A maximum of 12 letters can be added. Tap to add date and time. Tap to start calibration (see page 24 for more information on how to calibrate) Tap for Language selection.
B. Service Tap to select the operation mode (Expert or Easy) or to restore all settings to default . A password is required before any changes are made on these settings.
C. Operator Tap to enter the system Administrators Access screen. A maximum of 10 users can be added in this field with user names and passwords. Administrators can modify uses’ passwords and names in this screen. Tap Operator Login: ON / OFF to turn ON or OFF the procedure of logging in the entire system through passwords. If it’s turned off, the access is granted for all users without passwords.
NOTE: The device is configured with default administrator password: 123456 and user password is: 000000. NOTE: If you tap OFF to disable Operator Login under Setup screen, the login procedure through password will be canceled when you start the device. D. Print Tap to perform the Print settings and pick up one from 6 image groups to print out. (example: Image 1&7, Image 2&8, etc…). Each group contains two cross-sectional images.
E. Power Tap to perform the Power settings for the system. Input the time (in minutes) in the Screen Off Time field to place the whole system in standby mode input the screensaver activation time (in minutes). Input the time (in minutes) in the Shut Down Time field to automatically power off the whole system. F. Display Tap features. to perform the Display settings on Home screen.
G. WiFi Tap to perform the Wifi settings.
H. Play Tap transmission.
QUICK GUIDE ON HOW TO PERFORM THE PADSCAN HD 5 BLADDER SCANNER More details about screens can be found on page 13. 1. Login Press the power button to turn on the scanner. Tap Login and type the access code. NOTE: If you tap OFF to disable Operator Login under Setup screen, the login procedure through password will be canceled 2. Add Patient Information Tap Patient to add patient information. Tap Mode and select the appropriate icon. Tap ID, Age, Name to add corresponding information about the patient.
3. Prepare Patient and Position Probe Let the patient lie in a supine position with abdominal muscle relaxed. Place an ample quantity of ultrasound gel on the patient’s abdomen, approximately 3cm above the pubic bone, and on the probe. Gently press the probe onto the lower abdomen through the gel and ensure the probe’s button is oriented at the patient’s head. 4.
NOTE: Hold the Probe steady while the scan is in process. Any movement of the probe during the scan will impair the accuracy of the measurement. 5. Re-aim and re-scan If the scan was on target, the bladder projection will appear in the center of the crosshairs shown as the top right picture. If the scan was off target, the bladder projection will appear not in the center of the crosshairs shown as the right bottom picture. Please refer to Appendix C. of re-aiming. 6.
7. Save Information Tap SAVE to save the exam data and results. 8. Print Tap PRINT to print the scan results. The printout contains the patient’s name,ID code, age, scan mode, scan time, bladder volume, and two ultrasound images.
CALIBRATION 1. 2. 3. 4. Prepare the Dansk Tissue Equivalent Phantom for calibration. Place the probe head into the phantom holder firmly. Align the probe button with the red arrow on the phantom. In the main PadScan HD 5 Plus screen, tap SETUP>GENERAL> CALIBRATION to enter the calibration screen. 5. Tap to start auto calibration. It takes about 2 minutes to finish the calibration. 6. Do not remove the probe during the calibration. 7. The default calibration value is 24. 8.
TROUBLESHOOTING Check if the power supply is functioning properly, and the power cord of the main unit is connected and is plugged into the power adapter. Check if the probe and main unit are connected correctly. Symptom Check/Corrective Action(s) When power button pressed, the indicator does not turn on and no signal on the display screen visible. 1. Check the power supply; 2. Check the power cord and the plug; 3. Check if the power adapter is functioning. 1.
CLEANING AND PREVENTIVE MAINTENANCE The PadScan HD 5 Plus is non-immersible. It should be wiped down with a soft, clean cloth dampened with a cleaning solution such as soap and water, or a mild detergent solution, or as per hospital/clinic cleaning instructions. Performing regular maintenance will reduce the need for costly repairs. Check the system and calibration every 24 months or whenever you suspect the system is off calibration.
Treating and Disposing of Products After Use For end of life product, waste electrical and electronic equipment should be collected separately and returned to the designated local recycling service. Packaging waste should be collected separately for available national packaging collection and recycling services.
TECHNICAL SPECIFICATIONS AND GENERAL SYSTEM INFORMATION Component Specifications* Probe: 3D mechanical sector Standard ultrasonic frequency of operation: 2.5MHz Volume measure range: 0ml - 999ml.
System Storage System should be unpacked when storage time exceeds six months. Power it on for four hours, and then re-pack it. Do not place any objects on the package, and do not place it against floors, walls, or roof. Keep it in a well-ventilated area away from sunlight or caustic gases. Declaration of Electromagnetic Compatibility PadScan HD 5 Plus in use will not interfere with other wired, wireless equipment and/or other electrical equipment.
Symbols Type B device Attention!Consult accompanying documents Switch ON the general power Switch OFF the general power 0482 Signal output CE mark and code of certification body Class II Electrical Equipment Not for general waste. Dispose of in accordance to local regulations.
APPENDIX A:LABELING Main Unit Labeling Probe Labeling FCC Statement This equipment has been tested and found to comply with the limits for a Class B digital device, pursuant to Part 15 of the FCC Rules. These limits are designed to provide reasonable protection against harmful interference in a residential installation.
The antenna(s) used for this transmitter must be installed to provide a separation distance of at least 20 cm from all persons and must not be co-located or operating in conjunction with any other antenna or transmitter.
CARESONO PadScan HD 5 Plus User’s Manual 42
APPENDIX B: ACOUSTIC OUTPUT REPORT CARESONO PadScan HD 5 Plus User’s Manual 43
APPENDIX C: RE-AIMING GUIDE The above crosshair diagram shows the four points to consider when scanning the bladder. The projection guiding icon shows the bladder position after scanning. If the orange icon is not centered, you may need to re-aim and re-scan. The following images show how to re-aim.
Move the probe to the right Move the probe down CARESONO Move the probe to the left Move the probe up PadScan HD 5 Plus User’s Manual 45