SHORT TERM CONFIDENTIAL Preliminary User Manual Publication No.
SHORT TERM CONFIDENTIAL All rights reserved. No part of this manual may be reproduced or copied in any form by any mean graphic, electronic, or mechanical, including photocopying, typing, or information retrieval systems without written permission.
SHORT TERM CONFIDENTIAL Contents 1 Overview How the Imager Works ................................................................................................................. 1-4 Print Sequence ......................................................................................................................... 1-4 Film Sizes ........................................................................................................................................ 1-5 Mammography Imaging ..............
SHORT TERM CONFIDENTIAL Error Indicators on the Display Screen ......................................................................................... 3-6 Recognize and Handle a Calibration Error ............................................................................ 3-6 Handle a Required Restart ...................................................................................................... 3-7 Recognize and Handle a Film Jam ...................................................................
SHORT TERM CONFIDENTIAL 1 Overview The Laser Imaging System is a continuous-tone laser imager with an internal photothermographic film processor. Heat, rather than photo chemicals, is used to develop the film. This easy-to-use and reliable imager provides high-quality prints.
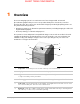
SHORT TERM CONFIDENTIAL Overview Major Internal Assemblies 1 2 11 3 10 4 9 8 7 6 1–2 H241_0003DCA H241_0003DC 5 1 Airflow manifolds. Remove heat and processing odors from the processor assembly. 2 Exit rollers. Move the film from the processor area to the exit tray. 3 Optics module. Writes the image onto the film while the film is moved through the exposure transport. 4 Charcoal filter. Absorbs the odors caused by heat processing. 5 Accumulator. Receives the film as it is imaged.
SHORT TERM CONFIDENTIAL Overview 6 Rollback assemblies (upper and lower). Roll the film cartridge cover back so the pickup assembly can lift the film. When the imager is not printing, the cover is closed over the film cartridge to protect the film from light. 7 Feed rollers. Move the film through the imager. 8 Pickup assemblies (upper and lower). Lift a single sheet of film from the supply cartridge and feed it into the rollers. 9 Transport guides.
SHORT TERM CONFIDENTIAL Overview How the Imager Works The imager receives, processes, manages, and prints the images on film. The imager has limited storage to hold a small number of digital images. As images are received for printing, they are stored in memory, placed in a sequential print queue, and printed in order. The imager can continue to accept incoming print jobs even if temporarily unable to print (if the film supply is empty, etc.).
SHORT TERM CONFIDENTIAL Overview Each time the imager receives a print request, the following print sequence occurs. The arrows show the film path. 1. Suction cups in the pickup area lift a single sheet of film out of one of the supply cartridges and feed the film into the transport rollers. 2. The transport rollers move the film down into the exposure transport area. 3.
SHORT TERM CONFIDENTIAL Overview Automatic Image Quality and Processing An internal densitometer enables the imager to automatically adjust image processing parameters using Automatic Image Quality Control (AIQC) to produce an optimal image. The imager adjusts these parameters each time it prints a calibration film. A calibration film is printed when: • A film cartridge is inserted in the imager with film of a new lot number. • You request a calibration film at the display screen or the Web Portal.
SHORT TERM CONFIDENTIAL Overview User Manual Conventions The following special messages emphasize information or indicate potential risks to personnel or equipment. Note Notes provide additional information, such as expanded explanations, hints, or reminders. Important Important notes highlight critical policy information that affects how you use this guide and this product.
SHORT TERM CONFIDENTIAL
SHORT TERM CONFIDENTIAL 2 Basic Operating Tasks During normal operation, the imager receives and automatically prints images sent by modalities over a network. Very little interaction is required. You can do the following: • Turn the power on (|) and off (0). • Load the film cartridges. • Monitor the display screen for status and operating conditions. Sometimes it will be necessary to perform preventive maintenance, filter replacement, and other corrective actions such as a restart.
SHORT TERM CONFIDENTIAL Basic Operating Tasks The Display Screen The display screen communicates the status of the imager. Figure 1: Display screen: normal state, processing a print job from the upper supply. In this example, there are 86 sheets of film in the upper cartridge and 113 sheets in the lower cartridge. 2–2 Symbol or code Description Upper and lower left side: Film counts. Displays the number of films that are remaining in the upper and lower film cartridges.
SHORT TERM CONFIDENTIAL Basic Operating Tasks Symbol or code Description Indicator light The light indicates the active cartridge. For example, when printing from the upper supply, the indicator light appears next to the upper film count. Power Calibrate • When green, operation is normal. • When amber, the light indicates that there is an issue with the film supply, such as a jammed film. When the symbol is green, the power is on and the imager is ready to print.
SHORT TERM CONFIDENTIAL Basic Operating Tasks Symbol or code Description Film Jam Film is jammed from the upper or lower cartridge. The error code confirms the film jam and gives direction on where to find the film inside the imager. The indicator light associates the error code with the film cartridge. Maintenance Preventive maintenance is required. An error code also displays to indicate the action to take.
SHORT TERM CONFIDENTIAL Basic Operating Tasks Imager Power Power Switch Location The power switch is on the lower back panel. Start the Imager 1. Press the power switch on the back of the imager on. 2. Wait as the imager warms up. The warm-up period might last up to 30 minutes. The display screen shows the progress as the imager becomes ready to print. Figure 2: The imager counts up to zero (0) to indicate how soon the imager will be ready to print.
SHORT TERM CONFIDENTIAL Basic Operating Tasks Figure 3: The green power symbol indicates that the imager is ready to process job requests. Emergency Shutdown or Power Loss In the event of a power loss, or if an emergency requires an immediate shutdown of the imager, films in process will not be completed. However, when power is restored, the imager will restart. After warming up, the imager automatically reprints any films that were in process when the power was interrupted.
SHORT TERM CONFIDENTIAL Basic Operating Tasks View the Film Cartridge Information Film Count The upper and lower film counts appear on the display screen. Figure 5: In this example, the upper cartridge has 86 sheets of film, and the lower has 113. Size/Type of the Loaded Film To check the size of the loaded film, open the film supply and view the loaded cartridges. Note Make sure the Pause symbol is off before you open the film supply.
SHORT TERM CONFIDENTIAL Basic Operating Tasks Film Size/Type Flashes When a film size/type is requested that is not loaded, the Film Size symbol appears, and the requested film flashes. Change the loaded film to match the print request. Figure 7: View and load the requested film size/type in the error code location (amber text). In this example, “M” represents a request for mammography film.
SHORT TERM CONFIDENTIAL Basic Operating Tasks Replace an Empty Film Cartridge When a film cartridge is empty, the film count appears as 0 on the display screen. Note Before you load a new film cartridge, make sure that the Pause symbol is off. During normal operation, the symbol is off. When the film cartridge cover is open, the symbol is on. To avoid exposing the film to light, do not open the film supply until the Pause symbol is off. 1.
SHORT TERM CONFIDENTIAL Basic Operating Tasks Load a Different Film Size to Match a Print Request If a print request requires a different film size, the requested film size flashes on the display screen. Change the installed film to match the print request. • M = mammography film • B = blue base film • C = clear base film Figure 8: The requested film size flashes, and the Film Size symbol indicates the need to load a different film size and/or type. In this example, mammography 10 x 12 in.
SHORT TERM CONFIDENTIAL Basic Operating Tasks Film Size/Type Flashes When a film size/type is requested that is not loaded, the Film Size symbol appears, and the requested film flashes. Change the loaded film to match the print request. Figure 7: View and load the requested film size/type in the error code location (amber text). In this example, “M” represents a request for mammography film.
SHORT TERM CONFIDENTIAL Basic Operating Tasks Calibrate the Imager for the Loaded Film Automatic vs. Manual Calibration The imager automatically calibrates film with a new media lot number. The calibration initiates a test print with a step wedge pattern. The pattern has a series of 21 step wedges of increasing optical density. Occasionally, it will be necessary to manually calibrate the imager for the film. Run a calibration manually when: • Code 001 appears on the display screen.
SHORT TERM CONFIDENTIAL Basic Operating Tasks Make a Test Print Make a test print to verify that you can print. The type of test print varies depending on whether you have clear/blue or mammography film loaded. There are several options for mammography calibration prints; the default is configured during installation. If you need a different type of test print for mammography film, you can change the default at the Web Portal. SMPTE Image Prints 1.
SHORT TERM CONFIDENTIAL Basic Operating Tasks Mammography Test Prints There are several options for mammography calibration prints, for example, QC wedges, multipurpose QC, TG18-PQC or QC, TG18-UN10 or 80, or TG18-UNL10 or 80. The default is configured during installation, and you can change it any time from the Web Portal. Press and hold the Calibrate symbol for the film cartridge (upper or lower, where the mammography film is loaded) for three seconds.
SHORT TERM CONFIDENTIAL Basic Operating Tasks Open or Remove a Cover You can open or remove the imager’s top cover, left cover, and film supply. The covers are protected with an interlock mechanism to keep the imager from printing when they are open, to keep you safe. Code 701 alerts you that a cover and an interlock are open, and internal power to the imager is turned off. You might remove the top cover or left cover to search for film jams.
SHORT TERM CONFIDENTIAL Basic Operating Tasks Access More Functionality with the Web Portal The Web Portal is your interface to additional features. In addition to the installation and setup of your system, you can view and manage the imager's connections over the network, configure features, view error messages, and access general status information at the Web Portal. You can also check film count, film size, and film type. Troubleshooting tools include: • Optimization of image quality for modalities.
SHORT TERM CONFIDENTIAL 3 Maintenance and Troubleshooting Use the information in this chapter to keep the imager in the best condition and to correct minor problems. • Overview: Status and Error Messages and Codes—Review this overview for information about where and when the messages and codes appear. • Preventive Maintenance—Learn how to respond to the Maintenance symbol. • Error Indicators on the Display Screen—Learn about the amber and red error symbols.
SHORT TERM CONFIDENTIAL Maintenance and Troubleshooting Overview: Status and Error Messages and Codes The imager detects errors and other conditions and reports them to you in multiple ways. Some conditions require your action. This section provides a list of the codes, explains the condition, and provides recommended actions when appropriate. View the codes: • At the imager’s display screen, on the top left. The display screen reports 3-digit codes.
SHORT TERM CONFIDENTIAL Maintenance and Troubleshooting Preventive Maintenance Note These conditions are also reported at the Web Portal. About the Charcoal Filter Caution In the U.S., exhausted filters are considered to be non-hazardous waste according to the US Environmental Protection Agency Resource Conservation Recovery Act (RCRA). Municipality owned and licensed solid waste management facilities are an appropriate disposal option.
SHORT TERM CONFIDENTIAL Maintenance and Troubleshooting Replace the Filter When the filter must be replaced, the display screen shows the error code and the Maintenance symbol: 1. Remove the filter cover. 2. Remove the filter by lifting it up and pulling it forward.
SHORT TERM CONFIDENTIAL Maintenance and Troubleshooting 3. Install a new filter. 4. Re-install the filter cover. 5. To reset the imager for the new filter and to clear the Maintenance symbol, press and then release the Maintenance and Calibrate symbols at the same time. 550 Code and Maintenance Symbol If the imager needs a preventive maintenance service call, the 550 code and Maintenance symbol appear: When the 550 code displays, contact a qualified service provider.
SHORT TERM CONFIDENTIAL Maintenance and Troubleshooting Error Indicators on the Display Screen The imager can detect errors and other conditions that require a response. Some errors or abnormal conditions are reported on the display screen in the form of condition codes and symbols. Note These errors are also reported at the Web Portal. Recognize and Handle a Calibration Error When the calibration has failed, the display screen shows a 624, 631, or 632 error and the Calibrate symbol is amber.
SHORT TERM CONFIDENTIAL Maintenance and Troubleshooting Handle a Required Restart When the Restart symbol appears, you must restart the imager. Figure 2: The amber Power symbol, together with the Restart symbol, indicates that you must restart the imager to continue printing. 1. Press the power switch on the back of the imager off. 2. Press the power switch on. If the error does not clear after the restart, it might be necessary to contact a qualified service provider.
SHORT TERM CONFIDENTIAL Maintenance and Troubleshooting Recognize and Handle a Film Jam When the Film Jam symbol appears, you must clear the jam before the imager can continue to print. After the jam has been cleared, the imager will reprint the image on a new sheet of film. Figure 3: In this example, the red jam symbol alerts you to the jam, and the amber indicator light shows you that the jam is related to the upper film cartridge. The error code also indicates a film jam.
SHORT TERM CONFIDENTIAL Maintenance and Troubleshooting Using the Web Portal to Gain More Information on Errors The Web Portal is your interface to additional functions on the imager. You can view and correct error messages and access general status information at the Web Portal. About Codes on the Web Portal and the Display Screen The 3-digit error and status codes on the display screen are reported at the Web Portal as 5-digit codes.
SHORT TERM CONFIDENTIAL Maintenance and Troubleshooting Subsystem Error Codes and Messages Use the information in this section to interpret the codes and messages that appear on the display screen and at the Web Portal. DICOM (Digital Imaging and Communications in Medicine) In response to a DICOM printer N-GET status request from a modality, a printer status message and a printer status info message are returned to the requesting service class user (SCU).
SHORT TERM CONFIDENTIAL Maintenance and Troubleshooting Printer Status Display Screen Web Portal DICOM Status Description Printing Power symbol is green and flashing Printing NORMAL The imager is currently printing films. Ready Power symbol is green Film count displays Ready NORMAL The imager is online and the processor has reached operating temperature.
SHORT TERM CONFIDENTIAL Maintenance and Troubleshooting Film Cartridge State Display Screen Web Portal Description Film cartridge is empty Power symbol is yellow Pause and Calibrate symbols are off Film count is flashing “0” Empty and/or sheet count of 0 The film cartridge is inserted, but the sheet count is 0. Insert a new cartridge.
SHORT TERM CONFIDENTIAL Maintenance and Troubleshooting Job Manager Job Manager Status Display Screen Web Portal Description Active Not Applicable Shows how many print requests have been initiated. The imager is accepting DICOM job requests and film is available for all current jobs. No Media Power symbol is green Film Size symbol is yellow The required film size is shown on the display screen Shows how many jobs with this status are in the job queue.
SHORT TERM CONFIDENTIAL Maintenance and Troubleshooting Condition Codes Condition codes are shown on the display screen in the order in which they are generated. If there is more than one code associated with the current condition of the imager, the first code is shown on the display screen for six seconds, while other codes in the list display for three seconds as the list is cycled. You can also view these codes and messages at the Web Portal.
SHORT TERM CONFIDENTIAL Maintenance and Troubleshooting Display Screen Web Portal Web Portal Message 154 20154 MCS: Internal Communications Failure Restart the imager. If the error persists, call for service. 155 20155 Incompatible MCS Printer Configuration for Hardware Restart the imager. If the error persists, call for service. 156 20156 Incompatible Software Versions Installed Restart the imager. If the error persists, call for service.
SHORT TERM CONFIDENTIAL Maintenance and Troubleshooting 3–16 Display Screen Web Portal Web Portal Message 118 21118 Film Supply: Internal Hardware Failure If the Pause symbol is on, press it to cover the film cartridge. When the Pause symbol stops flashing, remove the film cartridge from the imager. Then reinsert the film cartridge into the imager. If the error persists, call for service.
SHORT TERM CONFIDENTIAL Maintenance and Troubleshooting Display Screen Web Portal Web Portal Message 177 21177 Film Cartridge Failed to Close Open the film supply. Manually close the film cartridge, using the manual rollback knob, to prevent the film from fogging. If the error persists, call for service. 178 21178 Rollback Failed to Leave Home If the Pause symbol is on, press it to cover the film cartridge. When the Pause symbol stops flashing, remove the film cartridge from the imager.
SHORT TERM CONFIDENTIAL Maintenance and Troubleshooting 3–18 Display Screen Web Portal Web Portal Message Action 123 27123 Optics: Internal Hardware Failure Restart the imager. If the error persists, call for service. 601 27601 Optics: Calibration Failed Restart the imager. If the error persists, call for service. 604 27604 Optics: Calibration Failed Restart the imager. If the error persists, call for service. 607 27607 Optics: Calibration Failed Restart the imager.
SHORT TERM CONFIDENTIAL Maintenance and Troubleshooting Display Screen Web Portal Web Portal Message 931 29931 Densitometer: Internal Communications Failure Restart the imager. If the error persists, call for service. 935 36935 Local Panel: No Communications from MCS Restart the imager. If the error persists, call for service.
SHORT TERM CONFIDENTIAL Maintenance and Troubleshooting Film Jam Indication and Areas Jam Areas When film is jammed, the display screen indicates a jam and an error code that provides guidance on where to check for the jammed film. Figure 4: In this example, the indicator light shows you that the jam is related to the upper cartridge. Note These errors are also reported at the Web Portal.
SHORT TERM CONFIDENTIAL Maintenance and Troubleshooting Figure 5: Film Jam Areas Jam Areas Description Interlocks Description 1 Upper and Lower film supply I1 Lower film supply 2 Film path I2 Left cover 3 Processor / densitometer I3 Top cover I4 Upper film supply AA2204_en | 2012-07-27 3–21
SHORT TERM CONFIDENTIAL Maintenance and Troubleshooting Roller Knobs For some jams, you can remove the film by turning a knob to move the film out of the imager. See details in the film jam instructions.
SHORT TERM CONFIDENTIAL Maintenance and Troubleshooting Clear Film Jam Code 116 / Jam in Area 1 Note This error displays as code 21116 at the Web Portal. 1. If the Pause symbol is on, press it and wait until it goes off. 2. Open the film supply and remove the film cartridge from the imager. 3. Look in Area 1 (the upper or lower film supply) and remove any film. 4. Reinsert the film cartridge in the imager.
SHORT TERM CONFIDENTIAL Maintenance and Troubleshooting Clear Film Jam Code 324 or 325 / Jam in Area 2 Note This error displays as code 26324 or 26325 at the Web Portal. 1. If the Pause symbol is on, press it and wait until it goes off. 2. Remove the left cover: 2 Screws H210_1017ACA H210_1017AC a. Open the film supply. b. Remove the top cover. c. Turn the knurled knobs by hand. 3. Reach into Area 2 and remove any film. 4.
SHORT TERM CONFIDENTIAL Maintenance and Troubleshooting Clear Film Jam Code 326 / Jam in Area 2 or 3 Note This error displays as code 26326 at the Web Portal. 1. If the Pause symbol is on, press it and wait until it goes off. 2. Remove the left cover: a. Open the film supply. b. Remove the top cover. c. Turn the knurled knobs by hand. 3. Rotate the exit roller knob clockwise until a film exits the imager. 2 Screws H210_1017ACA H210_1017AC 4. If a film does not exit: a.
SHORT TERM CONFIDENTIAL Maintenance and Troubleshooting Clear Film Jam Code 543 / Jam in Area 3 Note This error displays as code 26543 at the Web Portal. 1. If the Pause symbol is on, press it and wait until it goes off. 2. Remove the left cover: a. Open the film supply. b. Remove the top cover. c. Turn the knurled knobs by hand. 3. Rotate the exit roller handle clockwise until a film exits the imager. 4. Reinstall the covers.
SHORT TERM CONFIDENTIAL Maintenance and Troubleshooting Display Screen is Not Functional If the display screen is not responding, use the power switch on the imager to turn power off, and then on. If the display screen is still non-responsive, turn the imager off and contact a qualified service provider. Call for Support If you cannot correct a condition and need help, call for support.
SHORT TERM CONFIDENTIAL
SHORT TERM CONFIDENTIAL 4 Film Technical Information This section describes the characteristics of Laser Imaging Film, not the operation of the imager. The Laser Imaging Film is a high-resolution, infrared-sensitive, photothermographic film designed specifically for the imager. Spectral Sensitivity of the Film The Laser Imaging Film is infrared sensitive and has been sensitized to the infrared laser diode of the imagers.
SHORT TERM CONFIDENTIAL Film Technical Information Film Image Quality The Laser Imaging Film delivers diagnostic-quality, continuous-tone images along with sharp alphanumerics and optimum contrast. This high-quality, silver-based film provides health care providers with the same diagnostic information they are accustomed to viewing—including the spatial resolution, contrast, and gray levels. Because it is a totally dry imaging process, there is no image quality variability due to wet chemistry.
SHORT TERM CONFIDENTIAL Film Technical Information Undeveloped Film Handling and Storage To achieve consistent results up to the expiration date indicated on the film package, the Laser Imaging Film must be stored in a cool, dry place (5–25 °C, or 41–77 °F) and protected from radiation and chemistry fumes. The film can withstand short-term temperature spikes (up to 35 °C, or 95 °F) for several hours without any significant effect on film quality or performance.
SHORT TERM CONFIDENTIAL Film Technical Information Exposing Film to Moisture The Laser Imaging Films typically withstand humidity, spills, and other forms of water without any significant effect on image quality or film integrity. If needed, film can be cleaned with a clean, damp cloth. Odor Dissipation Dry technology eliminates virtually all unpleasant odors. While some low-level odors are produced during the development process, they pose no known adverse health risks.
SHORT TERM CONFIDENTIAL 5 Specifications This section identifies the system specifications and the site requirements to operate the imager. Equipment Specifications Unpacked Packed These are all subject to change / preliminary. Height 66.55 cm (26.20 in.) TBD cm (TBD in.) Width 62.56 cm (24.63 in.) TBD cm (TBD in.) Depth 75.63 cm (29.77 in.) TBD cm (TBD in.) Weight 95 kg (210 lb) TBD kg (TBD lb) Operating Space Requirements • Allow 31 cm (12 in.
SHORT TERM CONFIDENTIAL Specifications Environmental Requirements Temperature • Operating: 15 to 35 °C (59 to 95 °F) • Storage: -40 to 60 °C (-40 to 140 °F) Relative Humidity • Operating: 20–85 % RH, non-condensing • Storage: 10–93 % RH, non-condensing Altitude 30 m (100 ft) below sea level to 3,048 m (10,000 ft) above sea level Surface Levelness The surface where the imager is placed must be level within 1 °.
SHORT TERM CONFIDENTIAL 6 Publication History Revision Date Reason for Change A 2012-07-27 Preliminary - for Gate 2 (preliminary) review AA2204_en | 2012-07-27 6–1
SHORT TERM CONFIDENTIAL Carestream Health, Inc. 150 Verona Street Rochester, NY 14608 United States © Carestream Health, Inc., 2012 Printed in China. CARESTREAM and DRYVIEW are trademarks of Carestream Health, Inc. Pub No.