
User's Manual


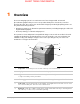


Table Of Contents
- 1 Overview
- 2 Basic Operating Tasks
- 3 Maintenance and Troubleshooting
- 4 Film Technical Information
- 5 Specifications
- 6 Publication History

Overview
AA2204_en | 2012-07-27 1–5
Each time the imager receives a print request, the following print sequence occurs. The
arrows show the film path.
1. Suction cups in the pickup area lift a single sheet of film out of one of the supply
cartridges and feed the film into the transport rollers.
2. The transport rollers move the film down into the exposure transport area.
3. The film moves down during imaging (as the optics module writes the image onto
film), reverses direction at the conclusion of imaging, and then the film moves up into
the processor.
4. As the film passes over the processor drum, the heat generated by the drum develops
the film.
5. The exit rollers move the developed film to the exit tray.
Film Sizes
The imager supports five sizes:
• 35 x 43 cm (14 x 17 in.)
• 35 x 35 cm (14 x 14 in.)
• 28 x 35 cm (11 x 14 in.)
• 25 x 30 cm (10 x 12 in.)
• 20 x 25 cm (8 x 10 in.)
Clear, blue, and mammography film types are supported.
Mammography Imaging
To manage and support mammography imaging, the imager provides these features:
• You can load mammography film in one or both film supplies.
• The imager only prints mammography images on mammography film. If a
mammography image request is received, and:
– a cartridge with mammography film is not loaded,
and/or
– the requested mammography film size is not loaded,
then the imager will request the appropriate film size and type. You must load the
requested size and type to print the mammography job.
• Several mammography-specific test prints are provided, including a default test print
for the routine calibration of mammography film (for example, a density wedge
print). The default mammography test print is configured during installation and can
be changed from the Web Portal.
Note
For help with the quality control process for mammography, see the Quality Control Manual.
Requirements for mammography quality control vary by region.
SHORT TERM CONFIDENTIAL