
Operation Manual


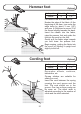


Overcasting foot
Turn stitch length dial to "1" ~ "4",
The stitch width can be adjusted to
suit the fabric.
The overlock stitches are suitable
for sewing and neatening edges and
visible seams in one operation.
When neatening, the needle should
just go over the edge of the fabric.
Attention:
Use new needles or ball point
needles or stretch needle!
Needle position Stitch width Stitch length
Left 3~5 1~4
Darning/ Embroidery foot
Install the darning plate
Remove the presser foot clamp.
Attach the darning foot to the
presser foot holder. The lever (A)
should be behind the needle clamp
screw (B). Press the darning foot on
firmly from behind with your index
finger and tighten the screw (C).
First sew around the edge of the
hole (to secure the threads). First
row: Always work from left to right.
Turn work by 1/4 and oversew.
A darning ring is recommended for
easier sewing and better results.
, the stitch
length cannot be controlled with dial.
Needle position Stitch width Stitch length
Middle 0 0
A
B
C
20
<Optional>
<Optional>