Instruction Manual
Important safety instructions When using an electrical appliance, basic safety should always be followed, including the following: Read all instructions before using this sewing machine. DANGER -To reduce the risk of electric shock: 1. An appliance should never be left unattended when plugged in. 2. Always unplug this appliance from the electric outlet immediately after using and before cleaning. WARNING -To reduce the risk of burns, fire, electric shock, or injury to persons: 1.
Contents PRINCIPAL PARTS OF THE MACHINE . . . . . . . . . . . . . . . . . . . . . . . . . . . . . . . . . . . . . . . . . . . . . . . . . . . . . . . . . . 1 ACCESSORIES . . . . . . . . . . . . . . . . . . . . . . . . . . . . . . . . . . . . . . . . . . . . . . . . . . . . . . . . . . . . . . . . . . . . . . . . . . . . . . . . 2 CONNECTING THE MACHINE TO THE POWER SOURCE . . . . . . . . . . . . . . . . . . . . . . . . . . . . . . . . . . . . . . . . 3 Connecting the machine . . . . . . . . . . . . . . . .
Contents OVERCASTING STITCHES. . . . . . . . . . . . . . . . . . . . . . . . . . . . . . . . . . . . . . . . . . . . . . . . . . . . . . . . . . . . . . . . . . . . 32 Using the overcasting foot . . . . . . . . . . . . . . . . . . . . . . . . . . . . . . . . . . . . . . . . . . . . . . . . . . . . . . . . . . . . . . . . . . . . 32 Using the all purpose foot. . . . . . . . . . . . . . . . . . . . . . . . . . . . . . . . . . . . . . . . . . . . . . . . . . . . . . . . . . . . . . . . . . . . .
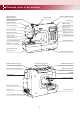
Principal parts of the machine Speed limiting adjustment lever Bobbin winder spindle Tension dial Needle up/down position button LCD screen Auto-lock button Stitch length adjustment button Reverse button Stitch width adjustment button Start/stop button Memory buttons Thread cutter Selection buttons Buttonhole lever Auto needle threader Function buttons Bobbin cover plate Sewing table and accessory box Bobbin winder stopper Quick reference plate Horizontal spool pin Hole for second spool
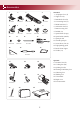
Accessories 1 2 3 Standard 4 1. All purpose foot (T) 2. Zipper foot (I) T D E 3. Buttonhole foot (D) 006H1A0004 006907008 4. Overcasting foot (E) I 006186008 006905008 5. Blind hem foot (F) 5 7 6 9 8 6. Satin stitch foot (A) 7. Button sewing foot 8. Bobbin (3x) F A 006904008 006172008 10 006914008 006084009 12 11 R12373209 9. Spool holder (Large) 10. Spool holder (Small) 13 11. Spool pin felt 12. Second spool pin TA10943209 006015009 006914008 006012008 13.
Connecting the machine to the power source Caution: Always make sure that the machine is unplugged from power source and the main switch is on ("O"). when the machine is not in use and before inserting or removing parts. ON OFF Connecting the machine Before connecting the power supply, make sure that the voltage and frequency shown on the machine is conforming with your electrical power. Place the machine on a stable table. 1.
Starting sewing Start/stop button The machine will start running when Start/stop button is pressed and will stop when pressed the second time. The machine will rotate slowly at the beginning of the sewing. The speed limiting adjustment lever can control the sewing speed. To increases the speed, slide the lever to the right, to decrease the sewing speed, slide the lever to the left. Foot control With the sewing machine turned off, insert the foot control plug into its connector on the sewing machine.
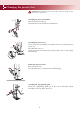
Changing the presser foot Attention: Turn power switch to off ("O") when carrying out any of the below operations! Attaching the presser foot holder Raise the presser foot bar (a). Attach the presser foot holder (b) as illustrated. a b Attaching the presser foot Lower the presser foot holder (b) until the cut-out (c) is directly above the pin (d). Press the black lever (e). Lower the presser foot holder (b) and the presser foot (f) will engage automatically.
Type of presser foot chart PRESSER FOOT T All purpose foot (T) APPLICATION NEEDLE PRESSER FOOT General sewing, Patchwork stitches, Decorative stitching, Smocking, Fagoting, etc.
Replacing the needle Attention: Turn power switch to off ("O") when carrying out any of the above operations! B A Change the needle regularly, especially if it is showing signs of wear and causing problems. Insert the needle following the illustrated instructions. A. Loosen the needle clamp screw and tighten again after inserting the new needle. The flat side of the shaft should be towards the back. B. Insert the needle as far up as it will go. Needles must be in perfect condition.
Winding the bobbin Bobbin winding 1. Place the thread and spool holder onto the spool pin. For smaller spools of thread, place spool holder with the small side next to the spool or use the small spool holder. 2. Snap the thread into the thread guide. 3. Wind the thread contrary clockwise around the bobbin winder tension discs. 4. Place the thread end through one of the inner holes in the bobbin as illustrated and place empty bobbin on the spindle. 5. Push the bobbin to right.
Winding the bobbin 6. Hold the thread tail securely in one hand. 7. Press on the foot control or the Start/stop button to start winding the bobbin. 8. After the bobbin has wound a few turns stop the machine and cut the thread near the hole of the bobbin. Continue filling the bobbin until it is full. The motor stops automatically when the bobbin is full. Stop the machine. Push the bobbin winder spindle to left. 9. Cut the thread and then remove the bobbin.
Inserting the bobbin Attention: Turn power switch to off ("O") before inserting or removing the bobbin. When inserting or removing the bobbin, the needle must be fully raised. Insert the bobbin in the bobbin case with the thread running in a counterclockwise direction (arrow). Pull the thread through the slit (A). A With a finger held gently on top of the bobbin. Draw the thread at the arrow markings into the stitch plate thread guide from (A) to (B).
Threading the upper thread 6 5 7 8 Please Note: It is important to carry out the threading correctly as by not doing so several sewing problems could result. Start by raising the needle to its highest point, and also raise the presser foot to release the tension discs. 1. Lift up the spool pin. Place the spool of thread on the spool pin so that the thread comes from the front of the spool, then place the spool cap at the end of the spool pin. 2.
Threading the upper thread 3. Guide the thread around the thread guide pulling the thread through the pre-tension spring as illustrated. 4. Thread the tension module by passing the thread between the silver discs. 5. Then, down and around the check spring holder. 6. At the top of this movement, pass the thread from right to the left through the slotted eye of the take-up lever and then downwards again. 7. Pass the thread behind the flat, horizontal thread guide. Guide the thread through the wire loop.
Using the needle threader Attention: Turn power switch to the off position ("O"). Raise the needle to its highest position and lower the presser foot. Lower the needle threader lever slowly and draw the thread through the thread guide as illustrated and then to the right. The needle threader automatically turns to the threading position and the hook pin passes through the needle eye. Take the thread in front of the needle. Hold the thread loosely and release the lever slowly.
Thread tension - Basic thread tension setting: "4" - To increase the tension, turn the dial to the next number up. To reduce the tension, turn the dial to the next number down. - Proper setting of tension is important to good sewing. - For all decorative sewing you will always obtain a nicer stitch and less fabric puckering when the upper thread appears on the bottom side of your fabric. Surface Normal thread tension for straight stitch sewing.
Raising up the lower thread 1. Hold the upper thread with the left hand. Turn the handwheel towards you (counterclockwise) lowering, then raising the needle. 2. Gently pull on the upper thread to bring the bobbin thread up through the needle plate hole. The bobbin thread will come up in a loop. 3. Pull both threads to the back under the presser foot. Cutting the thread Raise the presser foot. Remove the fabric, draw the threads to the left side of the face cover and cut using the thread cutter.
Two-step presser foot lifter The presser foot lifter raises and lowers your presser foot. When sewing several layers or thick fabrics, the presser foot can be raised a second stage for easy positioning of the work. To raise or drop the feed dogs With the sewing table off the machine, the feed dog adjustment lever can be seen on the base in back of the sewing machine. Sliding the lever to the " " (b) will lower the feed dog, for example during button sewing.
Buttons of the machine 9 10 5 4 3 2 1 7 6 8 1 2 4 5 6 7 8 9 3 0 13 12 11 Operation buttons (see page 21/22) 1. Start/stop button Press this button to start or stop the machine. 2. Reverse button Hold down this button to sew either backwards or a reinforcement stitch at a low speed. 3. Auto-lock button Hold down this button to sew locking stitches immediately or at the end of the current patterns and automatically stop. 4.
Buttons of the machine Memory buttons (see page 23) 6. Memory button Press this button to enter or store the created pattern combination in the memory. 7. Arrow button Press the " " button or " " button until the actual stitch number is displayed. 8. Clear button If an incorrect pattern is selected or memorized, pressing this button will clear it. Function buttons (see page 24/25/26) 9. Stitch length adjustment button Press this button to adjust the length of the stitch. 10.
LCD screen Direct Pattern Mirror Needle up Auto-lock Buttonhole lever Bobbin winding Reverse Needle position Pattern number Direct mode Pattern Stitch width Direct Needle down Mirror Auto-stop Reverse Pattern number Stitch width Patterns MEM Normal mode Suggested presser foot Number of current unit Total number of unit Memory Stitch length Alphabet Needle up Auto-stop Pattern number Stitch width Alphabet MEM Suggested presser foot Alphabet mode 19 Number of current unit Total number of
Pattern chart The portion marked in colored on the chart below shows the one unit of each pattern. A. Direction Patterns 1 2 3 4 5 6 7 8 9 0 B. Patterns 00 01 02 03 04 05 06 07 08 09 10 11 12 13 14 15 16 17 18 19 20 21 22 23 24 25 31 32 33 34 35 36 37 38 39 40 41 42 43 44 45 46 47 48 49 50 51 52 53 54 55 56 57 58 59 60 61 62 63 64 65 66 67 68 69 70 71 72 73 74 75 76 77 78 79 80 81 82 83 84 85 86 87 88 89 90 91 92 93 94 95 96 97 98 99 26 27 28 29 30 C.
Operation buttons Needle up/down position button Auto-lock button Reverse button Start/stop button Start/stop button The machine will start running when Start/stop button is pressed and will stop when pressed the second time. The machine will rotate slowly at the beginning of the sewing. The sewing speed can be controlled by the speed limiting adjustment lever. This way you may operate the machine without foot control.
Operation buttons Auto-lock button Patterns Patterns When the Direct Patterns 1-4 and Patterns 00-04 are selected, the machine will immediately sew 3 locking stitches when the Auto-lock button is pressed, then automatically stop. The LCD will display the figure " " until the machine is stopped. Please Note: The LCD will display the figure " " when the Direct Patterns 1-4 and Patterns 00-04 are selected. Press " " button will cancel this function and press it again to restore.
Memory buttons Clear button Arrow button Memory button Patterns MEM Memory button Press the " " button to enter the memory mode, and store the combinations of characters or decorative stitches. Press the " " button again to leave the memory mode and return Direct mode. Please Note: The Direct mode patterns and buttonholes cannot be memorized. Clear button Press this button when the incorrect character is selected.
Function buttons Stitch width adjustment button Stitch length adjustment button Mirror button Mode selection button Stitch width adjustment button Patterns When you select a stitch, the machine will automatically set the recommended stitch width, which will be indicated by numbers on the LCD screen. The stitch width can be regulated by pressing the stitch width adjustment buttons. Certain stitches have a limited stitch width. For a narrower stitch, press the "–" button (left).
Function buttons Stitch length adjustment button Patterns When you select a stitch the machine will automatically set the recommended stitch length which will be indicated by numbers on the LCD screen. The stitch length can be adjusted by pressing the stitch length adjustment buttons. To shorten the stitch length, press the "–" button (left). For a longer stitch length, press the "+" button (right). The stitch length can be adjusted between "0.0-4.5". Certain stitches have a limited length.
Function buttons Mirror button (see page 53) The patterns 00-14, 26-99 can be mirror, pressing the " " button will sew a reflection pattern from your selected stitch. The LCD will display the mirror function and the machine will continue to sew the reflected pattern until the mirror function is pressed again to cancel the mirror function. When the mirror function disappears from the LCD screen, the machine will continue to sew the normal stitch.
Selection buttons Direct pattern selection and number buttons Direct pattern selection and number buttons Direct Direct pattern selection Press the buttons to select the utility patterns shown beside the number button when the mode button is set at the Direct mode. Number buttons Press the number buttons for selecting the pattern needed. Except the Direct pattern mode, the other mode can be selected by pressing the desired numbers.
Useful skills 3 2 1 5 4 Sewing corners 1. Stop the sewing machine when you reach a corner. 2. Lower the needle into the fabric manually or by pressing the needle up/ down button once. 3. Raise the presser foot. 4. Use the needle as a pivot and turn the fabric. 5. Lower the presser foot and resume sewing. Reverse Reverse stitching is used to secure the threads at the beginning and at the end of a seam. Press the reverse button and sew 4-5 stitches.
Useful skills Installing the extension table * The Extension table accessory is optional. It is not included with this machine. Pull the sewing table and accessory box off by sliding it to the left. (1) 2 Follow the arrow, and stretch the foot of the extension table. (2) 1 Snap (A) of the extension table into (B) of the machine. (3) Extension table can help moving during sewing.
Straight stitches and needle position 00 01 02 03 04 T Changing the needle position These setting apply only to patterns 00-04. The pre-set position is "3.5", center position. When you press the "–" stitch width adjustment button, the needle position will move to the left. When you press the "+" stitch width adjustment button, the needle position will move to the right. 0.0 0.5 2.0 1.0 3.5 5.0 3.0 2.0 7.0 4.
Stretch stitch 02 03 07 07 T A Straight stretch stitch It assures you of a stitch that is strong and flexible and will give with the fabric without breaking. Good for easy to ravel and knit fabrics. It is good for joining durable fabric such as denims. These stitches can also be used as a decorative top stitch. Straight stitch 02 Straight stretch stitch is used to add triple reinforcement to stretch and hardwearing seams.
Overcasting stitches 05 Using the overcasting foot 08 E 5.0~7.0 2.0~3.0 Change the presser foot to the overcasting foot (E). Sew the fabric with the fabric edge against the guide of the overcasting foot. Attention: The overcasting foot should be used to sew with patterns 05 and 08 only and do not set the stitch width narrower than "5.0". It is possible that needle could hit the presser foot and break when sewing other patterns and width. 06 Using the all purpose foot 09 T 2.5~4.5 2.0~3.
Blind hem/ Lingerie stitch 10 10: Blind hem/lingerie for firm fabrics 11: Blind hem for stretch fabrics 11 2.5~4.0 F 1.0~2.0 5mm Please Note: It takes practice to sew blind hems. Always make a sewing test first. 5mm Fold the fabric as illustrated with the wrong side uppermost. Reverse side Overcasting stitches Reverse side a Place the fabric under the foot. Turn the handwheel forwards by hand until the needle swings fully to the left. It should just pierce the fold of the fabric.
Button sewing 05 2.5~4.5 Change the presser foot to the button sewing foot. a Move the drop feed control to " the feed dogs. b b " to lower Position the work under the foot. Place the button in the desired position, lower the foot. a 05 Select zig zag pattern. Adjust the stitch width to "2.5-4.5" according to the distance between the two holes of the button. 2.5~4.5 Turn the handwheel to check that the needle goes cleanly into the left and right holes of the button.
Buttonhole stitching 15: For thin or medium fabric 15 2.5~7.0 D 16 18 16: For horizontal holes on blouses or shirts made from thin or medium fabric 0.3~1.0 17: For suits or overcoats 19 2.5~5.5 18: For horizontal buttonholes on thick fabrics 0.3~1.0 19: For thin or medium fabric 17 5.5~7.0 20: For jeans or stretch fabric with a coarse weave 0.3~1.0 21: For stretch fabric 20 3.0~7.0 1.0~2.0 3.0~7.0 1.0~3.
Buttonhole stitching Select the buttonhole stitch. Adjust the stitch width and the stitch length to the desired width and density. Position the fabric under the presser foot with the front end of the buttonhole mark aligned with the center line on the buttonhole foot. Starting point Pull the buttonhole lever all the way down and position it behind the bracket on the buttonhole foot.
Buttonhole stitching * Buttonholes are sewn from the front of the presser foot to the back, as shown. 15 16 18 19 17 20 21 Buttonholes are sewn from the front of the presser foot to the back, as shown. Raise the presser foot and cut thread. To sew over same buttonhole, raise the presser foot (will return to original position). After sewing the buttonhole stitch, raise the buttonhole lever until it stops. Cut the center of the buttonhole being careful not to cut any stitches on either side.
Buttonhole stitching Making a buttonhole on stretch fabrics When sewing buttonholes on stretch fabric, hook heavy thread or cord under the buttonhole foot. Attach the buttonhole foot and hook the gimp thread onto the back of the presser foot. Bring the two gimp thread ends to the front of the foot and insert them into the grooves, then temporarily tie them there. Lower the presser foot and start sewing. Set the stitch width to match the diameter of the gimp thread.
Eyelet Stitch 22: Select for sewing eyelets on belts , etc 22 A 5.0 6.0 7.0 Select pattern 22 to get the eyelet stitch. Attach satin stitch foot (A). Patterns A B Press the "–" or "+" stitch width adjustment to button select the eyelet size. Size of eyelet. A. Large: 7.0mm (1/4 inch). B. Medium: 6.0mm (15/64 inch). C. Small: 5.0mm (3/16 inch). C Lower the needle into the fabric at the beginning of the stitching, and then lower the presser foot lever.
Darning stitch 23 3.5~7.0 D 1.0~2.0 Select pattern 23 to get the darning stitch. Chang the presser foot to the buttonhole foot. Patterns Baste the upper fabric and the under fabric together. Select the needle position. Lower the presser foot over the center of the tear. Pull the button holder to rear. Set the button guide plate on buttonhole foot to the desired length. The size of one darn cycle is variable. However, the maximum stitch length is 2.
Darning stitch Position the fabric so that the needle is 2mm (1/16 inch) in front of the area to be darned, and then lower the presser foot lever. Please Note: When lowering the presser foot, do not push in the front of the presser foot, otherwise the darning will not be sewn with the correct size. 2mm Pass the upper thread down through the hole in the presser foot. Pull down the buttonhole lever. The buttonhole lever is positioned behind the bracket on the buttonhole foot.
Zipper insertion Attention: Zipper foot should be used for sewing width center needle position straight stitch only. It is possible that needle could hit the presser foot and break when sewing other patterns. 00 3.5 I 1.5~3.0 Inserting a centered zipper - Baste the zipper opening on the garment. 5mm - Press open the seam allowance. Place the zipper face down on the seam allowance with the teeth against the seam line. Baste the zipper tape. - Attach the zipper foot.
Zipper insertion Inserting a side zipper - Baste the zipper opening on the garment. 5mm - Fold back to the left seam allowance. Turn under the right seam allowance to form 3mm (1/8 inch) fold. - Attach the zipper foot. Attach the right side of the presser foot pin to the holder when sewing the left side of the zipper. Attach the left side of the presser foot pin to the presser foot holder when sewing the right side of the zipper. - Stitch the left side of zipper from bottom to top.
Narrow hemming * The Hemmer foot accessory is optional. It is not included with this machine. 00 K 3.5 1.5~3.0 Fold edge of fabric over about 3mm (1/8 inch), then fold it over again 3mm (1/8 inch) for about 5cm (2 inches) along the edge of the fabric. Insert the needle into the fold by rotating the handwheel toward you, and lower the presser foot. Sew several stitches and raise the presser foot. Insert the fabric fold into the spiral opening of hemmer foot.
Cording Sew over one strand of cording to create a pretty swirled design on a jacket or vest or sew over three strands of cording for border trims. Pearl cotton, knitting yarn, embroidery floss, lace thread, fine wool or lily yarn can be used for cording. * The Cording foot accessory is optional. It is not included with this machine. 05 M Single cording Mark the design on the fabric. Insert the cord in the center groove of the cording foot from the right side opening.
Satin stitch sewing 05 26 27 28 29 30 31 32 33 34 35 36 A 3.5~7.0 0.5~1.0 Use the satin stitch foot for satin stitching and sewing decorative stitches. This foot has a full indentation on the underside to allowed easy sewing over the thickness of the stitches form by closely spaced zigzag stitches, and even feeding of the fabric. To tailor the satin or decorative stitch pattern, you may adjust the length and width of the pattern by pressing the stitch length and width adjustment buttons.
Quilting 00 02 3.5 P 1.0~3.0 * The Quilting foot accessory is optional. It is not included with this machine. Insert the edge/quilting guide in the presser foot holder as illustrated and set the space as you desire. Sew the first row and move over the fabric to sew successive rows with the guide riding along the previous row of stitching. Scallop stitch 28 79 T A - Stitch along the edge of the fabric, making sure not to sew directly on the edge of the fabric.
Gathering 00 3.5 * The Gathering foot accessory is optional. It is not included with this machine. 4.5 Gathered fabric Remove the presser foot holder and attach the gathering foot, lowering the tension setting to below 2. Place fabric to be gathered under presser foot to the right of the presser foot. Sew a row of stitching, keeping the raw edge of fabric aligned with the right edge of foot. The stitches automatically cause the fabric to gather. Suitable for light to medium weight fabrics.
Smocking 13 14 T A Use the all purpose foot to sew straight lines 1cm (3/8 inch) apart, across the area to be smocked. Knot the threads along one edge. Pull the bobbin threads and distribute the gathers evenly. Secure the threads at the other end. Reduce the tension, if necessary and sew decorative pattern stitches between the straight seams. Pull out the gathering stitches.
Free motion darning, embroidery and monogramming 00 * The Darning/ Embroidery foot accessory is optional. It is not included with this machine. 05 3.5~5.0 Move the drop feed control to " feed dogs. a " to lower the b b a Remove the presser foot holder, and attach the darning foot to the presser foot holder bar. The lever (a) should be behind the needle clamp screw (b). Press the darning foot on firmly from behind with your index finger and tighten the screw (c).
Free motion darning, embroidery and monogramming Embroidery Select zigzag stitch pattern and adjust the stitch width as desired. Stitch along the outline of the design by moving the embroidery hoop. Make sure to maintain a constant speed. Fill in the design working from the outline towards the inside. Keep the stitches close together. You will get longer stitches by moving the hoop faster and shorter stitches by moving the hoop more slowly.
Fagoting 12 T - Separate the folded edges of the fabric pieces with a gap of 4mm (1/8 inch) and baste them onto a piece of thin paper or water-soluble stabilizer sheet. Thin paper Basting - Align the center of the presser foot with the center of the two pieces of fabric and begin sewing. - After sewing, remove the paper. Patchworkstich 12 13 T 14 45 A - Place the two pieces of fabric with the right side together and sew with the straight stitch. - Open the seam allowances and presses it flat.
Mirror Select the pattern. Pressing the mirror button. LCD will display the mirror function and the machine will sew the reflected pattern until you press the mirror button again. Patterns A. Normal pattern sewing. B. Mirror pattern sewing. A Please Note: -Pattern 15-25 cannot be mirror imaged. -Mirror imaged patterns can also be combined with other patterns.
Twin needle * The twin needle is optional. It is not include with the accessories. T 2.0~5.0 Insert the twin needle. Attention: When using twin needles, use the all purpose foot (T) regardless of what kind of sewing foot will be carried out. Use only twin needle assemblies with max. 2mm needle distance. Follow the instructions for single-needle threading using the horizontal spool pin. Thread through the left needle.
Walking foot * The walking foot accessory is optional. It is not included with this machine. 00 Always try to sew first without the walking foot accessory which should be used only when necessary. It is easier to guide the fabric and you have a better view of the seam when using the standard, regular foot on your machine. Your sewing machine offers excellent stitch quality on a wide range of fabrics from delicate chiffons to multiple layers of denim.
Memory Combined patterns can be stored for later use. Since stored patterns are not lost after the sewing machine is turned off, they can be recalled at any time. This is convenient for patterns, such as names, that will be used often. - Please Note: The machine has a program memory that can retain 30 units of stitches. Multiple patterns selecting from pattern modes " Patterns , Alphabet " can be combined and sewn together.
Memory Press the " " button to leave the memory mode and return to the Direct mode. Direct Attention: The selected pattern will be cleared from the memory module after closing the machine if you do not press the " " button again when you have completed your selection.
Memory Press foot controller. The machine will start to sew from first entered pattern. On the LCD screen, sewing stitch data is indicated. Patterns Patterns MEM MEM If you wish to check what is programmed or if you wish to start sewing a few stitches in the memory mode, use the "........" button or " " button. You can use the Auto-lock " " function when the sewing machine is stopped.
Warning Functions Instruction message display Patterns Lowering the buttonhole lever When you select any buttonhole pattern or darning pattern, LCD screen will show the figure " ". It is to remind you to lower the buttonhole lever. Bobbin winding When the bobbin winder spindle is activated for bobbin winding (in the rightmost position) this figure appears on the LCD screen as a reminder.
Maintenance Attention: Disconnect the power cord from the wall socket before cleaning the screen and sewing machine surface, otherwise injury or electrical shock may result. Cleaning the screen If the front panel is dirty, wipe it gently with a soft, dry cloth. Do not use any organic solvents or detergents. Cleaning the sewing machine surface If the surface of the sewing machine is dirty, lightly soak a cloth in mild detergent, squeeze it out firmly and then wipe the surface.
Maintenance Clean the bobbin holder with a brush. Remove the needle, presser foot and presser foot holder. Remove the bobbin cover plate and bobbin. Remove the screw holding the needle plate and remove the needle plate. Lift up the bobbin case and remove it. Clean the hook race, feed dog and bobbin case with a brush. Also clean them, using a soft, dry cloth. Replace the bobbin case into the hook race so that the tip (a) fits to the stopper (b) as shown.
Trouble shooting guide Before calling for service, check the following items. If the problem still persists, contact the place of purchase or your nearest authorized dealer. Problem Upper thread breaks Lower thread breaks Skipped stitches Needle breaks Cause Correction Reference 1. The machine is not threaded correctly. 1. Rethread the machine. Page 11 2. The thread tension is too tight. 2. Reduce the thread tension (lower number). Page 14 3. The thread is too thick for the needle. 3.
Trouble shooting guide Problem Seam puckering Cause 1. The needle thread tension is too tight. Correction 1. Lossen the thread tension. Reference Page 14 2. The needle thread is not threaded correctly. 2. Rethread the machine. Page 11 3. The needle is too heavy for the fabric 3. Choose a needle to suit the thread and fabric. being sewn. Page 7 4. The stitch length is too long for the fabric. 4. Make stitch dense. Page 25 Patterns are distorted 1. The correct presser foot is not used. 1.
Quick adjustment reference chart Utility stitches Width (mm) Length (mm) Manual Auto Manual Presser Foot 00 3.5 0.0~7.0 2.5 0.0~4.5 T 01 0.0 0.0~7.0 2.5 0.0~4.5 T 02 3.5 0.0~7.0 2.5 1.0~3.0 T 03 3.5 1.0~6.0 2.5 1.0~3.0 T 04 3.5 0.0~7.0 2.5 1.5~3.0 T 05 5.0 0.0~7.0 2.0 0.3~4.5 T 06 5.0 2.0~7.0 1.0 0.3~4.5 T 07 5.0 2.5~7.0 2.5 1.0~3.0 T 08 5.0 3.5~7.0 2.5 1.0~3.0 E 09 5.0 2.5~7.0 2.5 1.0~3.0 T 10 3.5 2.5~7.0 2.0 0.5~4.5 F /T 11 3.
Quick adjustment reference chart Decorative satin stitches Cross stitches Quilt stitches Width (mm) Length (mm) Auto Manual Auto Manual Presser Foot 40 7.0 2.5~7.0 0.5 0.5~1.0 A 41 7.0 4.0~7.0 0.5 0.5~1.0 A 42 7.0 3.0~7.0 1.5 1.5~3.0 A 43 7.0 3.0~7.0 1.5 1.5~3.0 A 44 7.0 2.5~7.0 1.0 1.0~3.0 A 45 5.0 2.5~7.0 2.5 1.0~3.0 A 46 4.0 3.0~7.0 1.0 1.0~3.0 A 47 4.0 3.0~7.0 1.0 1.0~3.0 A 48 6.0 3.0~7.0 1.5 1.0~3.0 A 49 6.0 5.0~7.0 1.0 1.0~3.
Quick adjustment reference chart Decorative stitches Width (mm) Length (mm) Auto Manual Auto Manual Presser Foot 80 7.0 2.5~7.0 1.0 1.0~3.0 T 81 7.0 3.0~7.0 2.0 1.5~3.0 A 82 5.0 2.5~7.0 2.0 2.0~3.0 A 83 5.0 3.5~7.0 1.0 1.0~3.0 A 84 7.0 3.5~7.0 3.0 1.5~3.0 A 85 7.0 3.0~7.0 2.0 1.5~3.0 A 86 6.0 2.5~7.0 2.0 1.5~3.0 A 87 7.0 3.0~7.0 3.0 1.0~3.0 A 88 7.0 3.0~7.0 2.0 1.5~3.0 T 89 5.0 3.5~7.0 1.0 1.0~3.0 A 90 7.0 2.5~7.0 3.0 2.0~3.
Do not dispose of electrical appliances as unsorted municipal waste, use separate collection facilities. Contact your local government for information regarding the collection systems available. If electrical appliances are disposed of in landfills or dumps, hazardous substances can leak into the groundwater and get into the food chain, damaging your health and well-being.