
Instruction Manual


Model 301GAS burner — Instruction manual
Carlin part number MN301GAS Rev. 03/14/11
– 12 –
Where appliance instructions differ from this manual, follow the appliance instructions.
4. Check system • start-up burner/appliance
Inspect/check system
Beforestartingtheburnerandappliance,verifythesystemhasbeeninstalled
as directed by this manual and the appliance instructions.
Check gas piping for leaks
Disconnecttheburnerfromthegassupplylineifgaslinetest
pressure will exceed 14 inches w.c. Exposing the burner gas
train to pressure higher than 14 inches w.c. can damage the
valve seat, resulting in potentially unsafe operation.
You can usually test the gas piping by allowing the line to fill with gas to
main regulator outlet pressure.
1. Shut off gas flow to all equipment connected to the meter.
2. If test pressure will be less than 14 inches w.c., close the gas train
manual gas valve. If test pressure will be higher than 14 inches,
remove the burner gas train from the gas line by shutting off the
main manual gas valve installed near the burner (per Figure 10,
page 10) and disconnecting the ground joint union. See WARNING
above.
3. Watch the gas meter dial. For a one half cubic foot per revolution dial,
there should be no movement of the dial for at least 5 minutes. For
larger volumes per revolution, increase this time proportionately.
4. If you detect a gas leak, locate the leak with a soap suds mixture and
repair it. Then test the system for leaks again.
Donottestforleakswith anopename.Anddonotuse
oxygen as a test gas. Either of these could cause an explo-
sion, resulting in severe personal injury, death or substantial
property damage.
Bleed gas line
Purgeallairfromthegasline.Purgetooutsideofthebuilding,NEVERinto
the appliance or burner.
Leak test near-burner gas piping
If piping near burner has not already been pressure tested, open main
manual gas valve on supply to burner and smell around area for any signs of
gas. Apply a soap suds mixture to all gas piping joints near burner and check
for any leaks. If any leaks appear, repair before proceeding and retest.
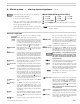
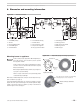
Figure 12 Air band adjustment
Set burner air band
See Figure 12. Loosen air band locking screw. Then rotate band until it
is open to the setting given in Table 1 page 7. Tighten air band locking
screw.
The Table 1 setting will probably be satisfactory without change. If the
combustion test indicates a need for more or less air, however, you will
have to adjust the band accordingly.
Check burner and primary control
Inspectburnerthoroughly.Verifythathingedignitorcoverplateisclosed
and screw is tight.Verifyall wiring is in place andall components are
secure and in position.
Donotstarttheburnerifyousmellgasoriftheremaybegas
present in the appliance combustion chamber, appliance or
the vent system. An explosion could occur, causing severe
personal injury, death or substantial property damage.
Duringinitial start-up,you must be constantly alert for
emergency conditions such as fuel leaks, electrical malfunc-
tions, etc. Familiarize yourself with the location of manual
shutoff valves and switches so you can quickly use them if
needed.
Iftheburnerfailstoignite,NEVERattempttomanuallybypass
the normal sequence of the control, which provides purging
of the combustion chamber.
Verify flame failure Lockout of 60200FR control
1. Install a hose barb fitting in the manual gas valve pressure tap (item
10a, page 3) and connect with a hose to a U-tube manometer.
2. Close the main manual gas valve and turn the combination gas valve
knob to ON.
3. Turn on power to appliance and set appliance limit(s) to call for heat.
4. Burnermotorwillstart.The60200FRwillrunforitsprepurgetiming,
then start the ignitor. Approximately one second later, the gas valves
will open. (The manometer should show almost no pressure, because
the main manual gas valve is closed.)
5. AftertheTrialforIgnitionPeriod,the60200FRwilllockoutandturnon
theredLED.Theignitorwillshutoffandthegasvalvewillclose.Turn
off power and set controls to stop call for heat.
6. IfLockoutdoesnotoccur,replacethe60200FRcontrol.