
Product Brochure


Orange Low Voltage Boxes/Brackets
45
Old Work Box
Installation
Please read these instructions completely
before attempting installation.
1. Locate studs and determine if they are 16" or 24" apart.
If 16" apart, measure a maximum of 3" from edge of stud to deter-
mine plate location. If 24" apart, center plate between studs. Note:
High voltage side must be 3" from stud.
2.
Place SC300PRB or SC300PRR face down against the wall. Using a
hammer, tap
around the edge of the plate to mark area to be cut out
(Fig. 1). Remove plate from wall, a line should be visible on the dry-
wall. Cutout should be 6.25" x 9.25" approximately.
3.
Carefully cut out area of drywall with a utility knife or drywall saw.
4. Place SC300PRB
or SC300PRR
in wall and secure by tightening
down all four Zip-Mount retainers (Fig. 2).
5. Select device and outlet/switch box, cat. number B114R
(14 cu. in.) or B120R (20 cu. in.), based on wire fill needs (Fig. 3).
6. Insert wires through boxes (B114R or B120R, and SC300PRB or
or
SC300PRR
). Make sure high and low voltage wires do not come in
contact with one another.
7. Install Carlon Old Work Zip Box
®
, model B114R or B120R (Fig. 4).
8. Install receptacle and faceplate per manufacturer’s instructions
(Fig. 5).
9. Install low voltage devices and faceplate per manufacturer’s
instructions (Fig. 6 and Fig. 7).
Note: When preparing for later installation of low voltage devices, use a 2 gang
blank plate to cover wall opening for a clean finished look.
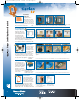
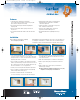
Fig. 1 Fig. 2 Fig. 3
Fig. 5 Fig. 6 Fig. 7
Fig. 4
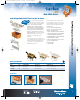
Features:
• 3-Gang dual service capability: Accommodates
(1) line voltage and (2) low voltage services using one plate
(boxes, devices, and plates not included)
• Recessed low profile design: Eliminates unsightly wires
and plug heads
• Universal 1-gang outlet / switch opening: Select the size
box you need
• Pre-assembled box and frame: Reduces labor time and saves
money
• Shallow design: Provides ample room behind the dry
wall and between the studs, and accommodates
cable bend requirements
• 4 Swing out clamps: Locks the plate securely to the
wall – horizontal or vertical mount
• Superior hi-gloss, paintable finish: Professional
appearance, and blends with any décor
• Non-metallic, ABS material: Lightweight and easy to
handle
IMPORTANT! Before attempting installation be sure power is off by removing the fuse
or switching the circuit breaker to “off ”. Make sure the Recessed Dual Voltage plate
is installed in accordance with the National Electrical Code (NEC) and local codes.
GM-19_2-01-10:GM-19_2-01-10 7/26/10 9:54 AM Page 45