
Use and Care Guide


United States
Tel: 901.252.8000
800.816.7809
Fax: 901.252.1354
Technical Services
Tel: 888.862.3289
www.tnb.com
E-479
Conduit & Fittings — Carlon
®
PVC Elbows, Conduit & Fittings
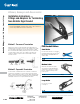
Installation Instructions —
Cement Joints
Carlon
®
non-metallic products are joined by means of solvent cement joints.
Sizes
1
⁄2" through 1
1
⁄2" should be cut square (using a fine-tooth handsaw)
and deburred. For sizes 2" through 6", a miter box or similar saw guide
should be utilized to keep the material steady. After cutting and deburring,
wipe ends clean of dust, dirt and shavings.
Joining process as follows:
– Be sure that conduit end is clean and dry.
– Apply coat of Carlon
®
Solvent Cement (use dauber) to end of conduit
for the length of the socket to be attached.
– Push conduit firmly into fitting while rotating conduit slightly, about
one-quarter turn to spread cement evenly.
– Allow joint to set approximately 10 minutes.
Carlon
®
recommends the use of Carlon
®
cement for proper
solvent cement joints. Because this cement is prepared particularly
for our product compounds and tolerances, we cannot guarantee joints
assembled with cement materials supplied by other manufacturers.
Regular-grade gray solvent cement will accommodate most application
situations being of a general-purpose nature. In situations requiring
an extremely fast-setting joint (low temperature or difficult installation
conditions), Carlon
®
All Weather Quick-Set Cement is recommended.
Standard-grade clear cement is recommended for non-critical utility
applications where gap filling and leak testing are not required.
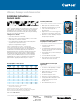
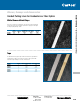
Cementing PVC Conduit:
1. Make square saw cut with fine-tooth saw.
2. Deburr and round inside edge of the cut end.
3. Clean socket I.D. and spigot O.D. of
dirt and moisture.
4. Apply a uniform coat of cement to spigot end
and push onto socket bottom, rotating
1
⁄4 turn.
5. Allow time to set before disturbing. Setting time
will depend upon temperature.
Cementing PVC Conduit for Submerged Areas
Requiring Air or Water Tightness:
1. Follow the procedure above for
cementing conduit.
2. Test workmanship by conducting a low-pressure
air (3.0–5.0 psi) test after system is installed and
cemented joints are set.
3. Plug and block ends to prevent movement prior
to pressurization.
4. Check for leaks with soap solution.
5. Even low-pressure air can cause high-thrust
loads and caution must be observed.
Cementing ENT for Concrete-Tight
Applications:
1. Use Carlon
®
Socket tight fittings or couplings.
2. Do not use chemical primer or cleaner.
3. Apply a light uniform coat of cement
labeled for use with ENT.
4. Use a brush to apply the cement.
5. Brush excess cement out of ENT grooves.
6. Promptly insert ENT into fitting while cement
is wet until the fitting stop is reached
and give
1
⁄4 turn.
7. Do not disturb until the joint is set.
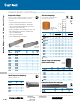
Average Number of Joints per Can
TRADE
SIZE (IN.)
1
⁄2 PINT
8 OZ.
PINT
16 OZ.
QUART
32 OZ.
GALLON
128 OZ.
SPRAY
4 OZ.
SPRAY
16 OZ.
1
⁄2 140 275 550 2,200 70 275
3
⁄4 90 180 360 1,440 45 180
1 70 140 280 1,120 35 140
1
1
⁄4 50 100 200 800 25 100
1
1
⁄2 37 75 150 600 18.5 75
2 20 40 80 320 10 40
2
1
⁄2 17 35 70 280 8.5 35
3 15 30 60 240 7.5 30
3
1
⁄2 13 27 54 216 6.5 27
4 12 25 50 200 6 25
5 9 19 38 150 N/A N/A
6 6 12 24 95 N/A N/A
Can: Average shelf life of all Carlon
®
cement is 24 months
(unopened cans stored below 80° F).
Spray: Average shelf life of all Carlon
®
spray PVC cement is three years.
All Carlon
®
cements are specially formulated to be used with Carlon
®
PVC products,
and do not require primers when parts are clean of dirt and moisture.
MSDS available at www.carlon.com.
Elbows, Sweeps and Accessories